Open Source 🥽
The LongMill MK2 project is the successor to the LongMill project, both at their core being open source projects. With much striving towards making design choices that would make the MK2 project as replicable and well-supported as possible, the MK2 wavers a little further away from replicability than its predecessor mainly in its rail design and reduced usage of 3D printed parts. If you want to understand why we made these choices, know it wasn’t taken lightly and we discussed it more on our blog post: https://sienci.com/2021/12/30/all-about-the-LongMill-mk2/
Other than these changes, all other aspects of the LongMill MK2 project are shared with the original LongMill which will continue to be maintained (and can be referenced here: https://resources.sienci.com/view/lm-open-source-and-modifications/). We believe that by making this design open source, we will be able to drive the CNC community forward through sharing and improving CNC technology. The idea is for:
- Users to modify and improve their machines to fit their needs
- Machine owners to share their designs with the community to help others that have similar needs
- Makers to use our design ideas and design philosophy to create other types of machines, such as laser cutters, plasma cutters, and 3D printers
- Us to gain inspiration from the community to help us guide our development of current and future products and features
License
This is accomplished by putting the project under a Creative Commons BY-SA license:
- The entire mechanical design of our LongMill MK2 Benchtop CNC available in a range of 3D file types and as drawings where applicable
- Any internal assembly jigs and other supporting hardware for the LongMill
- Documentation of general manufacturing techniques used to produce the LongMills various custom components including general 3D printing settings
- All educational information provided within the LongMill MK2 Resources area including machine assembly instructions and modifications
- The mechanical BOM which documents all the components required to build a LongMill
- Every aspect of the electrical design behind our custom LongBoard CNC controller including BOM, schematics, gerber file, etc.
and by sharing the LongMill MK2 modified firmware profile, a small modification of the grbl open source project, under the GPLv3 license just as the original project is.
All this information is continually updated as the LongMill MK2 project continues to be revised, with more openly shared information being made available at each new major revision and licensing continuing to be applied to all previous major versions. By making this information available, the LongMill MK2 project fulfils the Open Source Hardware Association’s definition of open source hardware, and we think that’s pretty cool 🙂
LongMill MK2 CNC
The LongMill MK2 has gone through two major iterations of its design:
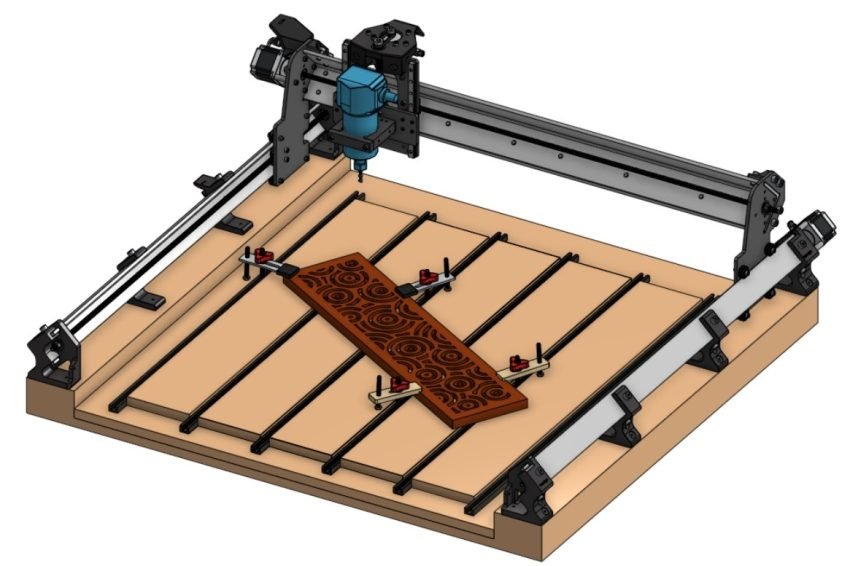
- MK2 distinguishes itself from the original LongMill project by a couple key factors. Though many of the common components carry over such as v-wheels, lead screws, motors, anti-backlash nuts, etc. the biggest differentiator is the use of two completely custom designed extrusions for each X and Y-axes which allow for much higher rigidity, easy of assembly, reduced part count, and more rigid mounting of the Y-rails to the tabletop surface. The MK2 design was also further optimized by the shape of the X, Y, an Z carriage plates to squeeze more travel out of the same length lead screws while also increasing the CNCs rigidity by how the v-wheels are located. The blank canvas of the MK2 also meant we could ensure that add-ons our customers have been enjoying on their existing LongMills could be make available on the MK2 with much simpler implementation such as dust shields, dust shoe, and limit switches. Batch 1 began production in October 2021 and started shipping in April 2022.
- MK2.5 was a notable step toward easier servicing and better reliability by introducing the SuperLongBoard 5xHAL controller, a new and novel spring-loaded anti-backlash nut design we created to reduce maintenance on the machines lead screws and improve accuracy, as well as strengthening up some maintenance components and using M5 hardware in place of M3 for more robust, long-term adjustment. You can read more on all these changes in our blog post here.
You can find the BOM and designs of every part and assembly of the LongMill MK2 Benchtop CNC in the linked Onshape and spreadsheet documents below:
SuperLongBoard Controller
You can find the models, PCB designs, firmware, and read more about the licensing for the SuperLongBoard CNC controller on its open source page.
LongBoard CNC Controller
The LongBoard CNC Controller is the control system and brains of the LongMill. This board was designed by our friend Chris Hadjuk and the Sienci Labs team with KiCAD. This design has been carried over from the original LongMill project’s LongBoard which had four major public revisions but in the context of the LongMill MK2 it’ll continue moving forward from the most recent 1.4.3. You can find the designs of every version in the form of gerber, assembly, schematic, and BOM files in their respective zip files below as well as a link to a more readable BOM for every board version if you’d like to source your own components.
Original LongBoard Project Designs
BOM of every version: https://docs.google.com/spreadsheets/d/10HOJIfVh_pb41V6eJ3zf50yBgs8vmk5MnvHfNH4q9_Q
Other Add-ons
We also share a record of every part and assembly of every version of add-on that we’ve released alongside our LongMill MK2 CNC since the projects conception. Each of these designs can be found in the linked Onshape documents below:
Custom T-track can uniquely fit common 1/4-20 hardware, clamps can be cut from wood, and clamp ends can be 3D printed to replace them when damaged.
⭳ CNC the Wood Clamps (STL)
⭳ 3D print the End Caps (STL)
View, Copy, or Edit in Onshape
Specially designed adjustable-style dust shoe that allows for height adjustment and removal with the same set of magnets and a spring-loaded trigger.
⭳ 3D print the Shoe Body (STL)
View, Copy, or Edit in Onshape
The main part of the Air Assist on our LaserBeam diode, in case you burn or break yours.
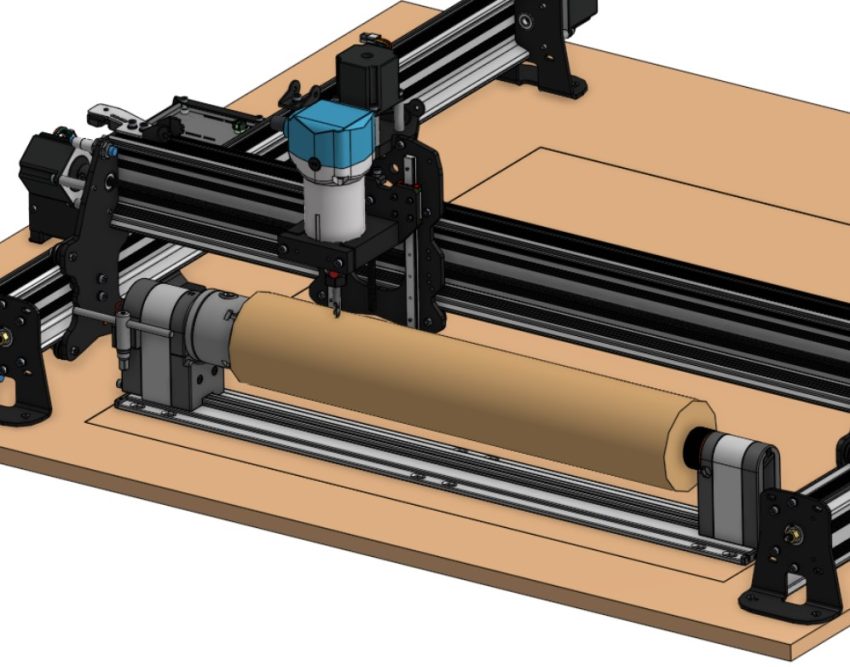
Custom designed, plug-and-play rotary axis which adds another carving dimension to 3-axis CNCs.
A typical block-style, 3-axis touch plate we designed for finding X, Y, and Z-zero on 3-axis CNCs, and our novel AutoZero touch plate designed to work with far more bit types and more accuracy than typical block-style plates.
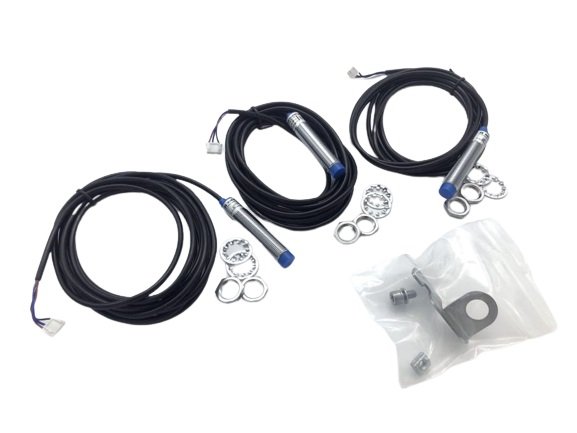
5V inductive barrel sensors for reliable homing in any environment. Take measurements in Onshape if you want to make your own mounting setup.
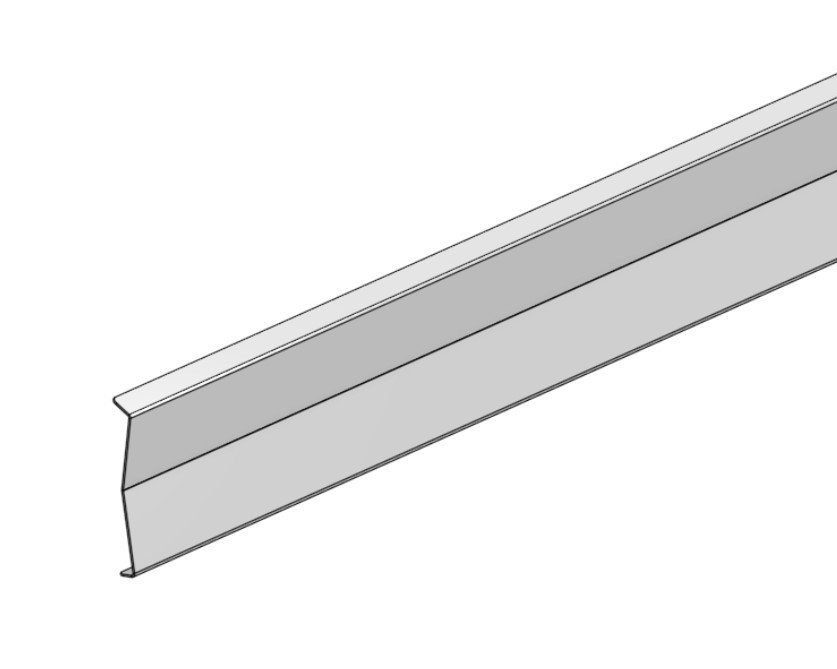
Keeps dust off the Y-axes of the LongMill MK2, made out of a single piece of bent stainless steel.
BOM of all add-ons: https://docs.google.com/spreadsheets/d/1-wWrsgTZU89hhSgYjCSs-IisSey4unI6lo25_mKFzHw/edit#gid=1028766194
3D Printing
To read more about our print settings to help you print your own parts, read this post here: https://sienci.com/2019/11/11/3d-printing-settings-for-LongMill-parts/
STL files can be directly downloaded from the Onshape document. You may need to make an account to download STL files.
Onshape
You may notice that many of the 3D models we share in our open source documents link to a 3D file on a website called “Onshape”. This is the browser-based software that the engineers and designers on our team use to design and iterate on all the products we produce at Sienci Labs. The fact that it’s online has the great advantage that anytime we make an update or release a new product, you are able to see them live or download them for yourself. We feel this is a great way to keep our company open and make our designs easily accessible to others.
Interact with Designs
Let’s cover a couple things you can do with the open source Onshape files:

- Look at the design from all sides
- Rotate around by right-clicking on your mouse and dragging around on the screen, or clicking the ‘rotate’ tool on the toolbar and left-click dragging on the screen, or clicking the buttons on the cube at the top, right of the screen
- Zoom in and out by scrolling on your mouse or clicking the down arrow next to the magnifying glass on the toolbar and then left-click and drag up-and-down to see closer and further
- See a list of all the parts in the design
- This shows up on the left-hand side of the window, where if you click the name it’ll highlight the 3D model
- This makes it easy to know the names and parts of everything that makes up the full design
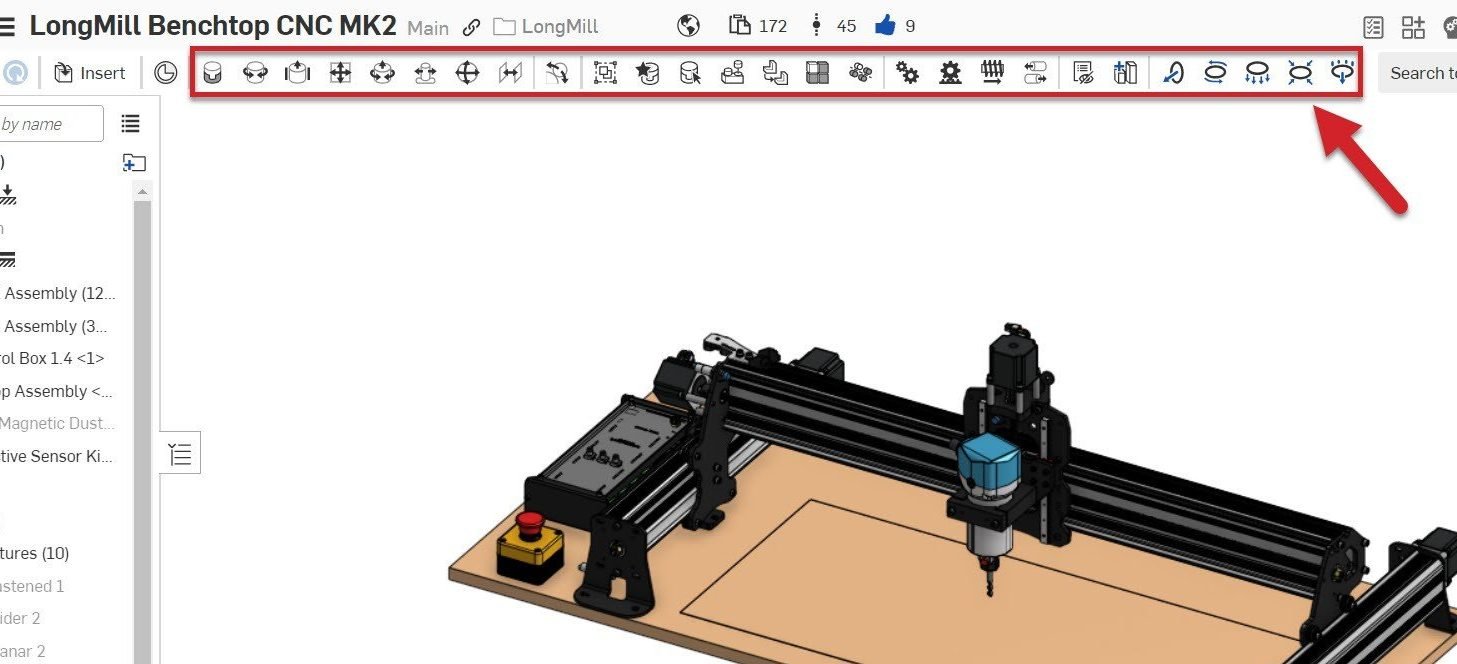
- Measure different parts of the design
- After selecting the measuring tape on the toolbar and selecting the units you’d like to measure, you can click anywhere on the model to get length of a line, distance between two points or faces, angle between two lines or faces, surface area, and more
- If you want to measure something else, just click somewhere in the blank space or hit the spacebar and then select the new spots you want to measure
- This is especially useful for quickly verifying dimensions, checking clearances, and ensuring design accuracy. Feel free to save measurements by writing them down or taking screenshots as a reference for your own purposes
- Even see the Mass and Volume of the parts!
- This uses the right-most Mass tool on the toolbar where after selecting the tool and selecting a part you can get even more information on its properties
- This can be useful is you’re working on a modification and need to decide how strong to make it based on the weight of some other parts
- We try to make sure these values are all as accurate as possible but there still might be some discrepancy
Export or Modify
If you want to Export our Onshape designs as either a 3D model (STL, IGES, STEP) or a 2D drawing (DWG, DXF) for your own tweaks or accessories, then:
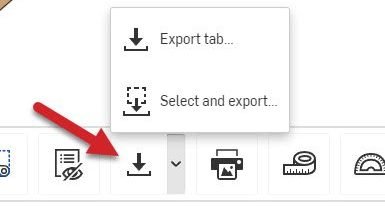
- Open the link to the design you’d like to download.
- Use the ‘Export’ option in the toolbar to either export the whole design or use the down arrow to allow you to export only individual parts or assemblies. You can select these parts by clicking on the 3D model or by clicking on the parts list on the left-hand side of the window.
- When you’ve selected all your parts, you’ll be given more options to choose the file type you want to download as and other options based on your selections. Typically STLs are used for 3D printing, IGES and STEP are good for importing to other design software to modify the files, and DXF or DWG are used for laser or plasma cutting. Typically the other files defaults tend to be good to use.
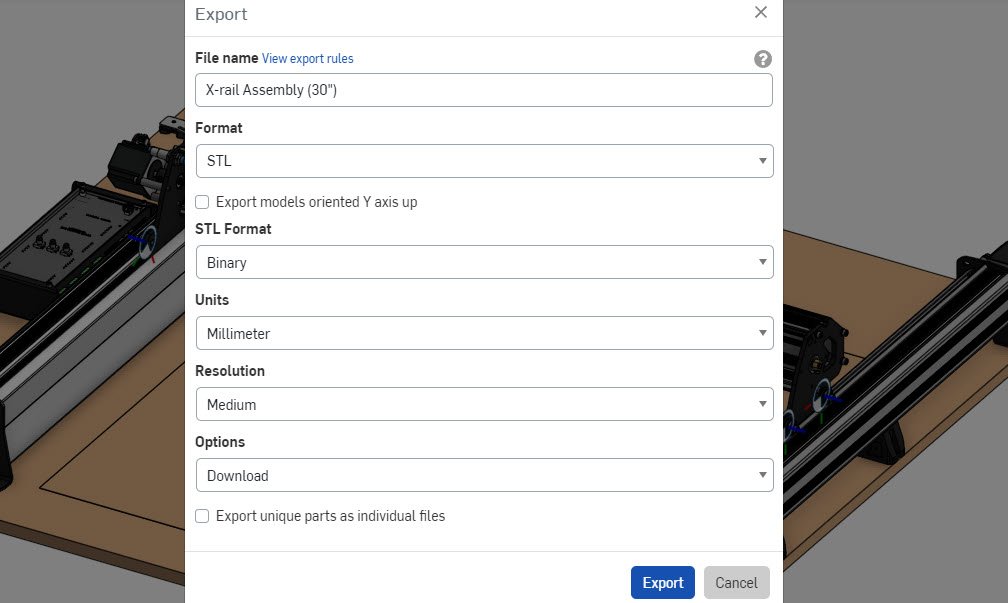
- After configuring the settings, click “Export” and you should find the file appears in your typical download location.
If instead of Exporting the files, you’d like to use Onshape as your main design software to make and publish modifications, then you’ll need to make an account first; though luckily it’s free to make one:
- Open your web browser and go to the Onshape Sign up page.
- Enter your Name and Email Address, then Onshape will ask for some other information that you might need to fill out and some Terms & Conditions.
- Once you get to the end, you’ll be sent a verification email which you can click through to set up your password. You don’t need to enter a Company name but you do need to agree to some more Terms & Conditions.
- Once you’re set up, feel free to set your default units and controls – or get straight to downloading the models since you can always change these later in your settings.
Once you’ve successfully created an account and you’re logged in:
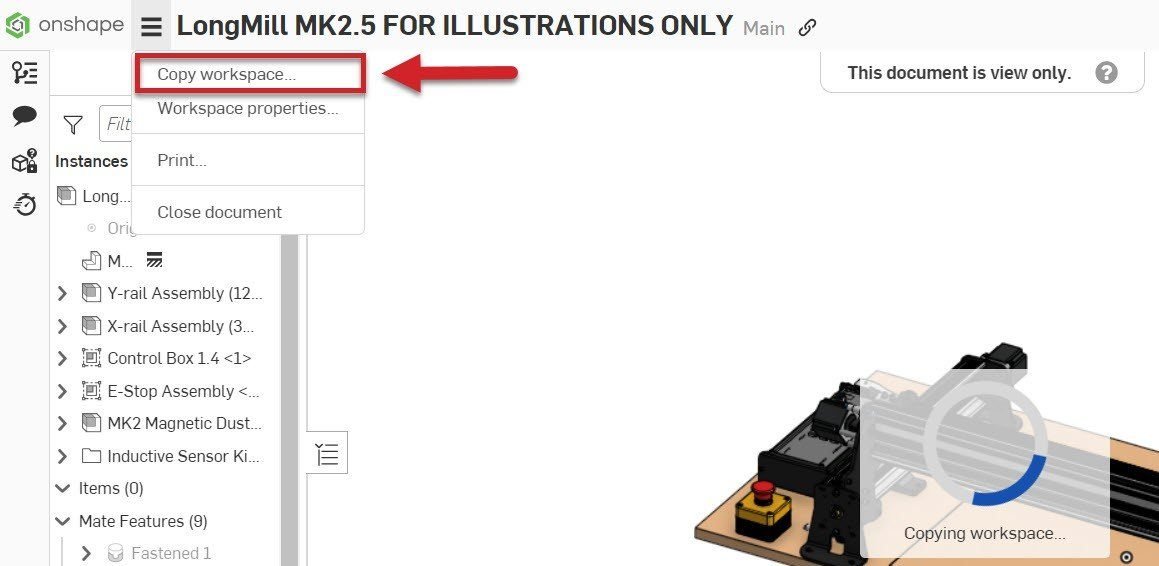
- Copy our entire design file into your own workspace by clicking the button with three lines at the top, left corner of the window, and select Copy workspace.
- Give the copied version its own name.
- You can now make changes to the file using Onshape’s various editing tools! These tools allow you to add or remove features, adjust dimensions, edit sketches, modify assemblies, and more.
- As you make modifications, Onshape will automatically save your progress, and if you’re unfamiliar with what the features do there are plenty of guides out there on how to use Onshape.
- Once you’re done, remember to share your work with us and the community by sharing the link to your Onshape designs so everyone can see your cool stuff!
The sky’s the limit now that you can measure, export, copy and modify all of your CAD projects! Remember to share your learnings and collaborate with others to continue the spread of open source ideas.