
Anonymous Information
When you open up gSender, you’ll notice a prompt regarding ‘Anonymous usage information’. This is just to ask if you’d be fine with us knowing things like what CNC you use it for, what computer you run it on, and other information about how you use the app. You can imagine that if we know certain features are widely used or certain errors are constantly encountered, that can be very helpful to understand how we can improve the app or its documentation. This is completely optional and anonymous, we only do it with your permission and it can be turned off at any time in the settings menu.

Layout
Before starting to use gSender, let’s briefly cover the way its functions are laid out so that you’ll know where to find things moving forward. The program can be broken down into it’s three major sections:
- The top toolbar (boxed in red), will stay visible regardless of what you are doing. It includes machine connection on the left side, notifications, system stats and current status in the middle, and shortcuts on the right.
- The left sidebar (boxed in green) is also always visible and holds 5 main tabs; the Helper, the main Carve tab (which we have showing now), Stats, Tools, and Config.
- The main screen (boxed in blue) will show the contents of the tab you select on the left sidebar, with the default being the Carve tab.
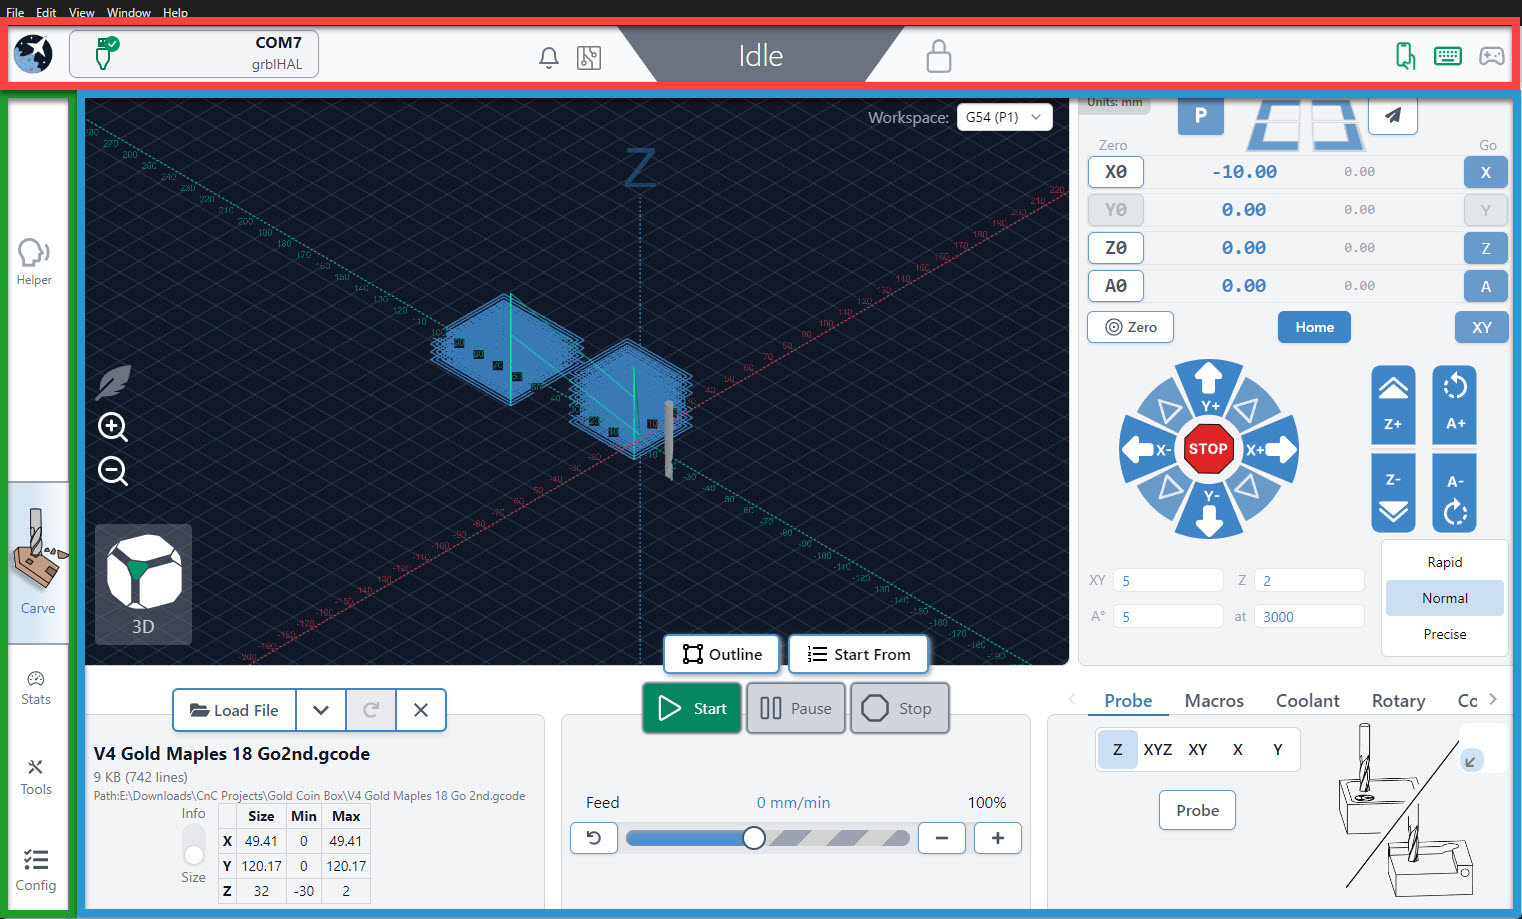
Another of gSender’s Design Principals is colouring. It can be scary to have an assortment of buttons in front of you and not know what they’re going to do. This is why we made every button in the app that moves the CNC dark blue. This means you shouldn’t ever find yourself startled when the machine moves unexpectedly since the colour will help to communicate whether it’s a ‘machine moving’ button or not.
Carve Tab
This is where you will spend the majority of your time actually carving. When the program opens, this is where you will arrive! There are 2 main sections to the Carve tab.
- The large middle visualizer (boxed in red), is where you manage your files and can watch the magic happen after you hit the Start button. Rotate your view, monitor the job progress, turn on lightweight mode, change workspaces, adjust feed rate, and more.
- The ‘DRO’ (Digital Read Out) and Jog Controls on the right (boxed in blue), have all the functions you need to manually control your CNC when jobs aren’t running. This includes jogging, zero setting, homing, Go to movements, and more. The section at the bottom includes extra features like probing, macros, manual spindle/laser control, and more.
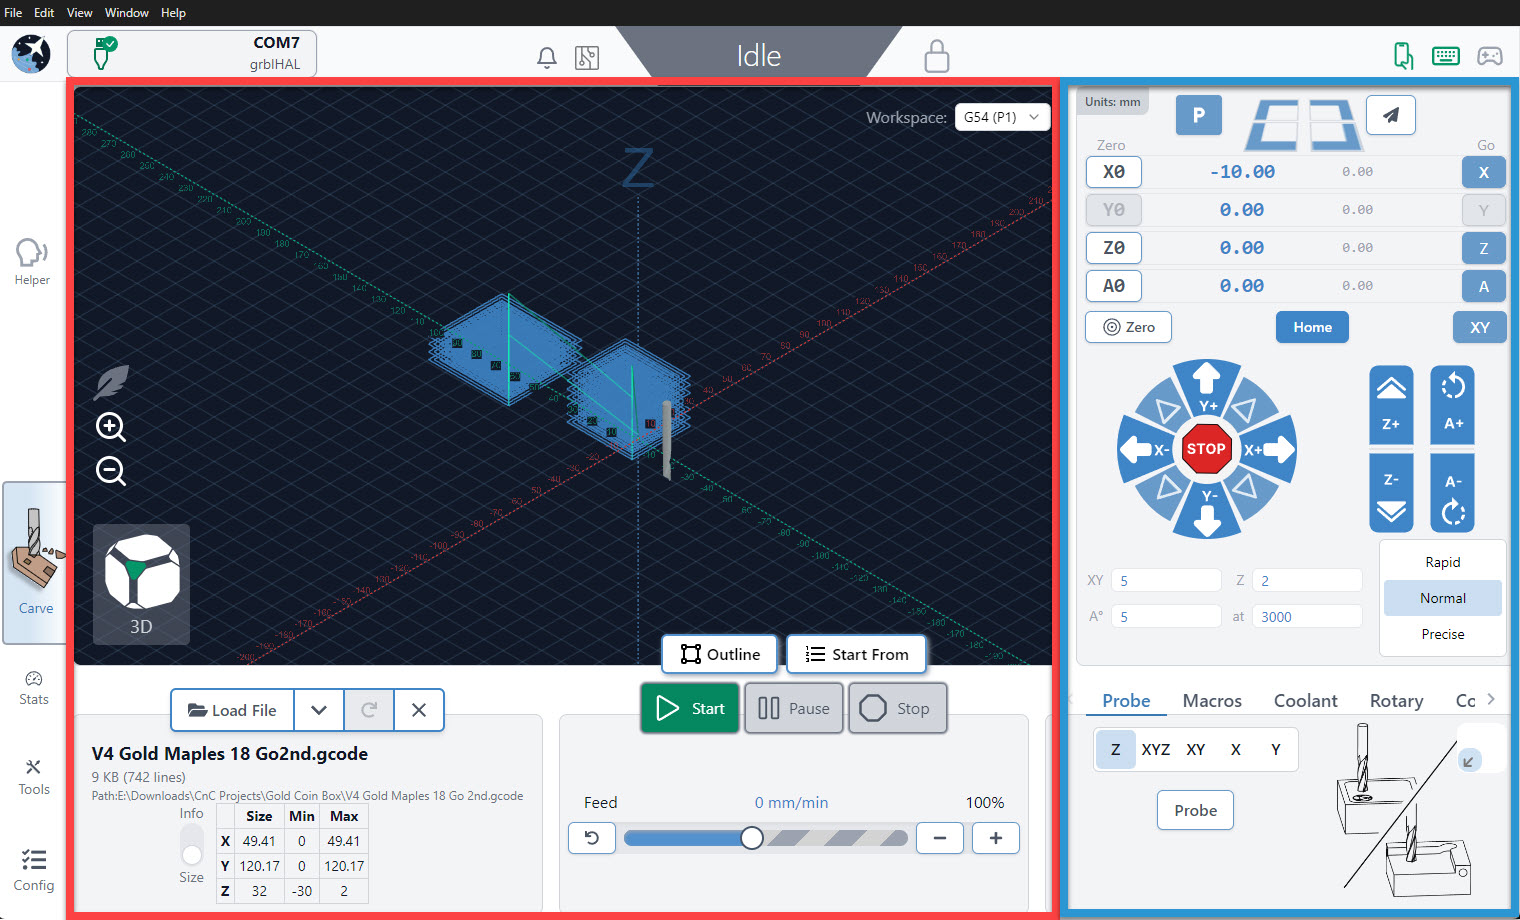
We’ve built gSender’s main screen around these primary boxed sections so that you can have all of the CNC functionality most hobbyists need on one screen without getting confused about what each button does. If you’re doing anything during a job it’ll be in the middle, if you’re doing anything outside a job it’ll likely be on the right, and if you want greater customization or functionality it’ll be found in the toolbars.
Console
The console is a tab that you can access at the bottom right hand side of the gSender window. The text here shows a truer representation of the communication that happens between your computer and your CNC. As you start to understand more about your machine, this is a great tab to reference so you can see if commands are being properly sent, received, and executed. It’s also great for troubleshooting since you can:
- Manually send g-code commands to your CNC
- Check for errors or alarms and the g-code that caused them (normally the line that comes before)
- Copy text straight from the console to send in an email for help by clicking the ‘…’ button next to ‘Run’, then clicking ‘Copy last 50 lines’.
- Even open the console in another window by pressing the top, right icon to help you see more console text at a time (if you press the button again once you reconnect to your CNC, it’ll reconnect the console stream to the original window too)

When you first start up gSender, the console will display EEPROM settings that are sent from the Arduino in the control box. These EEPROM settings control parameters for your CNC such as:
- Maximum speed and acceleration in each axis
- Boundaries of the work area
- Direction of each axis movement
- Limit switch settings
To access EEPROM settings again, enter in “$$” into the console and hit the ‘Enter’ key or click the ‘Run’ button. These settings can be changed via the console as well as the Firmware Tool which we’ve designed as a much more visual way to alter machine settings.
Stats Tab
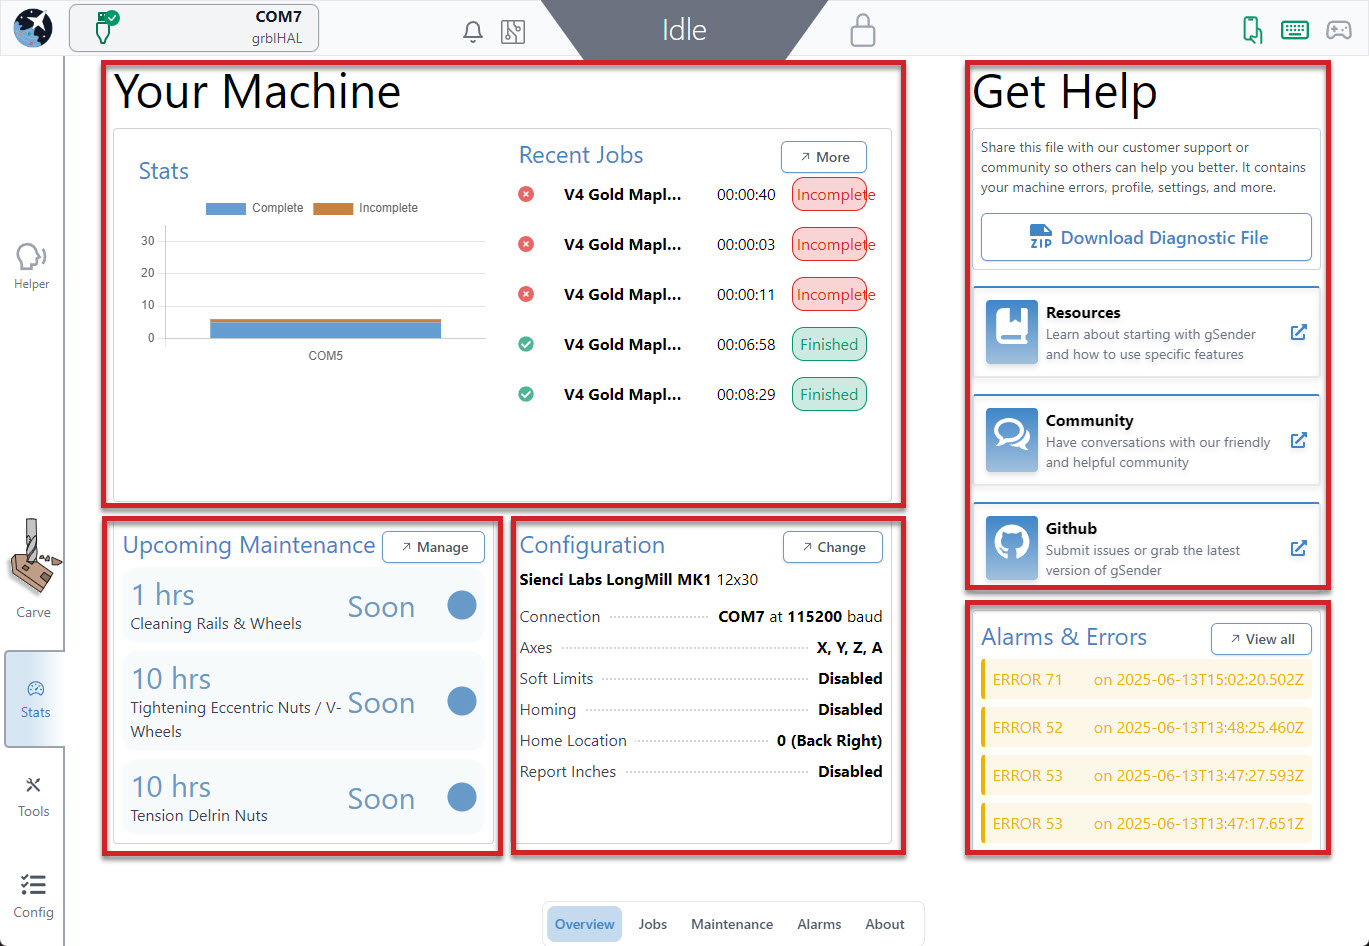
Curious to know how many jobs you’ve completed, how many hours you’ve put on your machine, what alarms you’ve encountered or what maintenance you should be focusing on? Think of the Stats tab as your dashboard for understanding how your machine is running, what things you might need to check up on, or to collect information that would be useful for troubleshooting.
Here you can see information about your machine including job statistics, machine maintenance, alarms & errors, configuration settings, diagnostic files, resources to help along your CNC journey, or learn more about gSender. You can check out the main dashboard, click into each section to see further details using the tabs at the bottom of the screen, or click on the button in the top right corner of each section.
Get Help
Before moving on to the other sections in Stats, the main page can be really useful if you’ve got an issue with your machine and feel stuck. Most importantly, you can follow links to our community pages including our Resources, Community Forum, and GitHub.
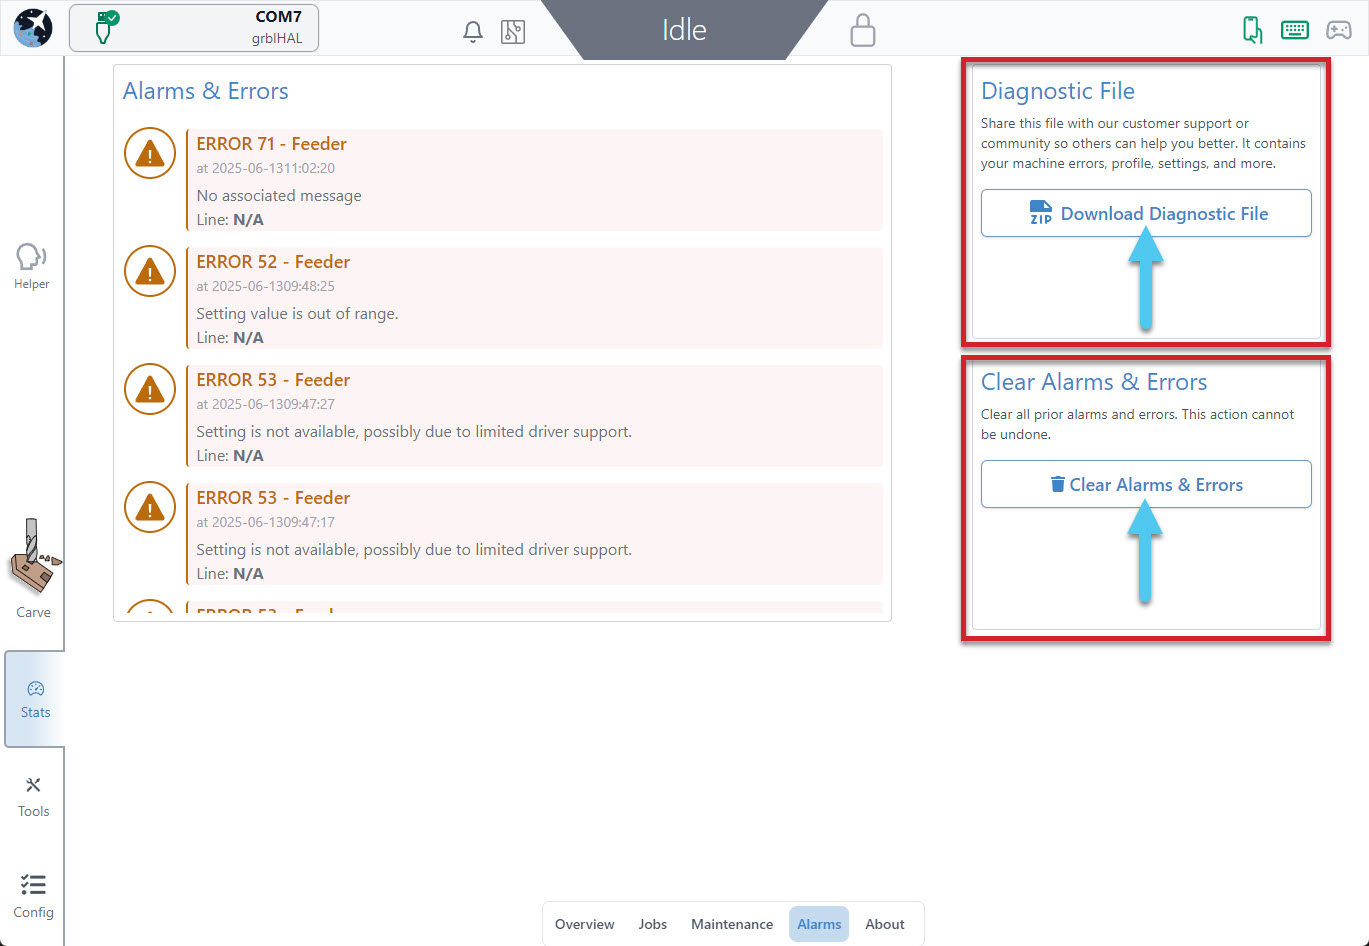
Another valuable feature is the ability to download a Diagnostic File of your CNC machine. This file contains many things like your current machine settings, gSender preferences, and a PDF file that includes about your computer, your CNC, recent alarms / errors, any currently loaded g-code file, and more. It’s basically a treasure trove of information that you can share on Community Forums, Facebook groups, or with your CNC customer support. This can go a long way towards getting help from others on diagnosing any problems your CNC might be experiencing.
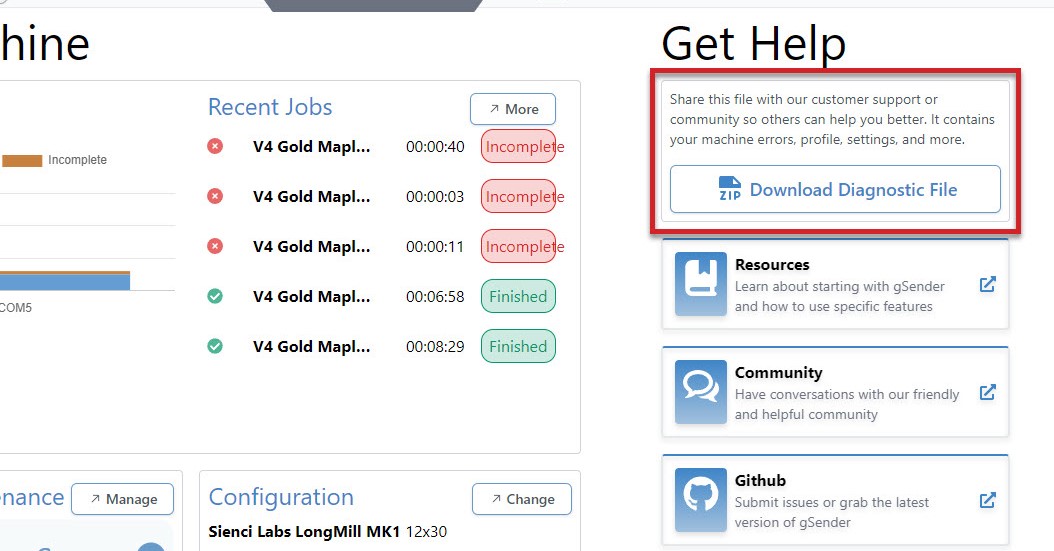
Click the ‘Download Diagnostic File‘ button to download this. This will open a save dialog box for you to save the file to a location that you can easily access to send along to others in an email, support ticket or post online.
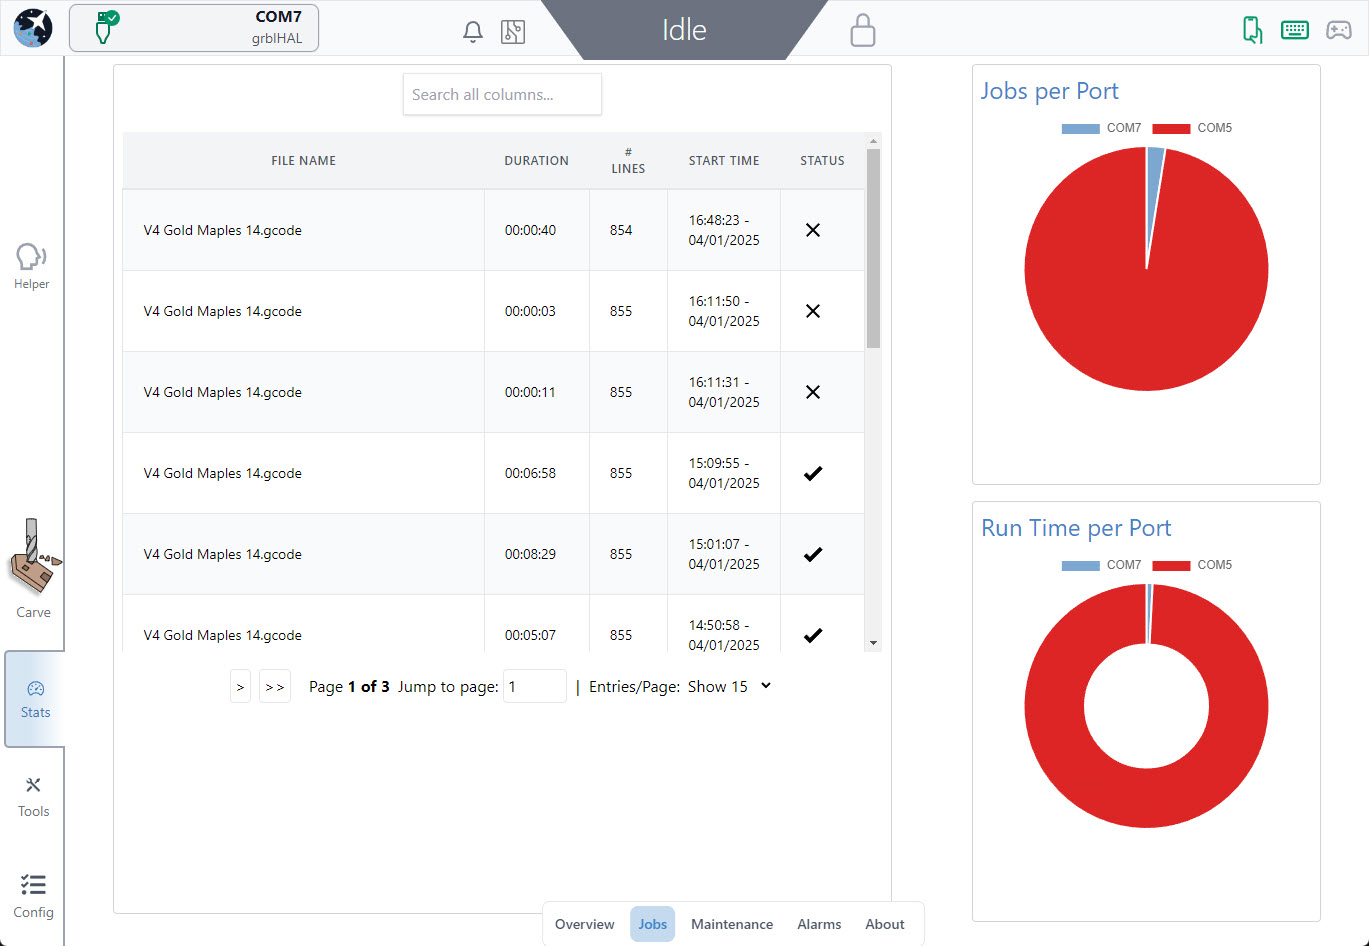
Job Stats
The Job Table provides a simplified breakdown of each job, including the file name, duration of the job, # of lines in the job, start time/date and if the job completed successfully or not. This section also displays jobs per port and run time per port. You can use the search bar at the top to search each column for a specific job by date, file name, completion status, etc.
CNC Maintenance
In the Maintenance tab, you will see preset tasks with an hourly countdown range, to remind you when a maintenance task is due to be performed. These times pull directly from the runtime of your jobs and allow you to mark them as complete to reset the timers. Once the task is in range, the maintenance is due, once past the range, the task becomes critical to address.
Each task includes a timer showing how much time remains before the task needs attention, detailed descriptions and an edit button or complete task button. This section also displays all upcoming maintenance in a colour coded list to the right.
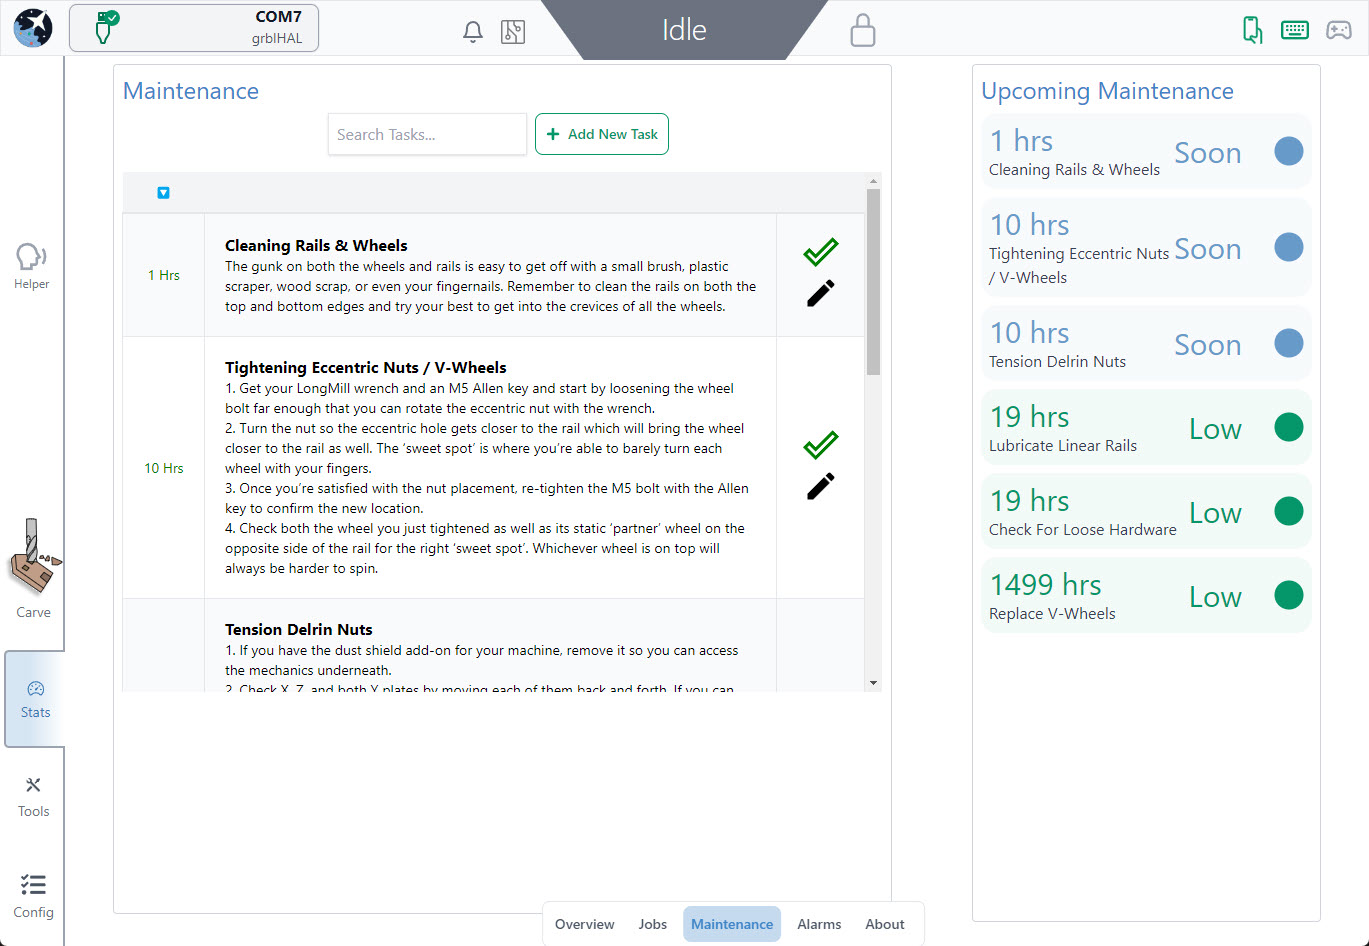
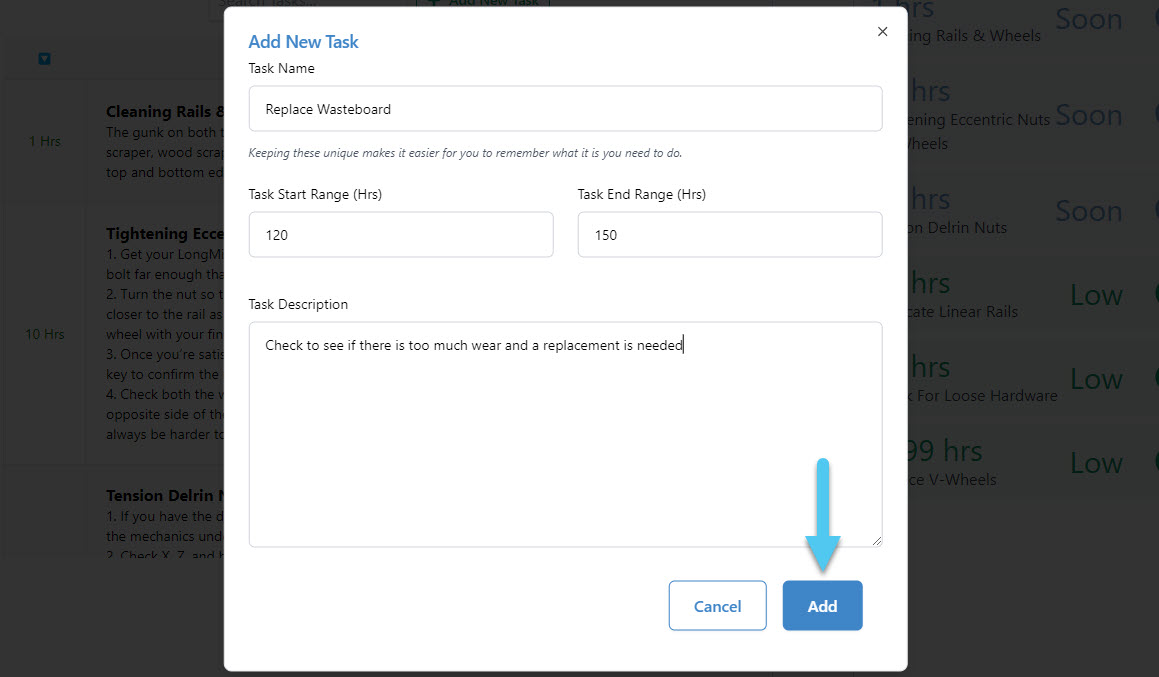
You can also add your own reminders, time due range and description to this section, to really make it your own.
Alarms & Errors
In the Alarms & Errors tab, you will see a list or errors and alarms. Details include the error or alarm number, time and date and a brief explanation of the issue. Here you can also Clear Alarms & Errors or Download a Diagnostic File for further troubleshooting.
To read more about Alarms & Errors, visit our grbl Alarms & Errors resource.
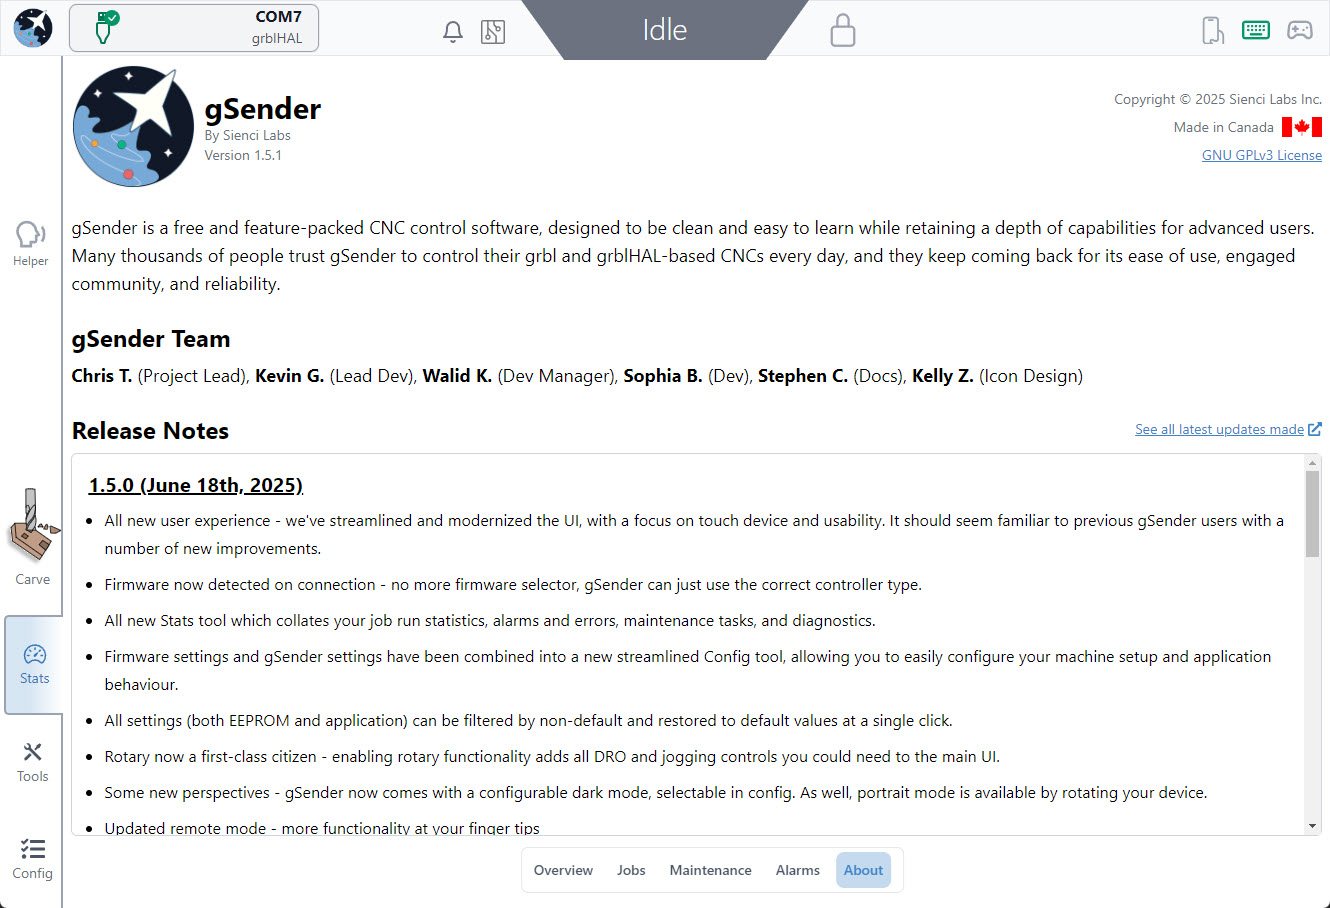
About Page
You can find the release notes for the latest version of gSender in the “About” section of Stats, as well as get to know more about the team behind gSender!
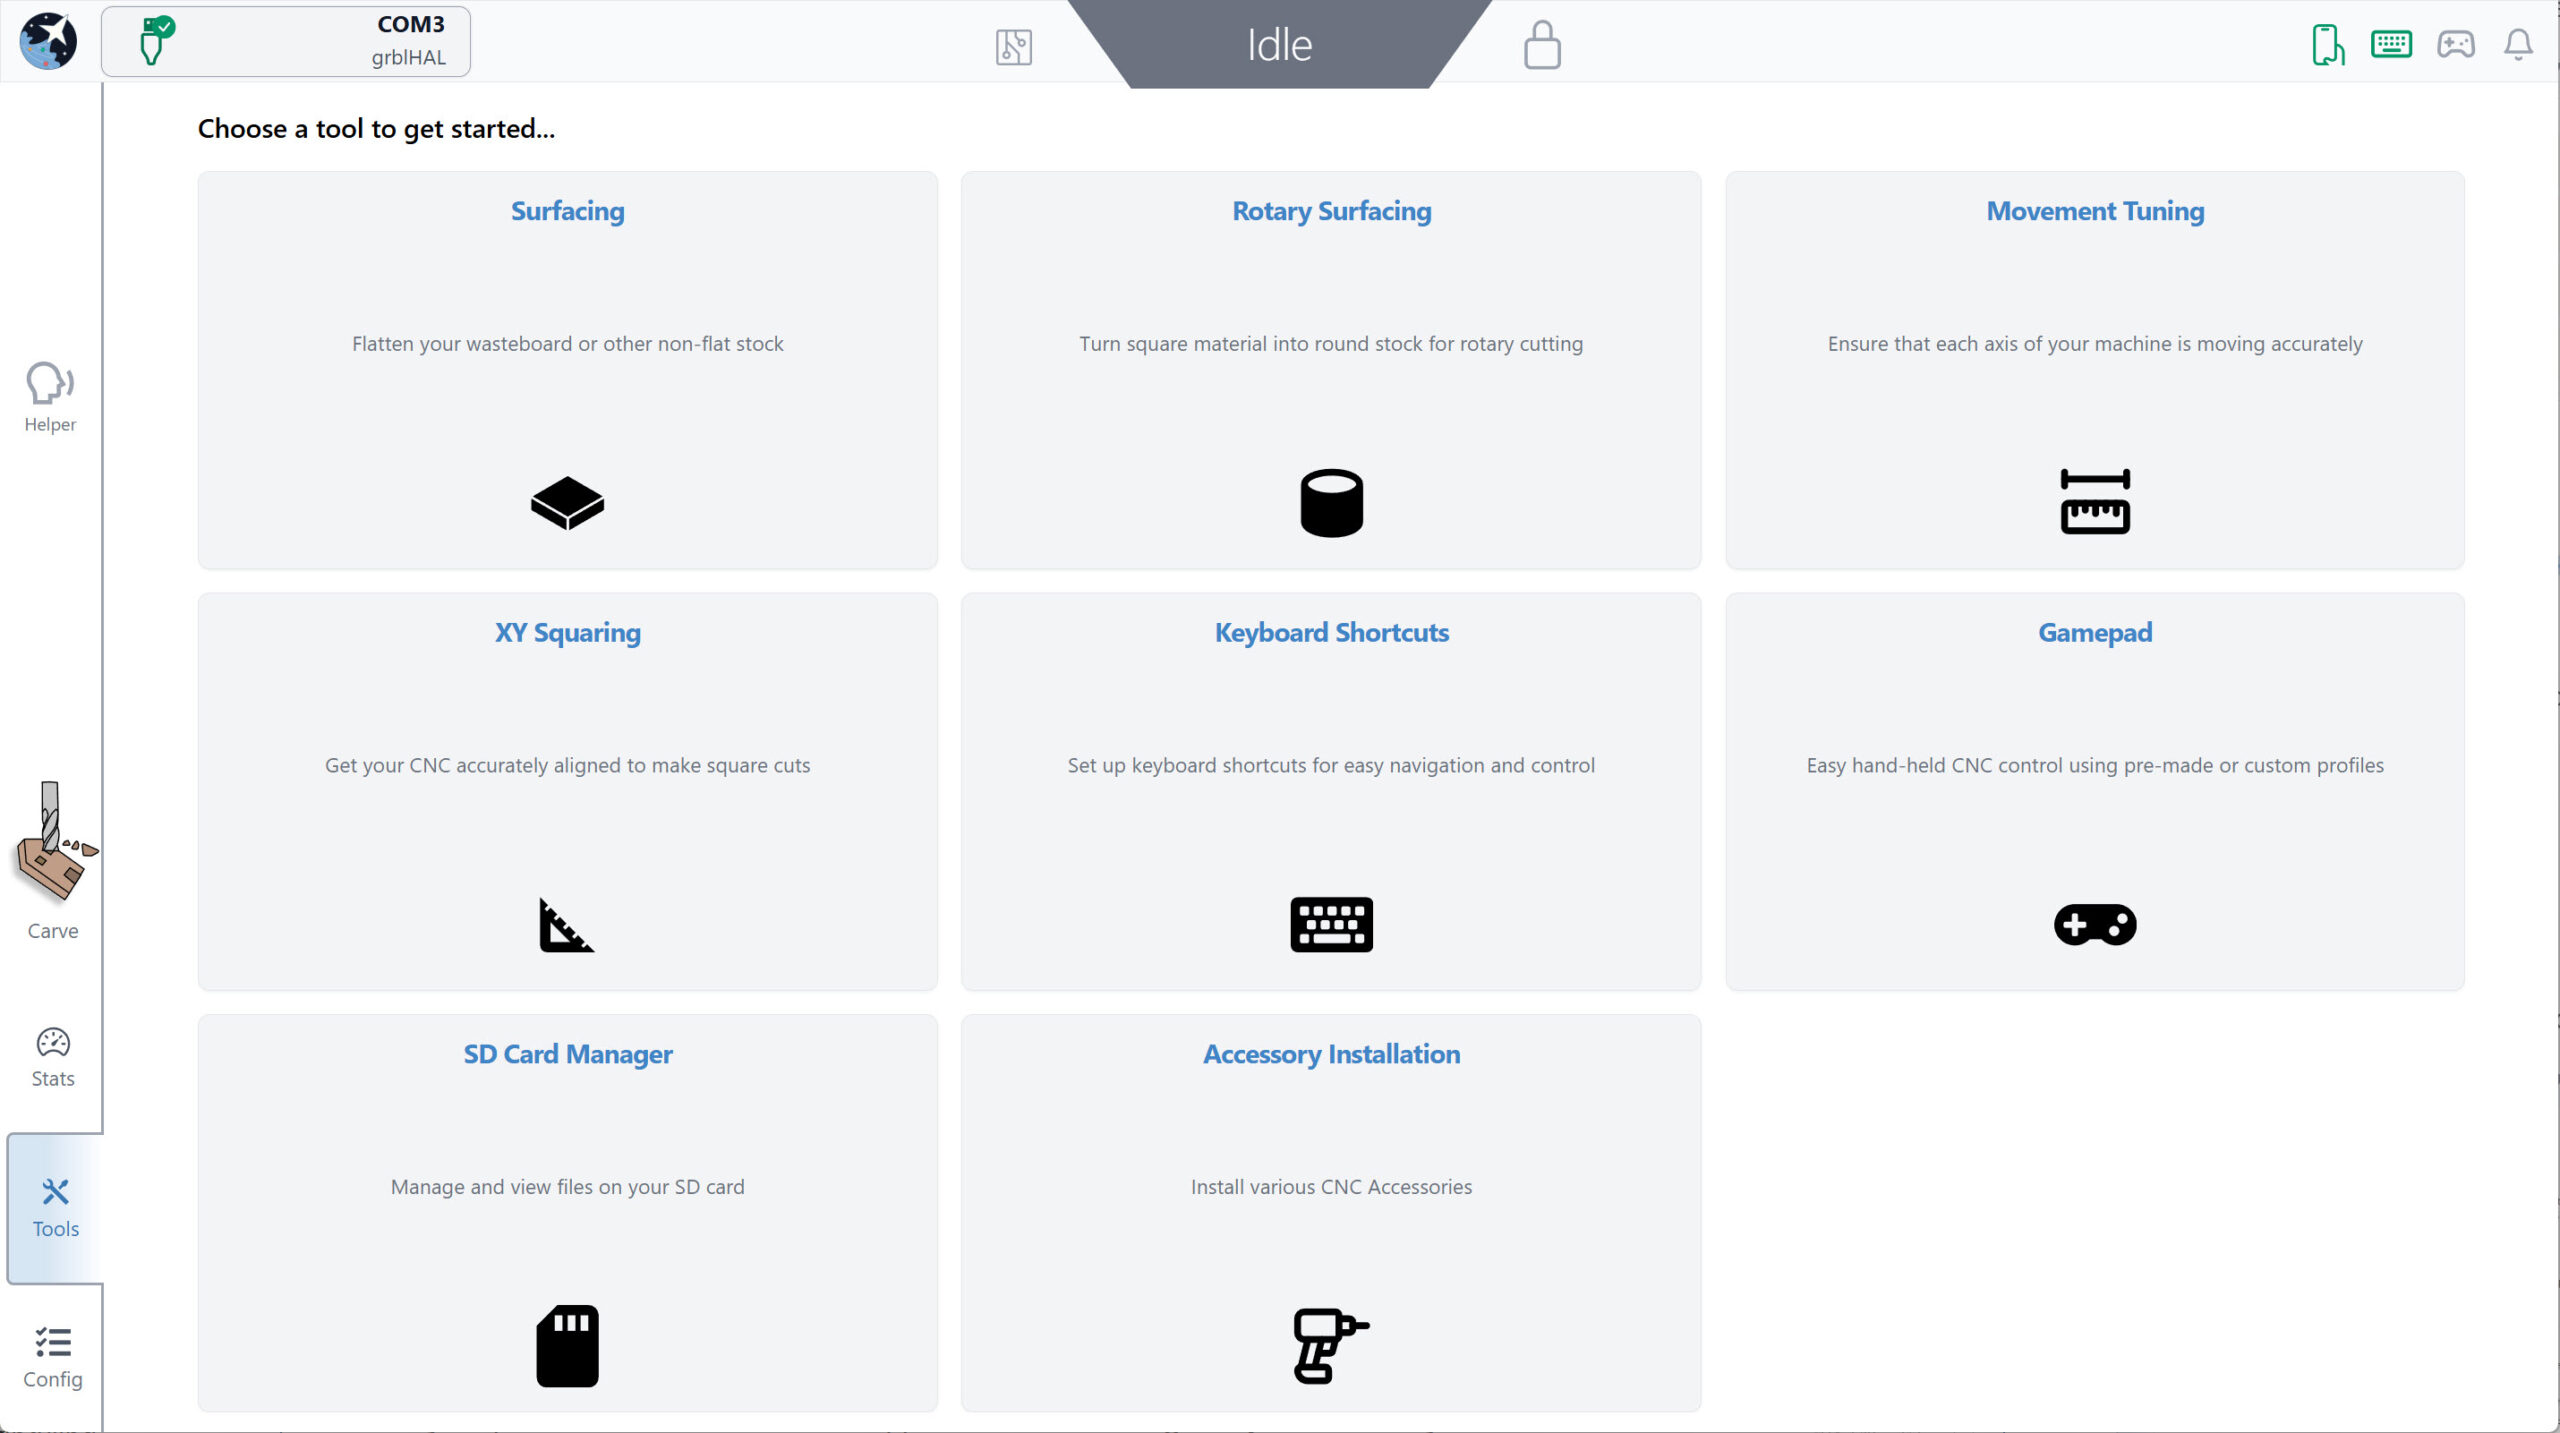
Tools Tab
The Tools tab has what we like to call “Wizards” you can use to walk through lots of common CNCing tasks like XY squaring, movement tuning, wasteboard surfacing, as well as you can access keyboard and gamepad shortcuts.
Config Tab
The Config tab is meant to act as your one-stop-shop for any customization to how gSender looks or acts, or how your CNC is configured. This starts with some basics, then moves on to motors, probing, homing/limits, spindle/laser, rotary, tool changing, and more.
The settings are grouped to make the whole setup process easier, and you can quickly navigate them by either:
- Scrolling along the page
- Clicking the table of contents links on the left side
- Type the setting you’re looking for in the search bar (for example “acceleration” or “$110”)
- Clicking the ‘View Modified’ toggle to filter by only settings that have been changed from their default
As you look through this area to get a lay of the land, you might also notice some other useful aspects:
- You’ll be able to tell which settings are firmware-based by the microchip icon next to them, the ones without a microchip are gSenders local preferences.
- There are buttons and indicators put into place so that you can change and test settings on the fly without having to leave the Config tab. This makes machine setup much faster (for example, if your CNC jogs the wrong way you can invert it, save the settings, and test that it’s working all in the same place).
- There are also some buttons that that will take you to automated setup wizards
- Any setting will highlight in yellow once it’s been changed from default and give you the option to revert it if needed
Some of the common settings to change are: preferred units (mm/inch), visualizer theme and Dark mode, enabling controls for add-ons that your machine has (spindle/laser controls, rotary controls, etc.), customizing notifications, and of course selecting a Machine Profile.
Remember to hit Apply Settings after any changes you make!
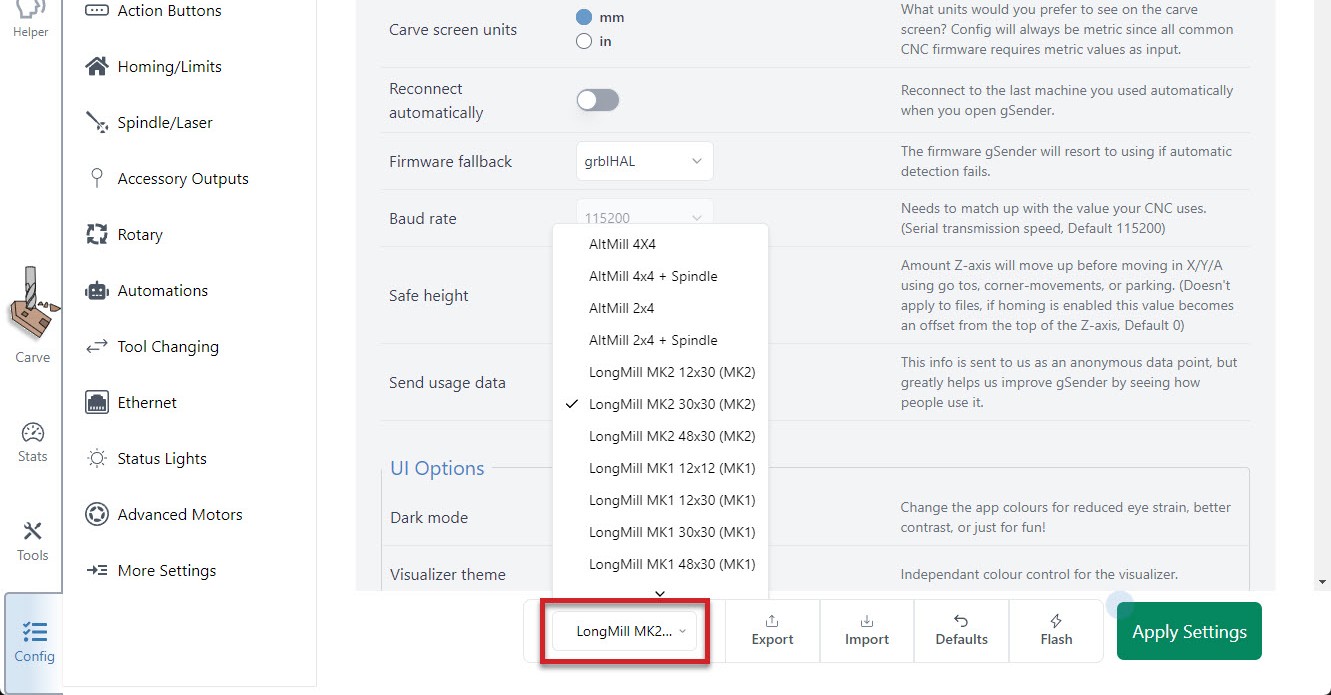
Machine Profiles
When it comes to selecting a machine profile at the bottom of the Config tab, your machine will either be ‘supported‘ or ‘unsupported‘. The only difference between these two types is that for unsupported machines:
- Firmware-based settings won’t turn yellow when they’re changed from their default (this is because gSender isn’t aware of what the default for that machine is)
- There won’t be an option to reset a firmware-based setting back to its default
- Clicking the bottom ‘Defaults’ button will revert your machine settings to standard grbl defaults
- Attempting to ‘Flash’ your machine will flash it with default grbl firmware
- You should be more cautious when using the Config tab since it could enable you to alter your machine in unpredictable ways and we won’t be able to help you with your specific hardware. In this case, if your machine isn’t working, contact your manufacturer to get their advice on how to fix it.
All other aspects of using and operating gSender will work as expected no matter what machine profile you select; but because these extra features for setting, resetting, and flashing can be useful for many CNCers we encourage manufacturers to contact us so we can add more supported machine profiles. The current list of supported machines is:
- Sienci Labs LongMill (MK1, MK2, and MK2.5)
- Sienci Labs AltMill (MK1 and MK2)
- Sienci Labs Mill One (V1, V2, and V3)
Machine settings
With your Machine Profile selected (if yours is not listed then select “Generic CNC”), the rest of the buttons at the bottom can be used as follows:
- All the bottom buttons only apply to firmware-based settings specific to your machine (the settings with the microchip next to them), not gSenders local settings
- Defaults
- Should only really be used if you’ve selected a ‘supported machine profile‘
- Acts like a “factory reset”
- Use it when you’re first setting up your CNC to ensure your settings are broadly correct, or if you want to bulk reset all settings back to their default
- Flash
- Should only really be used if you’ve selected a ‘supported machine profile‘
- Will either flash your specific machines grbl firmware, or for grblHAL boards will give you the option to upload a hex file to flash a new firmware
- Import
- If you had previously exported machine settings that worked for your CNC, you can import them to get things working again
- Export
- If you’ve configured your CNC and everything seems to be working well, save your firmware settings to a file so you have it on hand in case something goes wrong
- The process of importing/exporting is basically the same as for importing/exporting gSender preferences
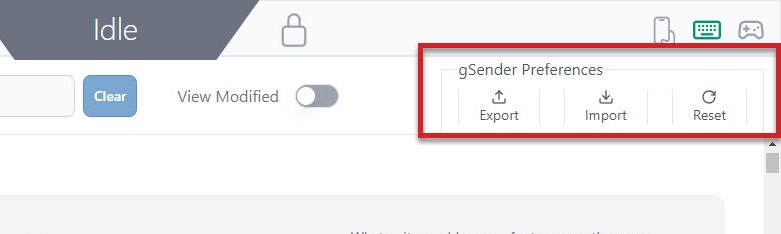
gSender Preferences
These preferences are stored on the specific computer being used to run gSender and includes items like: preferred units, machine selected, probe, tools, jogging presets, keymapping, tool change g-code, automations, and more. These don’t have any impact on your machines firmware settings (settings with the microchip symbol next to them), rather they impact how you use gSender day-to-day.
The buttons for gSender Preferences are all in the top right corner of the Config tab and be used at any time to reset all settings to default (remember you can reset individual settings if you’d like), or import or export your current gSender setup. Importing/Exporting can be useful if you’re updating to a new major version of gSender or you plan on using a different computer to run your CNC and want to carry over all your familiarities to make sure things keep running as expected.
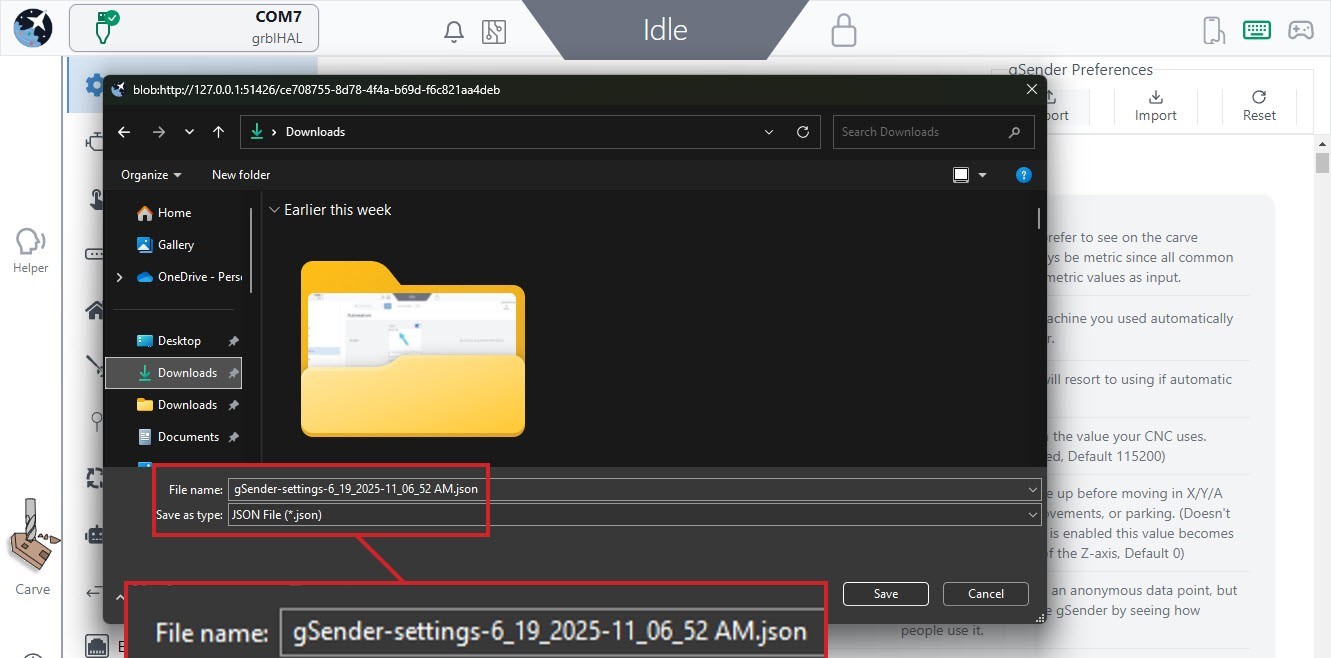
To transfer your settings over, start by exporting a save file:
- Go to the Config Tab, and click the ‘Export‘ button.
- Save the file somewhere onto your computer that you can find afterwards
- Outside of gSender, if you plan to move the file to another computer, find the file and transfer it using a memory stick or sending it over the internet by emailing to yourself or using Google Drive or OneDrive.
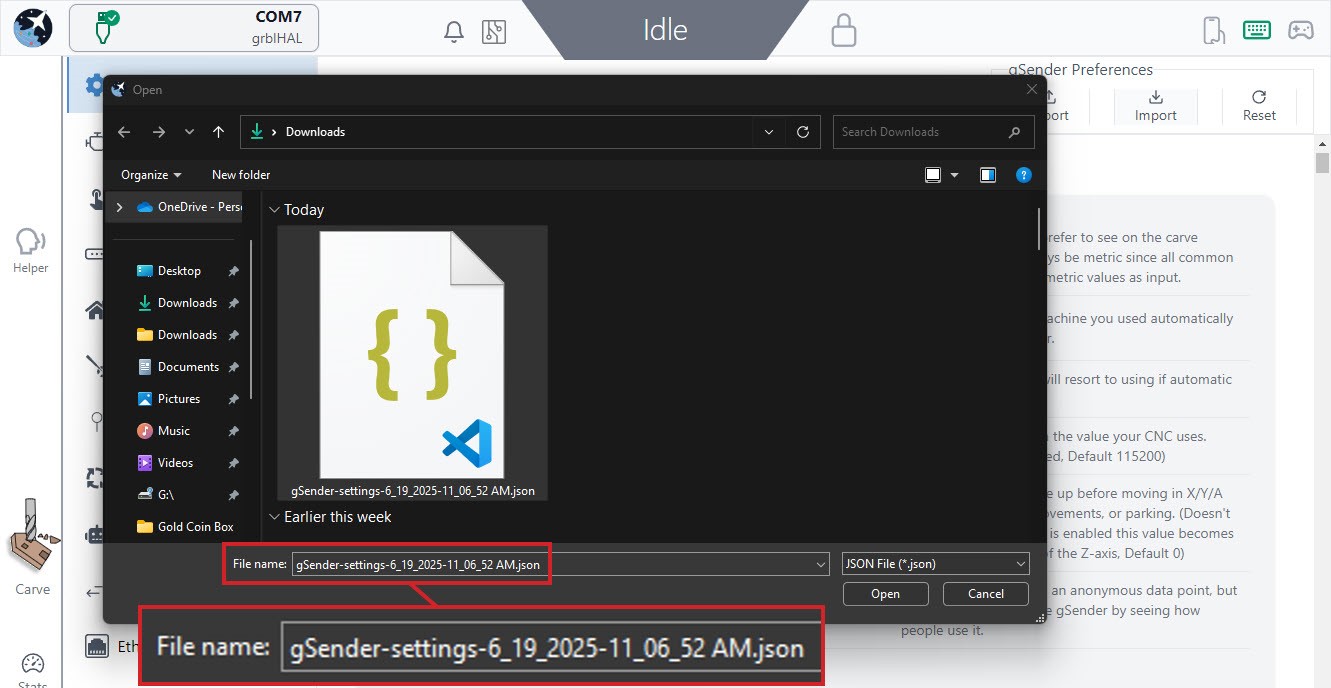
- Once you’ve got the file onto the other computer it’s now easy enough to open gSender on that computer, or in the web browser if you’re doing remote control, and go to the Config tab and click the ‘Import‘ button just to the right of the export button.
- Locate the file and click ‘Open’
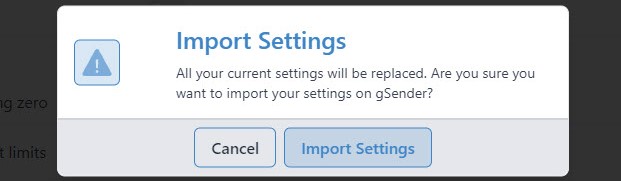
- You’ll get a warning. Click ‘Import Settings’ if you want to continue. Once you do, gSender will disconnect and you’ll need to reconnect the machine to resume operation but the settings should now be brought over.
Set up to Use
Let’s explore some common gSender settings to help get your setup running the way you prefer. This will all happen in the Config tab, which if you remember can both adjust your machine setup, gSender preferences, and how gSender looks all in a single place. Some things you may want to configure would be:
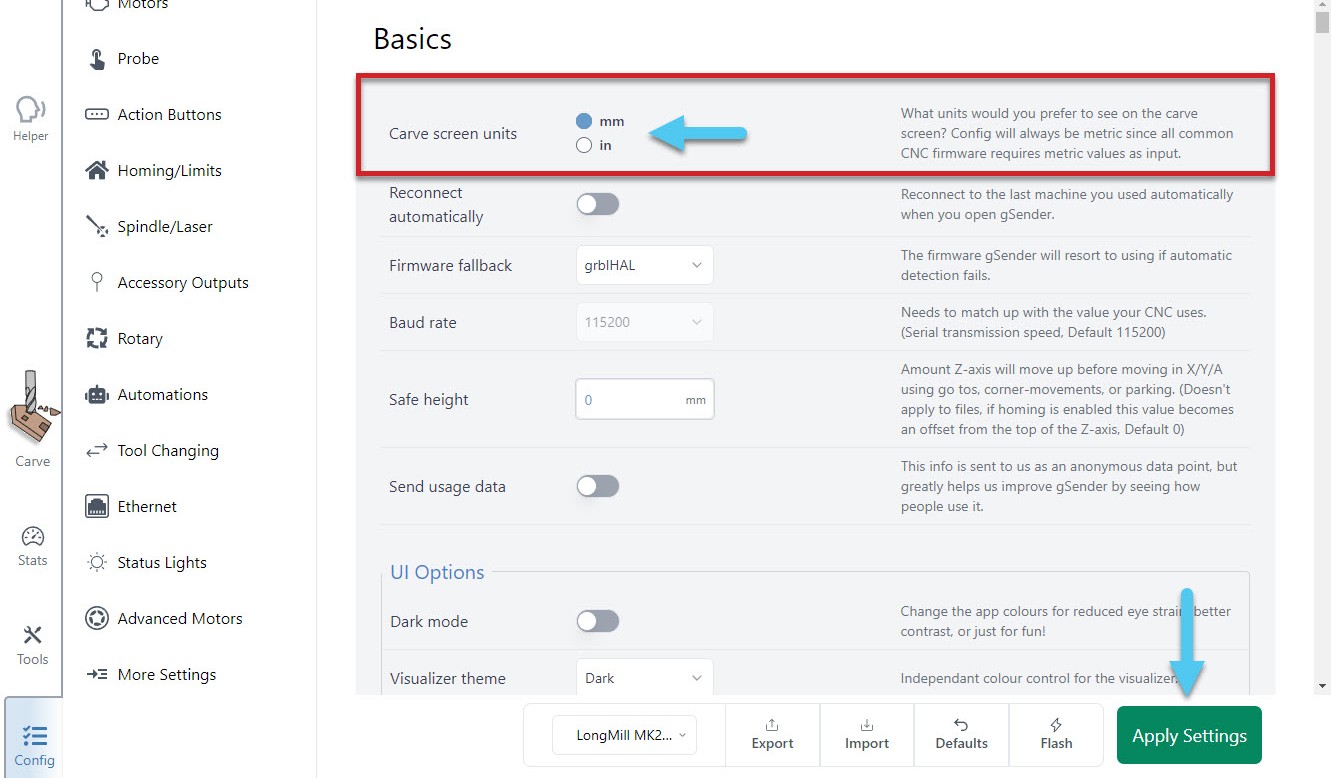
- Preferred units
- In the Basics section, change which units (mm or inches) you want to see on the main Carve screen (Config units will always display as mm)
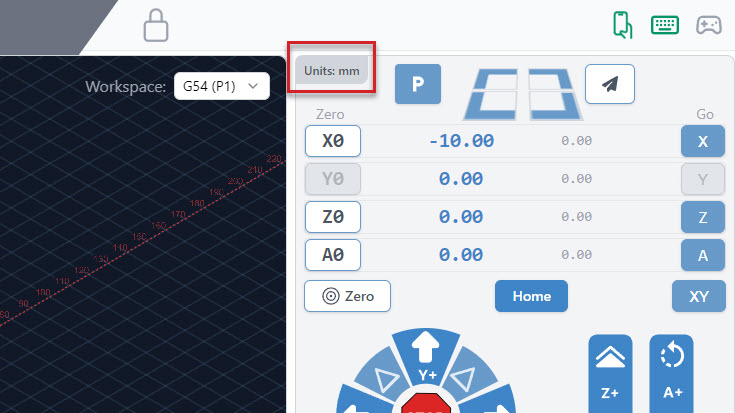
The Carve tab will always show the units you set at the top left corner of the DRO.
- In the Basics section, change which units (mm or inches) you want to see on the main Carve screen (Config units will always display as mm)
- Enable other CNC functions
- If your CNC supports them, this can include a Spindle, Laser, Rotary axis, and more. Just go to the appropriate section in Config and the first option you should see should mention “enabling” it. After Applying the changes you’ll see a new tab appear in the bottom-right of the main Carve screen.
- If your CNC supports them, this can include a Spindle, Laser, Rotary axis, and more. Just go to the appropriate section in Config and the first option you should see should mention “enabling” it. After Applying the changes you’ll see a new tab appear in the bottom-right of the main Carve screen.
- Notifications
- In Basics ➜ Notifications, these can be customized to give you warnings when you load bad files, provide information at the end of a job, and more.
- Visualizer theme and Dark mode
- In the Basics section, both these settings help change the colours in gSender based on what will be easier on your eyes. Check them out if that sounds interesting!
- And lastly your Machine Profile which is explained more in the next section
After these changes, don’t forget to hit Apply Settings so everything gets saved!
Machine Profiles 2
If you’re planning to make any firmware modifications, first check the current machine profile selected at the bottom of the Config tab. The default in gSender is the “LongMill MK2 30×30” so select a different option in the dropdown if that’s not your machine (if yours is not listed then select “Generic CNC”).
For supported machines, once you’ve made this change you might want to ‘Restore Defaults’ to ensure your machine has all the most up-to-date settings.
If you’re running into an issue where the size isn’t correct when using Soft Limits for example, get the size from your manufacturer or their resources and update it in Config ➜ Homing/Limits ➜ X/Y/Z axis travel. Remember to hit the Apply Settings button afterwards.

Running Longer Jobs (optional)
Windows computers can tend to have their screens and USB ports ‘fall asleep’ even in the middle of running a long carving job. This can cause your intricate cuts to stop short and the job to fail. gSender tries to fight against this by keeping your computer awake (we use similar tactics to auto-clicker apps), but sometimes this still isn’t enough so you have to change your computer settings manually.
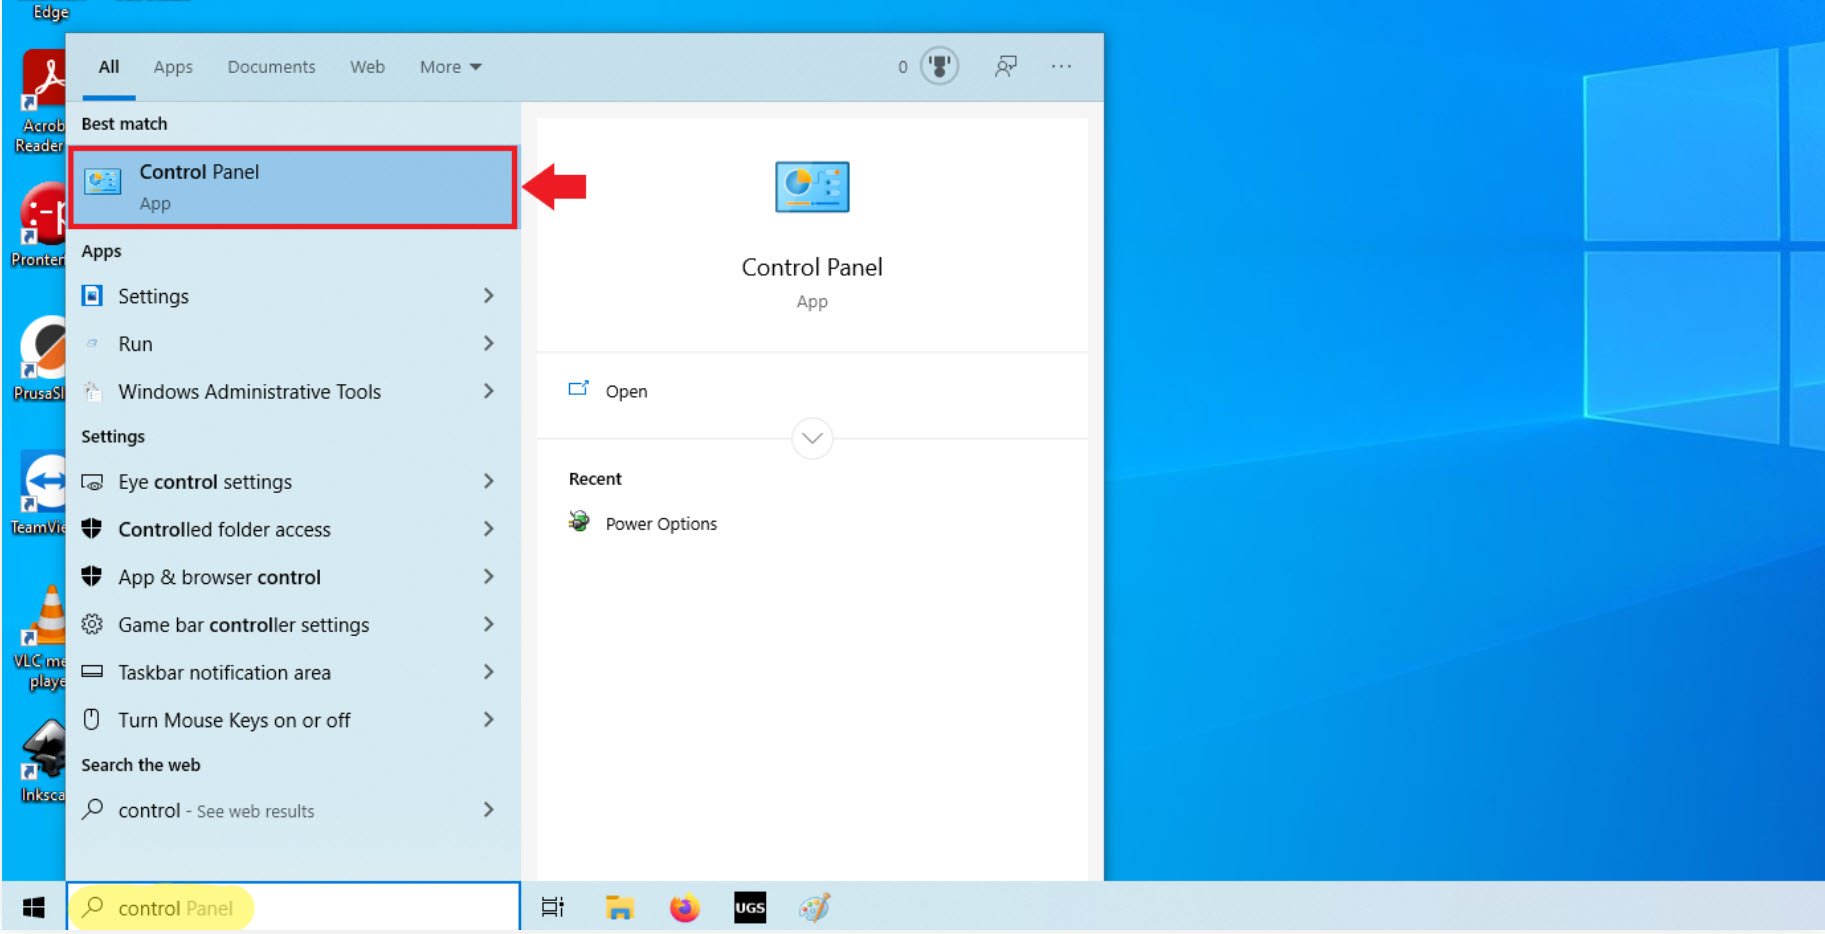
To keep the display on, you’ll want to click the Windows icon at the bottom left corner of your screen and start to type “control panel” to bring it up.
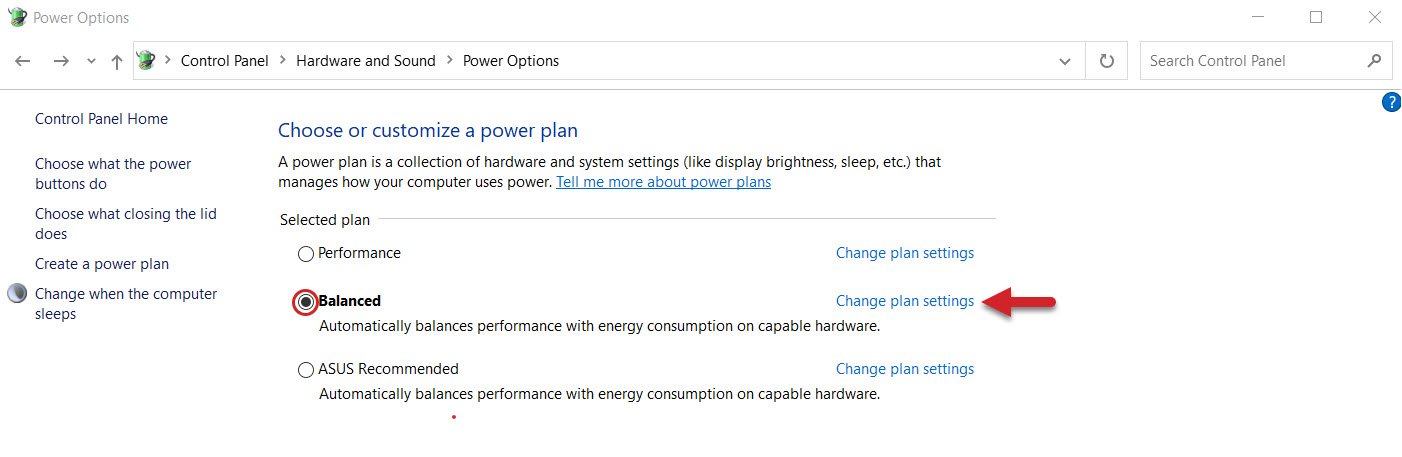
Once you’ve clicked to open it, go to Hardware and Sound then Power Options


The plan that’s currently selected (circled in the picture) will be the one that you want to change. In this example we will be editing the Balanced plan. Click on the “Change plan settings” text (highlighted with an arrow).
Go to the second drop-down and set both ‘battery’ and ‘plugged in’ selection to Never, save the changes to ensure that your computer never dozes off on its own.
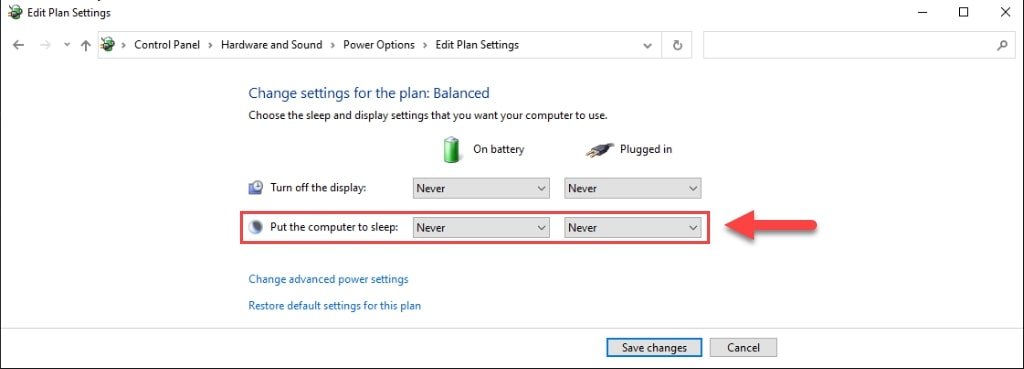
To keep the USB ports on, click Change advanced power settings

In the separate window that appears, you’ll want to Expand the USB Settings, then USB selective suspend setting, and finally change both the ‘battery’ and ‘plugged in’ settings for these drop-downs to ‘Disabled‘. Click OK to Apply these new settings.

After having done all of this, just be mindful now that sometimes a Windows update can remove these settings. If you have an update and want to be confident running your CNC, we’d recommend checking back on these settings to make sure they’re still set properly.
Transitioning from Classic
If you’ve been comfortably using gSender 1.4.12 or earlier and are about to click to update, we’ve got some news to share with you. After over a year of hard work, gSender has been almost fully re-coded from scratch and will now be looking a little bit different compared to what you’re used to once the update is complete. We had to do this because gSender really needed some improvements under the hood, and we thought while we were at it we’d try to improve on gSender’s already great user interface as well.
Rest assured that all of the functionality you are used to is still here, it may simply have a new home. Hopefully this section helps guide you through these changes so that you won’t skip a beat.
Out with the old Classic version, and in with the New U!! Let’s dive into some specifics.
Key Enhancements
Check out this video of Chris showing off the New U release, reviewing some of the new features and what there is to be excited about!
We’ve combined similar features, and are excited to share things like our new Stats Tab which incorporates stats, maintenance, diagnostics, and more into a simple dashboard, as well as the new Config Tab which puts all of your settings into one place, so no more flipping between the Firmware and gSender settings.
You will notice right away that as you click through the new UI, there are two sections of your screen that are always available to access: the Top bar and the Left bar.
Top and Left Bars
The top bar holds several cool things, moving from left to right you will see: your connection status, notification bell, machine information, machine status, and shortcuts for remote mode, keyboard shortcuts, and gamepad profiles. Feel free to click on some of these icons to see what they do!
On the left side of the screen, you will see another bar that stays on the screen at all time, with 5 tabs. From top to bottom, these tabs are:
- The Helper Tab will aid you in understanding and correcting any errors that pop up. It also includes a tool changing wizard.
- The Carve Tab, is where you handle files, watch the visualizer, setup jobs, move the machine, probe for zero, manage macros, check out the console and more.
- The Stats Tab can be used for examining your machine stats, upcoming maintenance, your recent alarms & errors and your machine configuration. A diagnostic file download is available if you run into trouble, and links to our community, resources and Git Hub repository are also found on this tab.
- On the Tools Tab, you will see aids to help you surface a project, square or tune your machine and setup your keyboard and gamepad shortcuts.
- The Config Tab has combined both your machine settings with the firmware settings. You can search these settings or toggle the ones that have been modified.
Let’s briefly check out each tab, to see what goodies are there.
Main Carve Tab
We’ve improved the main screen, now called the Carve Tab. The right side (Blue) is very similar to Classic gSender — all the blue buttons move the machine, whether it be jogging, homing or parking. Below, you can access many functions like Probe and Rotary. The middle/left side of the screen (Red) is like a dashboard, you can load files, control the job and observe your progress in the visualizer.
The jog controls have also been redesigned for better ergonomics and touch-screen compatibility.
Stats Tab
The stats tab offers an overview of your Machine, including your recent jobs run, configuration, upcoming maintenance warnings and your recent alarms & errors. You can also download a diagnostic file for extra support, access our resources, community or github repository! Tap on one of the tabs at the bottom of this page, to see even more details!
Tools Management
The Tools tab now contains all the widgets for surfacing your project, tuning your machine, as well as creating keyboard shortcuts and gamepad profiles. In this short video, you can see where the Surfacing and Calibrate Tools are on Classic gSender, then we flip over to the Tools tab on the New U.
Streamlined CNC Setup
The Config menu has been refined to display only relevant sections based on your machine’s connection status and selected profile. It’s a combination of the preferences mixed with the firmware settings, so now all settings are in one place. In this short video, you can see these moved from the top right (Classic) to the bottom left corner of the screen (New U).
One cool thing is that modified settings are highlighted, and a ‘Show Modified’ toggle allows you to filter and manage settings that have been changed from the machine default. You can reset to default settings at any time if you find a change you have made isn’t working.
New Features
There are also a couple of new features that we should mention. Connecting is now easier! gSender now automatically detects your firmware type (Grbl/grblHAL) upon connection, selecting the appropriate controller settings. This feature simplifies the process, as you can select your default firmware choice in Config, and connect with a simple button press.
We’ve also made several visual and usability upgrades to gSender. The visualizer now supports pinch-to-zoom on touch screens, Dark Mode to reduce eye strain, and includes a redesigned Lightweight Mode with easy presets. Turn these on by going to Config ➜ Customize UI.
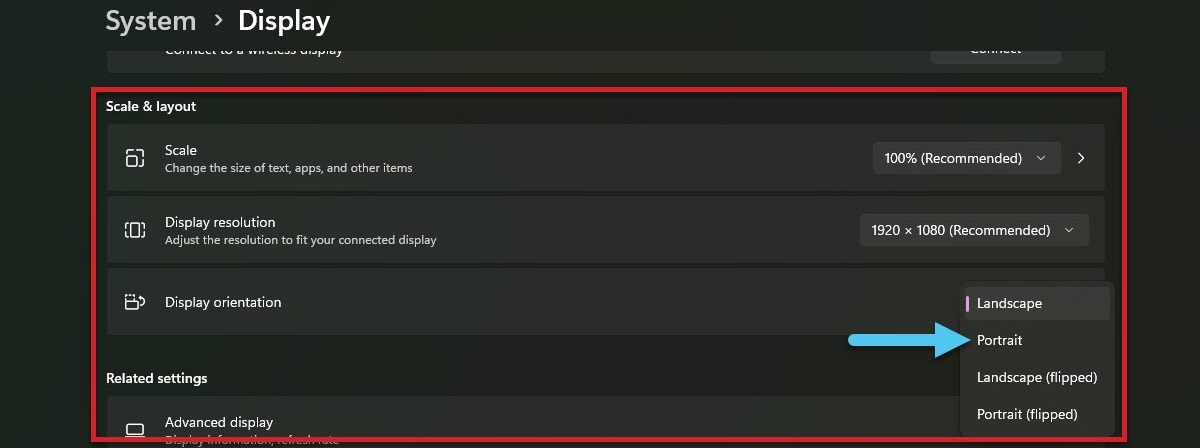
If you’re using a tablet or vertical screen, Portrait Mode is now supported—just rotate your device or change your display orientation.
Some other noteworthy features include:
- Console Enhancements: Added console clearing functionality and arrow-scrollable input history for improved usability.
- Visual Tweaks: Numerous UI adjustments, including updated icons, responsive sidebar sizing, and improved text legibility.
Customizations
Listing off a few more customizations before moving on to new features, some which were already mentioned on the Setup & Layout page, we’d encourage you to look into these options to personalize your gSender experience (you can find them all in the Config tab):
- Reconnect automatically
- Will connect to your last CNC anytime you boot up your computer or open gSender and the CNC is still plugged in.
- Visualizer theme and Dark mode
- In the Basics section, both these settings help change the colours in gSender based on what will be easier on your eyes. Check them out if that sounds interesting!
- Lightweight mode
- This mode enables gSender to run faster on computers that are older or less powerful by turning off processor-heavy aspects of the visualizer. It comes in two flavours, either it’ll show your file as a picture with no 3D movement, or it’ll turn visualization off completely. You can toggle it on/off using the Feather button on the left side of the visualizer on the Carve page.
- Portrait layout
- gSender takes on a whole new life if you prefer to use your monitor in portrait mode, and we actually prefer using it in portrait on touchscreens. If you’re interested in trying this out it should just be a setting in your operating system, and gSender will adapt automatically.
- gSender takes on a whole new life if you prefer to use your monitor in portrait mode, and we actually prefer using it in portrait on touchscreens. If you’re interested in trying this out it should just be a setting in your operating system, and gSender will adapt automatically.
- Jogging presets
- You can set these based on the size of your CNC or to match how you like to move your machine around to make jogging around feel more natural.
- Notifications
- In Basics ➜ Notifications, these can be customized to give you warnings when you load bad files, provide information at the end of a job, and more.
- Enable other CNC functions
- If your CNC supports them, this can include a Spindle, Laser, Rotary axis, and more. Just go to the appropriate section in Config and the first option you should see should mention “enabling” it. After Applying the changes you’ll see a new tab appear in the bottom-right of the main Carve screen.
Get Started
To explore these new features:
- Download gSender 1.5.0: Access the latest version from the Sienci Labs GitHub repository.
- Refer to the Official Documentation: The gSender Docs provide comprehensive guidance on utilizing the software’s capabilities.
- Engage with the Community: Share your experiences, provide feedback, and seek assistance on the Sienci Community Forum.
By familiarizing yourself with these updates, you can leverage the enhanced functionality and improved user experience that gSender 1.5.0 offers!