
Anonymous Information
When you open up gSender, you’ll notice a prompt regarding ‘Anonymous usage information’. This is just to ask if you’d be fine with us knowing things like what CNC you use it for, what computer you run it on, and other information about how you use the app. You can imagine that if we know certain features are widely used or certain errors are constantly encountered, that can be very helpful to understand how we can improve the app or its documentation. This is completely optional and anonymous, we only do it with your permission and it can be turned off at any time in the settings menu.

Layout
Before starting to use gSender, let’s briefly cover the way its functions are laid out so that you’ll know where to find things moving forward. The program can be broken down into it’s three major sections:
- The top toolbar (boxed in red), will stay visible regardless of what you are doing. It includes machine connection on the left side, notifications, system stats and current status in the middle, and shortcuts on the right.
- The left sidebar (boxed in green) is also always visible and holds 5 main tabs; the Helper, the main Carve tab (which we have showing now), Stats, Tools, and Config.
- The main screen (boxed in blue) will show the contents of the tab you select on the left sidebar, with the default being the Carve tab.
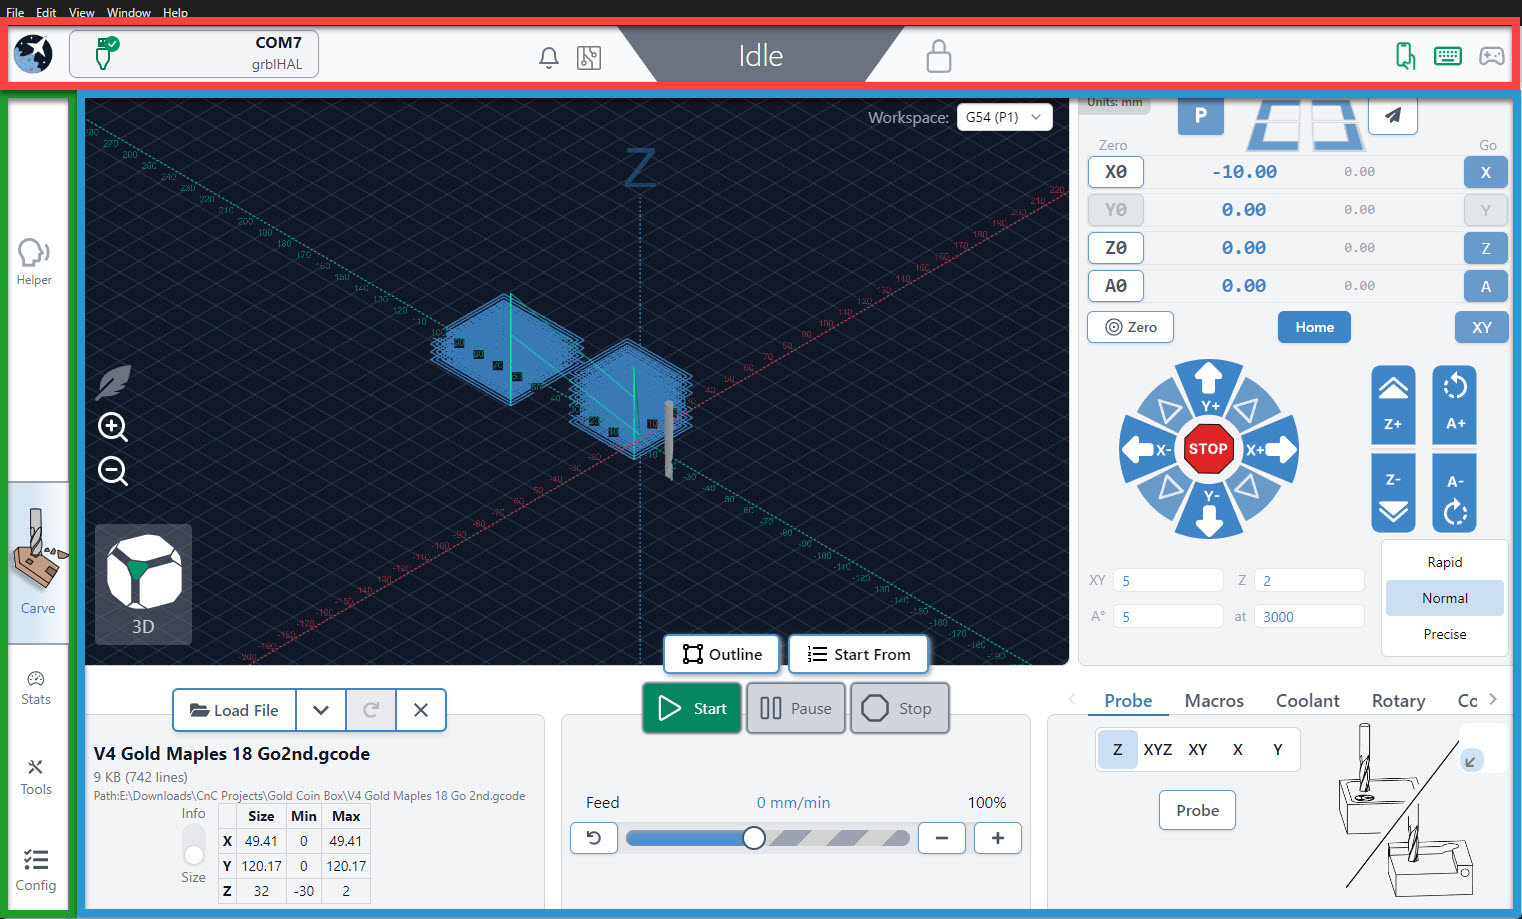
Another of gSender’s Design Principals is colouring. It can be scary to have an assortment of buttons in front of you and not know what they’re going to do. This is why we made every button in the app that moves the CNC dark blue. This means you shouldn’t ever find yourself startled when the machine moves unexpectedly since the colour will help to communicate whether it’s a ‘machine moving’ button or not.
Carve
This is where you will spend the majority of your time actually carving. When the program opens, this is where you will arrive! There are 2 main sections to the Carve tab.
- The large middle visualizer (boxed in red), is where you manage your files and can watch the magic happen after you hit the Start button. Rotate your view, monitor the job progress, turn on lightweight mode, change workspaces, adjust feed rate, and more.
- The ‘DRO’ (Digital Read Out) and Jog Controls on the right (boxed in blue), have all the functions you need to manually control your CNC when jobs aren’t running. This includes jogging, zero setting, homing, Go to movements, and more. The section at the bottom includes extra features like probing, macros, manual spindle/laser control, and more.
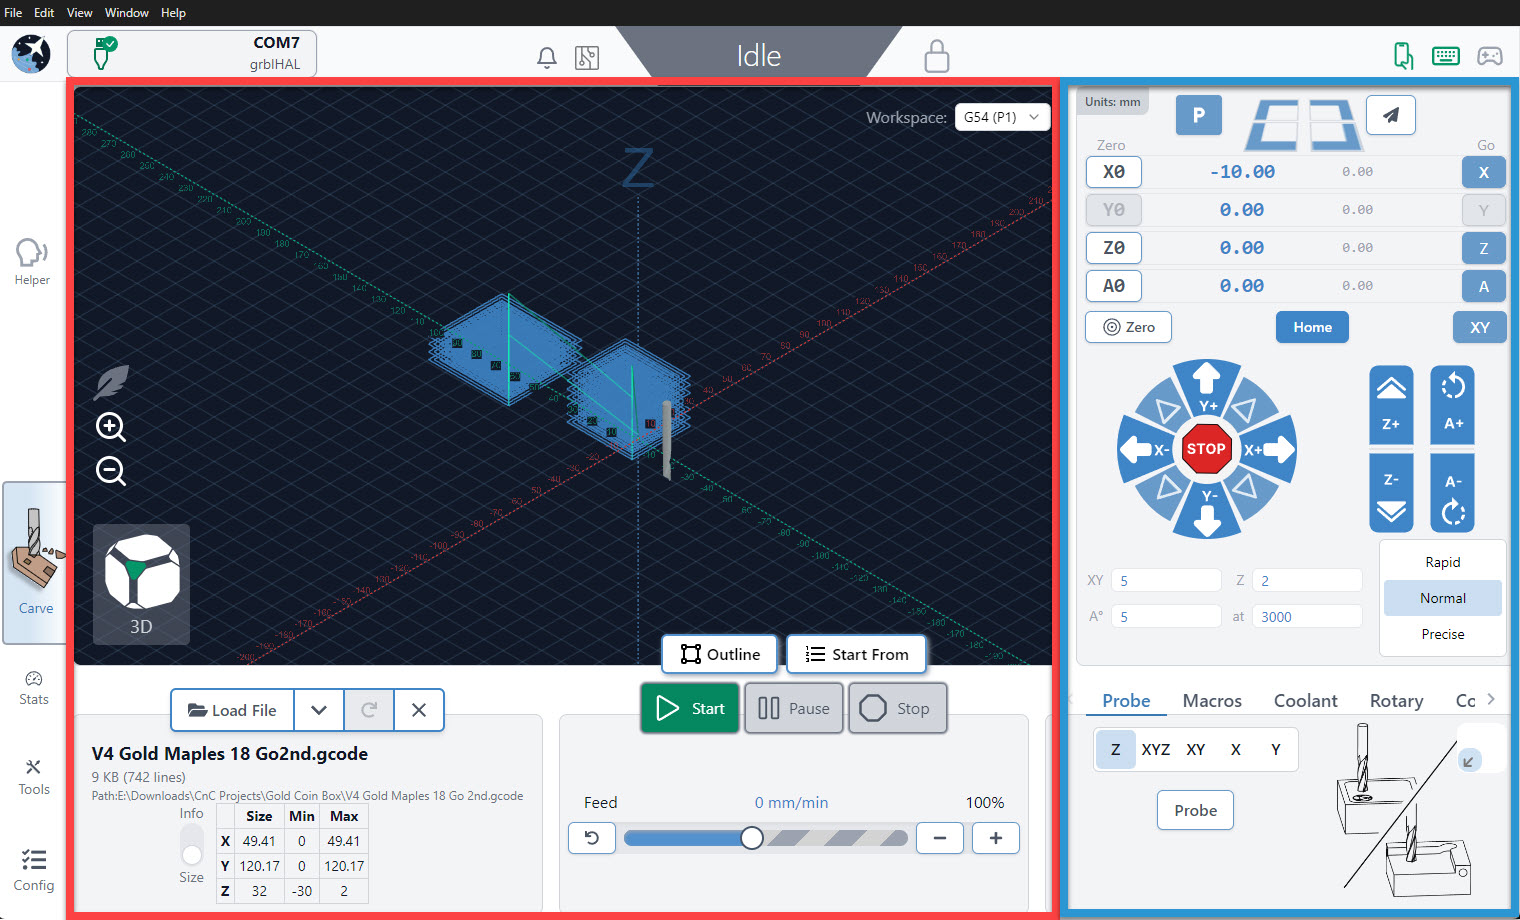
We’ve built gSender’s main screen around these primary boxed sections so that you can have all of the CNC functionality most hobbyists need on one screen without getting confused about what each button does. If you’re doing anything during a job it’ll be in the middle, if you’re doing anything outside a job it’ll likely be on the right, and if you want greater customization or functionality it’ll be found in the toolbars.
Stats
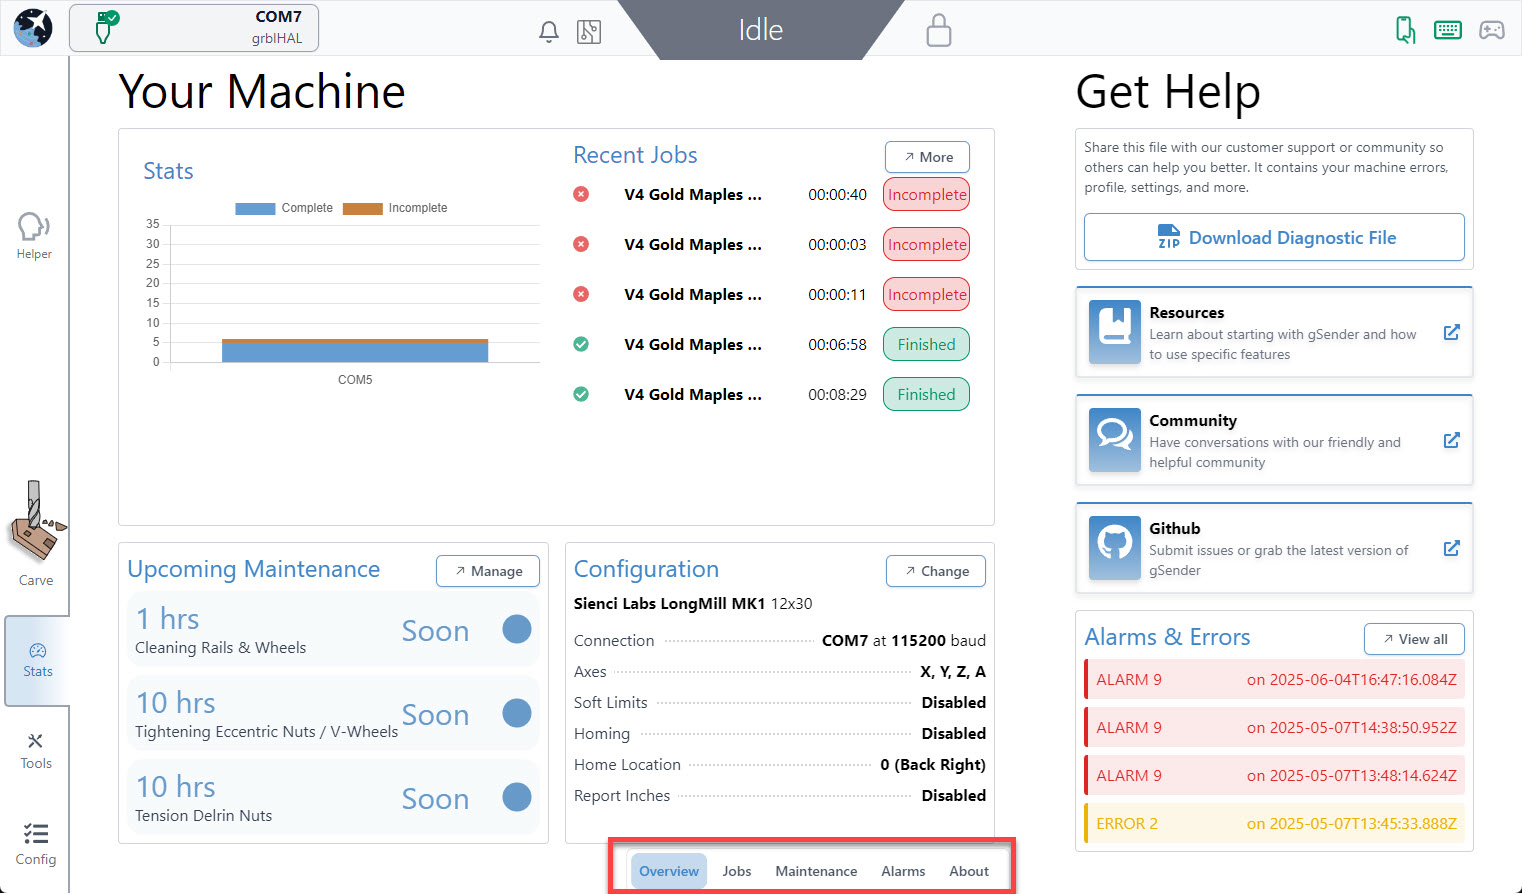
The Stats tab is a great place to check in on how your machines doing. This includes:
- Summary of stats
- Recent jobs (including their run time and if they were successful or not)
- Upcoming maintenance
- Guidance on help and troubleshooting
- And some more technical information like an overview of your machine configuration and a list of recent alarms & errors
You can click on the bottom bar to see more details on each of these summaries.
Tools
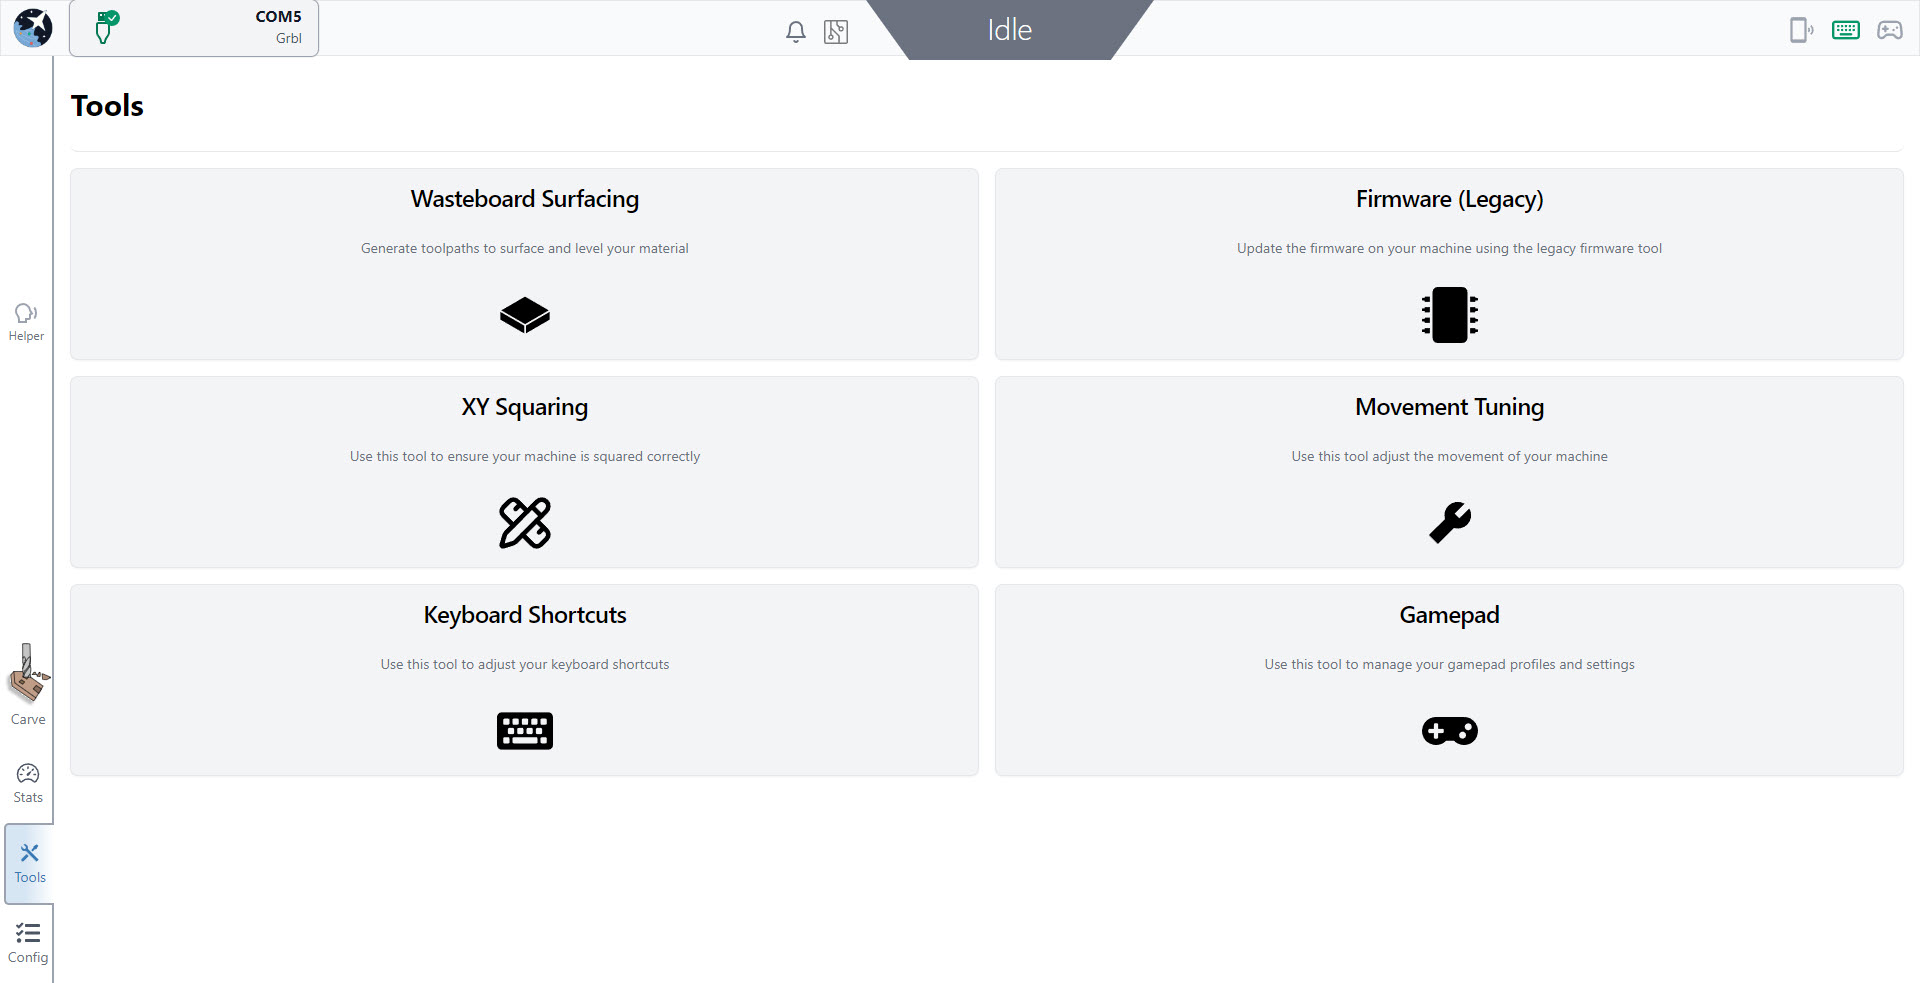
The Tools tab has what we like to call “Wizards” you can use to walk through lots of common CNCing tasks like XY squaring, movement tuning, wasteboard surfacing, as well as you can access keyboard and gamepad shortcuts.
Config
The final tab is the configuration tab. Here you will find an extensive list of settings, starting with the basics, motors, probe, homing/limits, spindle/laser, tool changing, rotary, and more.
Set up to Use
Let’s explore some common gSender settings to help get your setup running the way you prefer. This will all happen in the Config tab, which if you remember can both adjust your machine setup, gSender preferences, and how gSender looks all in a single place. Some things you may want to configure would be:
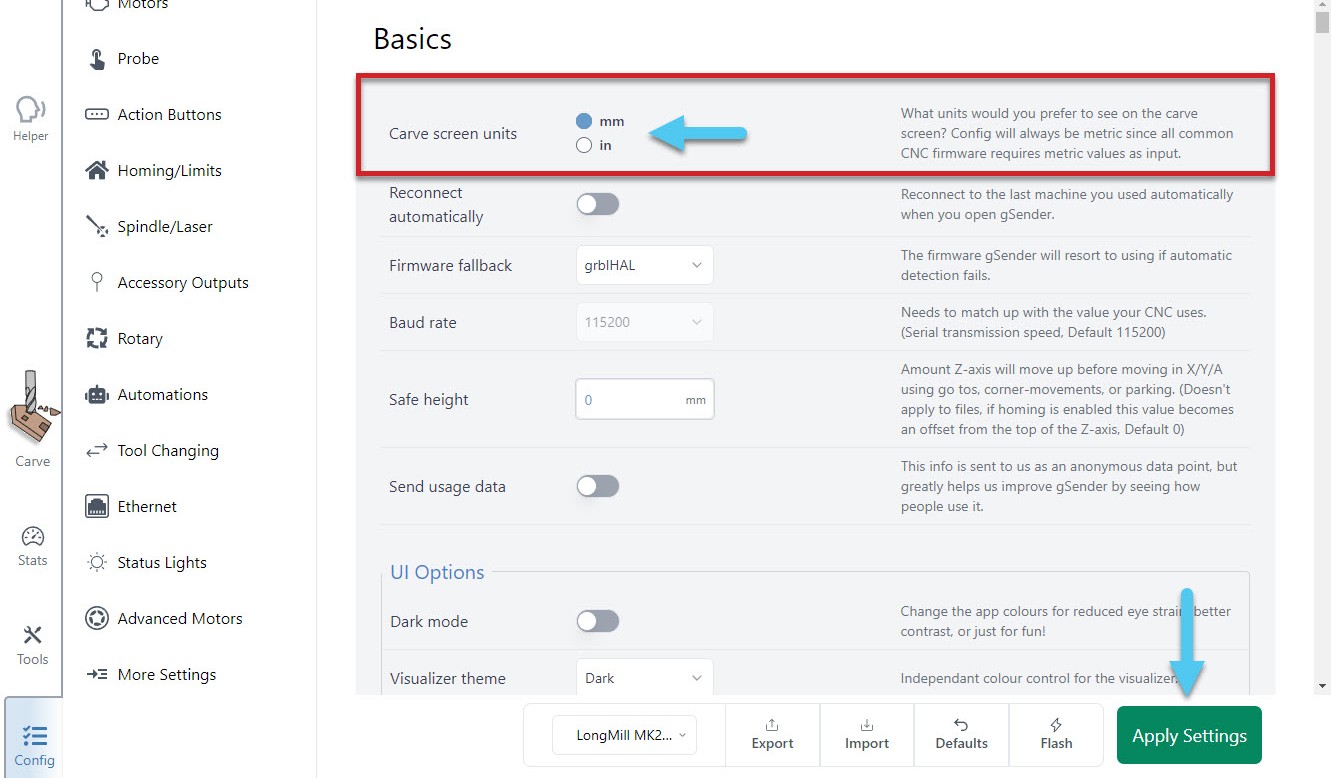
- Preferred units
- In the Basics section, change which units (mm or inches) you want to see on the main Carve screen (Config units will always display as mm)
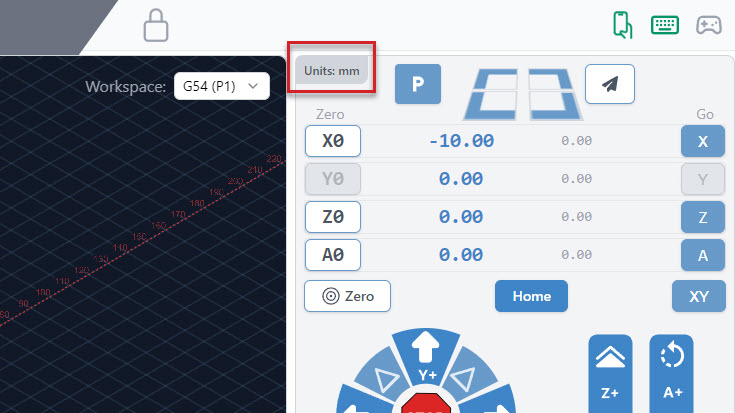
The Carve tab will always show the units you set at the top left corner of the DRO.
- In the Basics section, change which units (mm or inches) you want to see on the main Carve screen (Config units will always display as mm)
- Enable other CNC functions
- If your CNC supports them, this can include a Spindle, Laser, Rotary axis, and more. Just go to the appropriate section in Config and the first option you should see should mention “enabling” it. After Applying the changes you’ll see a new tab appear in the bottom-right of the main Carve screen.
- If your CNC supports them, this can include a Spindle, Laser, Rotary axis, and more. Just go to the appropriate section in Config and the first option you should see should mention “enabling” it. After Applying the changes you’ll see a new tab appear in the bottom-right of the main Carve screen.
- Notifications
- In Basics ➜ Notifications, these can be customized to give you warnings when you load bad files, provide information at the end of a job, and more.
- Visualizer theme and Dark mode
- In the Basics section, both these settings help change the colours in gSender based on what will be easier on your eyes. Check them out if that sounds interesting!
- And lastly your Machine Profile which is explained more in the next section
After these changes, don’t forget to hit Apply Settings so everything gets saved!
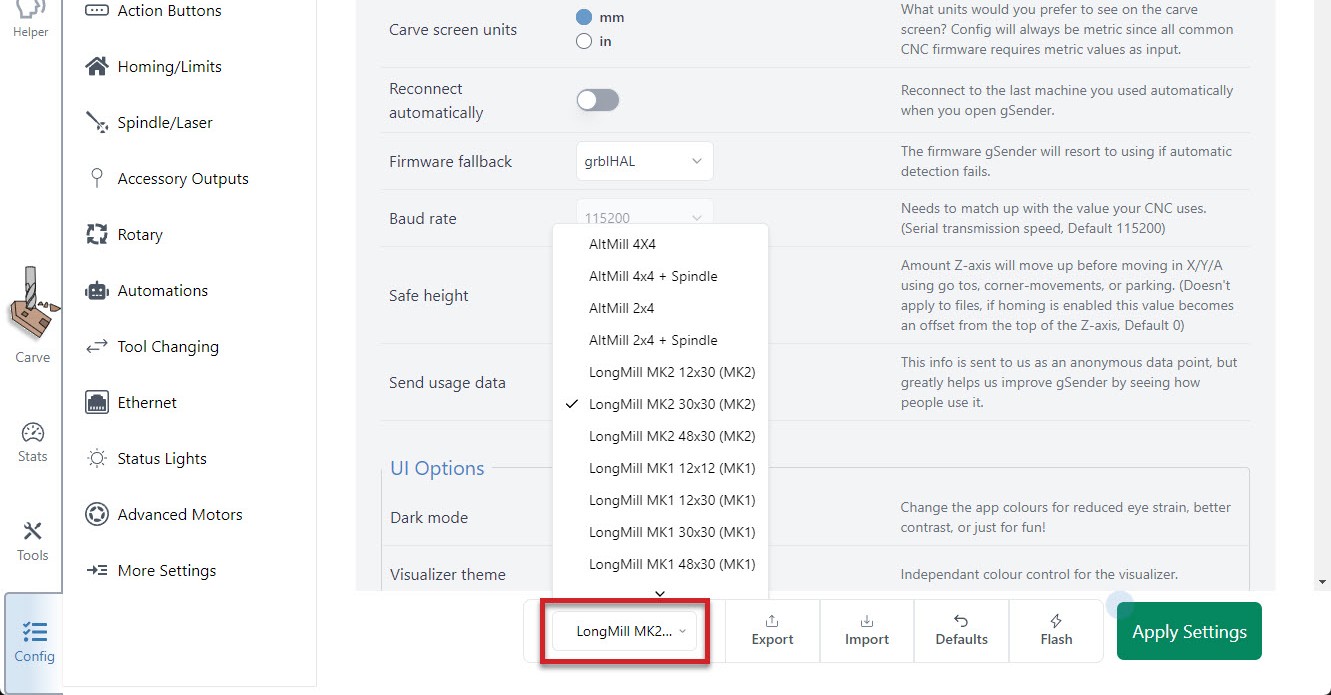
Machine Profiles
If you’re planning to make any firmware modifications, first check the current machine profile selected at the bottom of the Config tab. The default in gSender is the “LongMill MK2 30×30” so select a different option in the dropdown if that’s not your machine (if yours is not listed then select “Generic CNC”).
For supported machines, once you’ve made this change you might want to ‘Restore Defaults’ to ensure your machine has all the most up-to-date settings.
If you’re running into an issue where the size isn’t correct when using Soft Limits for example, get the size from your manufacturer or their resources and update it in Config ➜ Homing/Limits ➜ X/Y/Z axis travel. Remember to hit the Apply Settings button afterwards.

Running Longer Jobs (optional)
Windows computers can tend to have their screens and USB ports ‘fall asleep’ even in the middle of running a long carving job. This can cause your intricate cuts to stop short and the job to fail. gSender tries to fight against this by keeping your computer awake (we use similar tactics to auto-clicker apps), but sometimes this still isn’t enough so you have to change your computer settings manually.
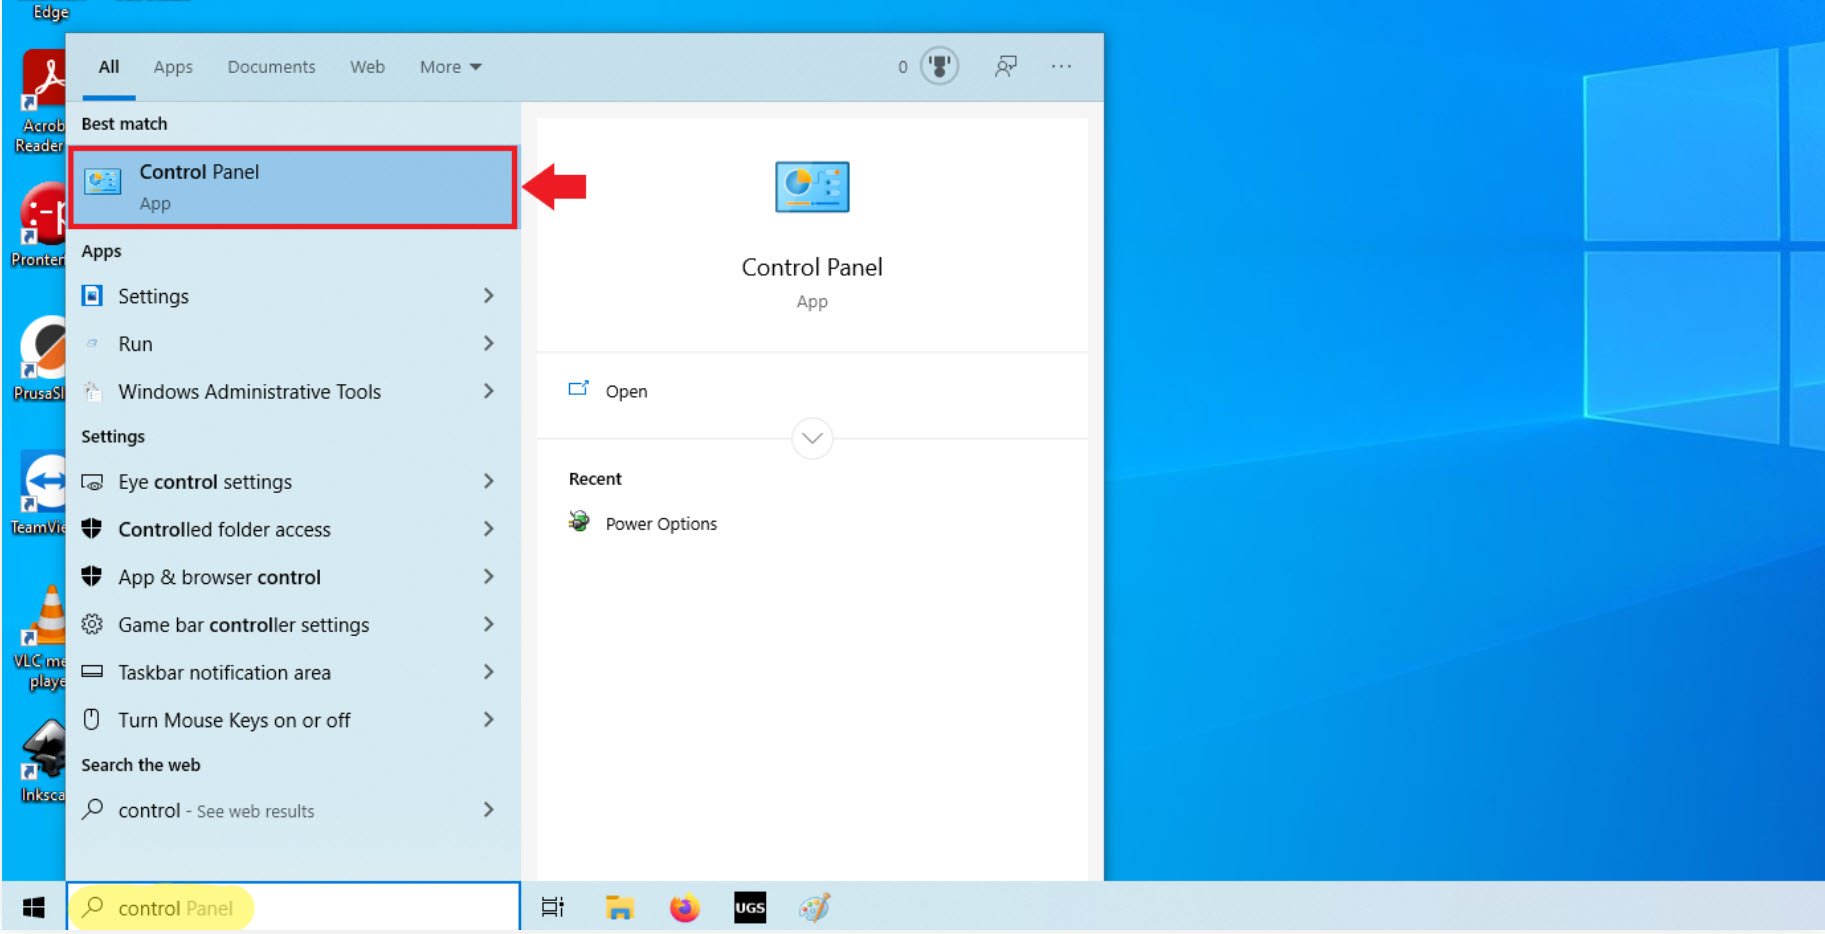
To keep the display on, you’ll want to click the Windows icon at the bottom left corner of your screen and start to type “control panel” to bring it up.
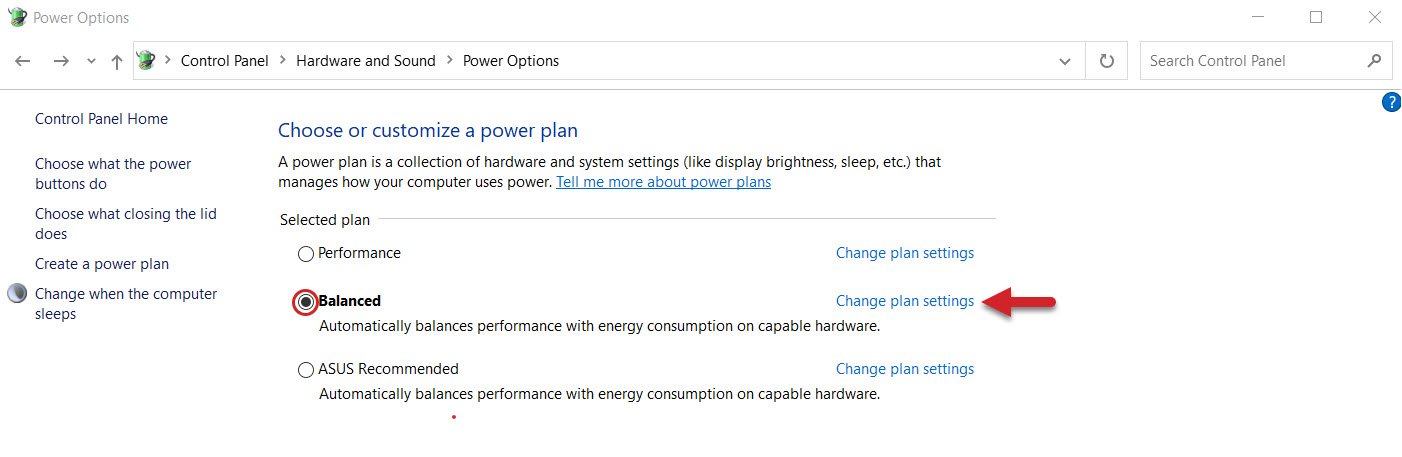
Once you’ve clicked to open it, go to Hardware and Sound then Power Options


The plan that’s currently selected (circled in the picture) will be the one that you want to change. In this example we will be editing the Balanced plan. Click on the “Change plan settings” text (highlighted with an arrow).
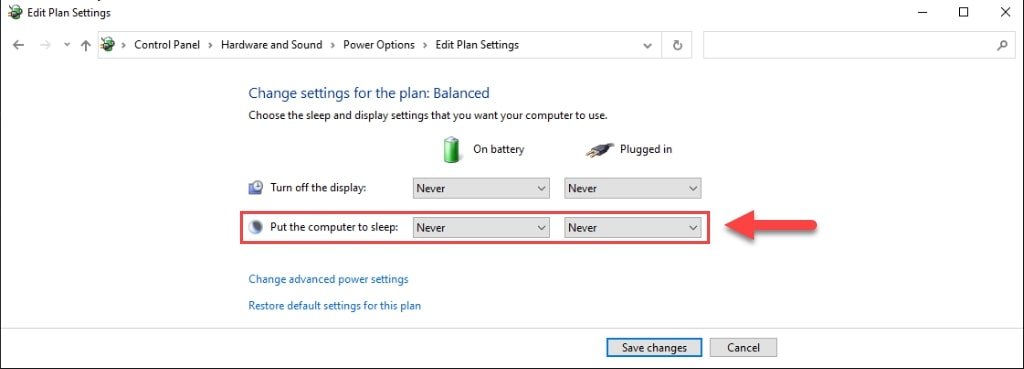
Go to the second drop-down and set both ‘battery’ and ‘plugged in’ selection to Never, save the changes to ensure that your computer never dozes off on its own.
To keep the USB ports on, click Change advanced power settings

In the separate window that appears, you’ll want to Expand the USB Settings, then USB selective suspend setting, and finally change both the ‘battery’ and ‘plugged in’ settings for these drop-downs to ‘Disabled‘. Click OK to Apply these new settings.

After having done all of this, just be mindful now that sometimes a Windows update can remove these settings. If you have an update and want to be confident running your CNC, we’d recommend checking back on these settings to make sure they’re still set properly.
Transitioning from Classic
If you’ve been comfortably using gSender 1.4.12 or earlier and are about to click to update, we’ve got some news to share with you. After over a year of hard work, gSender has been almost fully re-coded from scratch and will now be looking a little bit different compared to what you’re used to once the update is complete. We had to do this because gSender really needed some improvements under the hood, and we thought while we were at it we’d try to improve on gSender’s already great user interface as well.
Rest assured that all of the functionality you are used to is still here, it may simply have a new home. Hopefully this section helps guide you through these changes so that you won’t skip a beat.
Out with the old Classic version, and in with the New U!! Let’s dive into some specifics.
Key Enhancements
Check out this video of Chris showing off the New U release, reviewing some of the new features and what there is to be excited about!
We’ve combined similar features, and are excited to share things like our new Stats Tab which incorporates stats, maintenance, diagnostics, and more into a simple dashboard, as well as the new Config Tab which puts all of your settings into one place, so no more flipping between the Firmware and gSender settings.
You will notice right away that as you click through the new UI, there are two sections of your screen that are always available to access: the Top bar and the Left bar.
Top and Left Bars
The top bar holds several cool things, moving from left to right you will see: your connection status, notification bell, machine information, machine status, and shortcuts for remote mode, keyboard shortcuts, and gamepad profiles. Feel free to click on some of these icons to see what they do!
On the left side of the screen, you will see another bar that stays on the screen at all time, with 5 tabs. From top to bottom, these tabs are:
- The Helper Tab will aid you in understanding and correcting any errors that pop up. It also includes a tool changing wizard.
- The Carve Tab, is where you handle files, watch the visualizer, setup jobs, move the machine, probe for zero, manage macros, check out the console and more.
- The Stats Tab can be used for examining your machine stats, upcoming maintenance, your recent alarms & errors and your machine configuration. A diagnostic file download is available if you run into trouble, and links to our community, resources and Git Hub repository are also found on this tab.
- On the Tools Tab, you will see aids to help you surface a project, square or tune your machine and setup your keyboard and gamepad shortcuts.
- The Config Tab has combined both your machine settings with the firmware settings. You can search these settings or toggle the ones that have been modified.
Let’s briefly check out each tab, to see what goodies are there.
Main Carve Tab
We’ve improved the main screen, now called the Carve Tab. The right side (Blue) is very similar to Classic gSender — all the blue buttons move the machine, whether it be jogging, homing or parking. Below, you can access many functions like Probe and Rotary. The middle/left side of the screen (Red) is like a dashboard, you can load files, control the job and observe your progress in the visualizer.
The jog controls have also been redesigned for better ergonomics and touch-screen compatibility.
Stats Tab
The stats tab offers an overview of your Machine, including your recent jobs run, configuration, upcoming maintenance warnings and your recent alarms & errors. You can also download a diagnostic file for extra support, access our resources, community or github repository! Tap on one of the tabs at the bottom of this page, to see even more details!
Tools Management
The Tools tab now contains all the widgets for surfacing your project, tuning your machine, as well as creating keyboard shortcuts and gamepad profiles. In this short video, you can see where the Surfacing and Calibrate Tools are on Classic gSender, then we flip over to the Tools tab on the New U.
Streamlined CNC Setup
The Config menu has been refined to display only relevant sections based on your machine’s connection status and selected profile. It’s a combination of the preferences mixed with the firmware settings, so now all settings are in one place. In this short video, you can see these moved from the top right (Classic) to the bottom left corner of the screen (New U).
One cool thing is that modified settings are highlighted, and a ‘Show Modified’ toggle allows you to filter and manage settings that have been changed from the machine default. You can reset to default settings at any time if you find a change you have made isn’t working.
New Features
There are also a couple of new features that we should mention. Connecting is now easier! gSender now automatically detects your firmware type (Grbl/grblHAL) upon connection, selecting the appropriate controller settings. This feature simplifies the process, as you can select your default firmware choice in Config, and connect with a simple button press.
We’ve also made several visual and usability upgrades to gSender. The visualizer now supports pinch-to-zoom on touch screens, Dark Mode to reduce eye strain, and includes a redesigned Lightweight Mode with easy presets. Turn these on by going to Config ➜ Customize UI.
If you’re using a tablet or vertical screen, Portrait Mode is now supported—just rotate your device or change your display orientation.
Some other noteworthy features include:
- Console Enhancements: Added console clearing functionality and arrow-scrollable input history for improved usability.
- Visual Tweaks: Numerous UI adjustments, including updated icons, responsive sidebar sizing, and improved text legibility.
Get Started
To explore these new features:
- Download gSender 1.5.0: Access the latest version from the Sienci Labs GitHub repository.
- Refer to the Official Documentation: The gSender Docs provide comprehensive guidance on utilizing the software’s capabilities.
- Engage with the Community: Share your experiences, provide feedback, and seek assistance on the Sienci Community Forum.
By familiarizing yourself with these updates, you can leverage the enhanced functionality and improved user experience that gSender 1.5.0 offers!