
This section covers different setups and customizations we think you’ll find helpful for your gControl Panel Computer. You’ll also find specific information about updates, including drivers and other software that comes pre-installed on your gControl.
How to add gSender to startup with Windows
This setup allows gSender to start-up automatically when powering on your computer. You can follow these same processes to add any other programs you may want to start automatically.
Step 1: Search for “run” on the Search and open it or Windows + R using a keyboard.
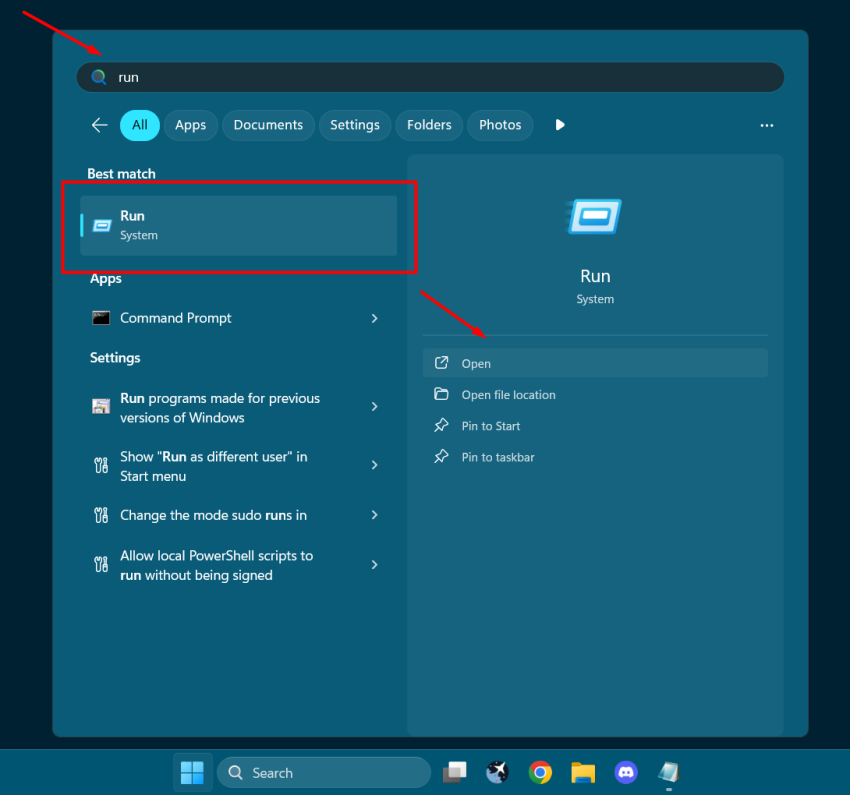
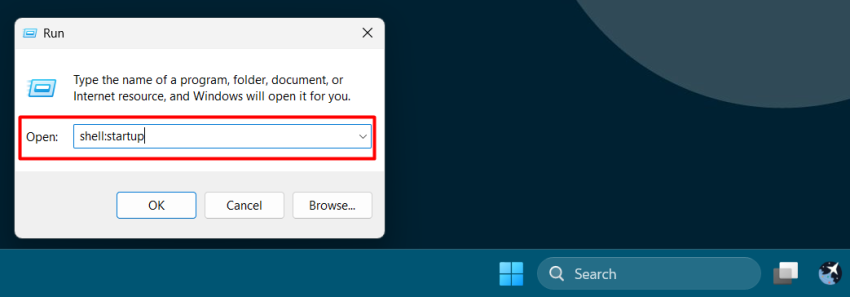
Step 2: Type “shell:startup” and press Enter. This will open the Startup folder, which is where you can add shortcuts to programs that you want to run automatically when your computer starts.
Step 3: Create a shortcut for the gSender. Press the screen for 3s to open the proprieties as below or right-click if using a mouse.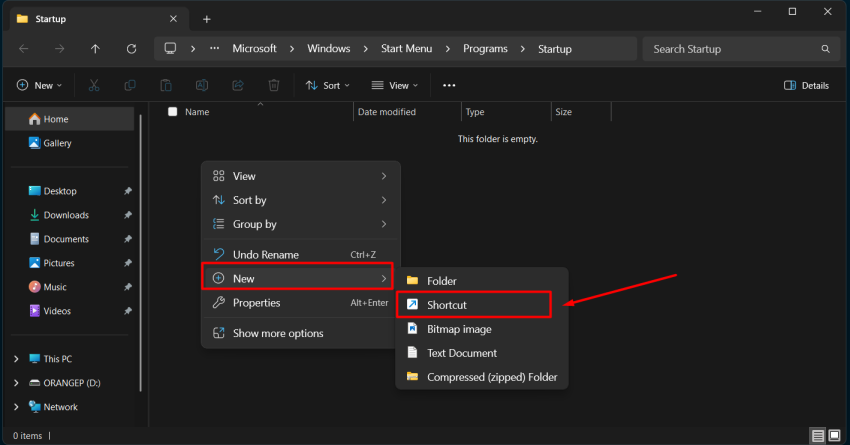
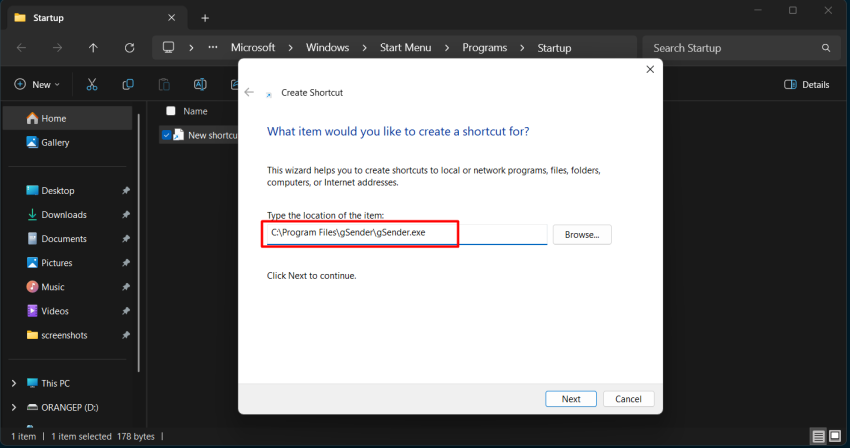
Step 4: Type the location of the gSender executable. “C:\Program Files\gSender\gSender.exe”
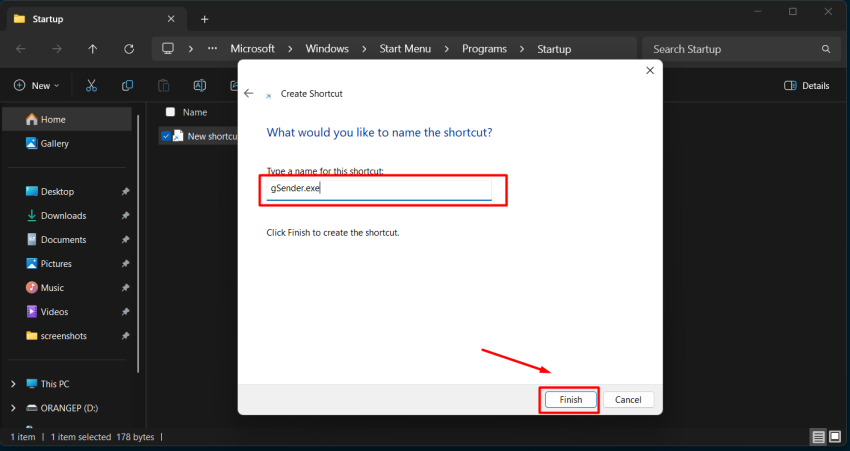
Step 5: Type a name for the shortcut.

Step 6: Click on the Finish button.
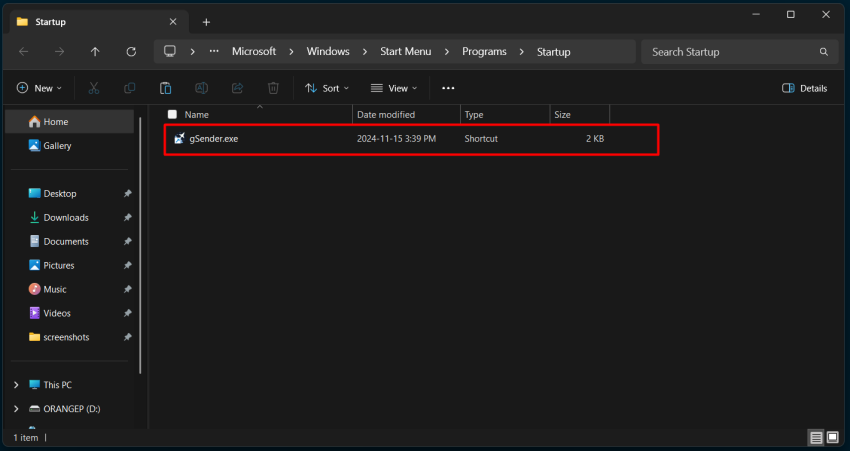
Step 7: Now that you have created the gSender.exe shortcut, you can close Windows and restart the computer to test it. The gSender will open automatically as soon as your Windows starts. (It could take more time depending on the other apps that you already have set to start up with your Windows).
** You can also check the #open-faster topic on the gSender installation page to speed up gSender’s startup by excluding its installation folder from Windows Defender scans.
How to update the Bluetooth driver on your gControl
If you can find the device but get the message: “Try connecting your device again,” you should probably update the Bluetooth driver of your machine.

The steps below will guide you through the installation.
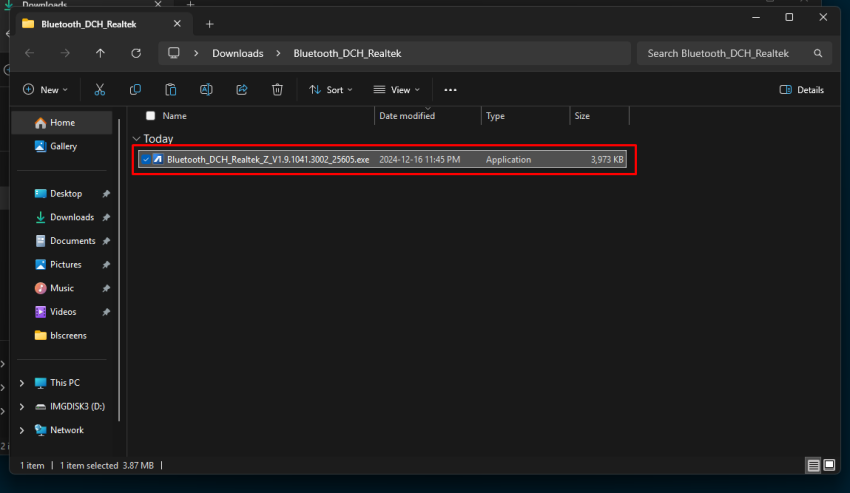
First, download the driver here.

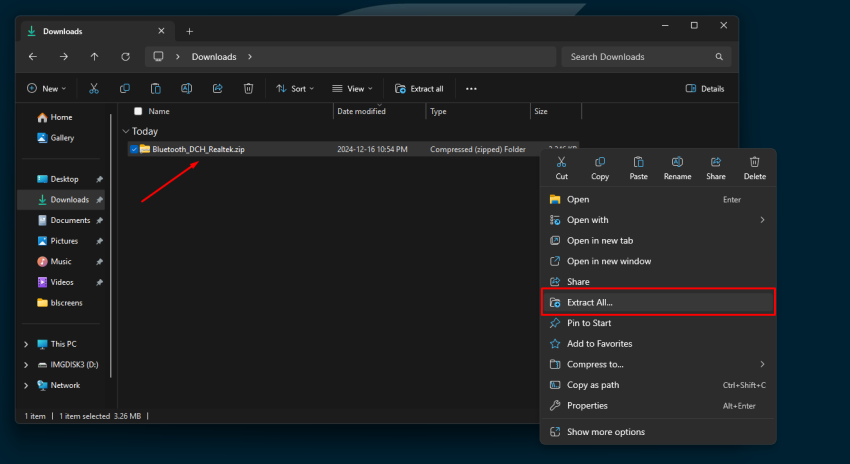
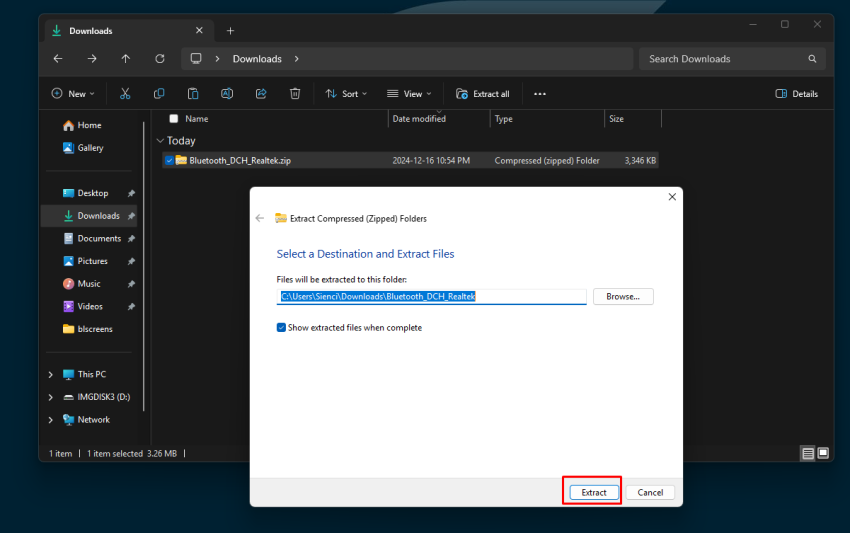
After downloading the zip folder, Extract All…
When the extraction is complete, Windows will show the folder with the .exe file Bluetooth_DCH_Realtek_Z_V1.9.1041.3002_25605.exe.
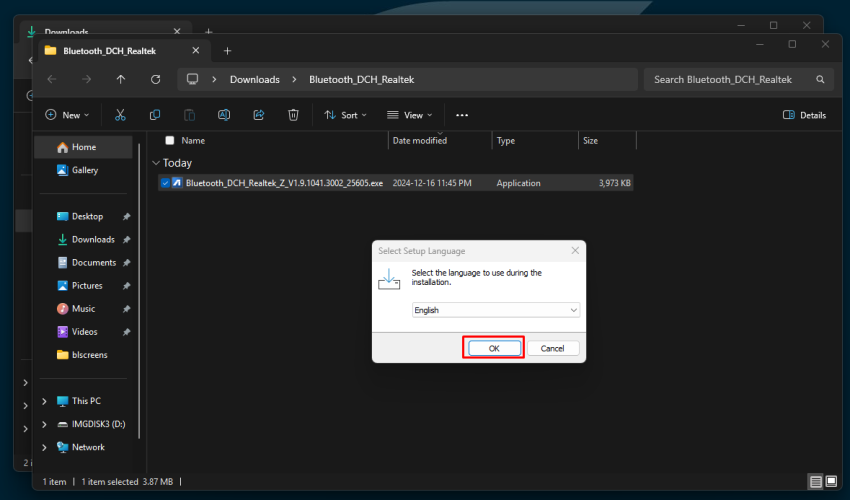
Click (2x) to install and then OK.
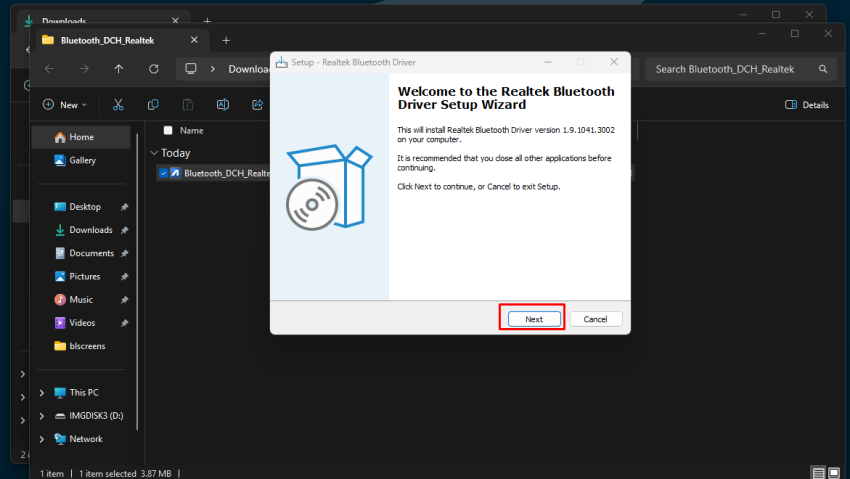
Click Next.
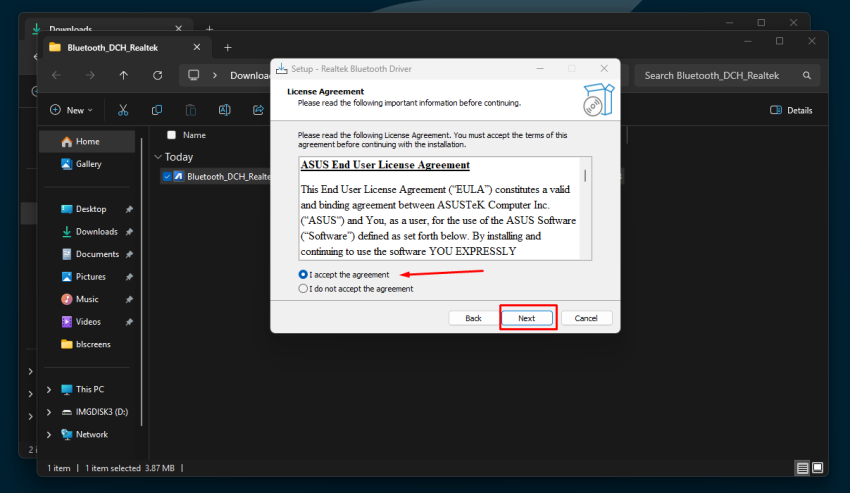
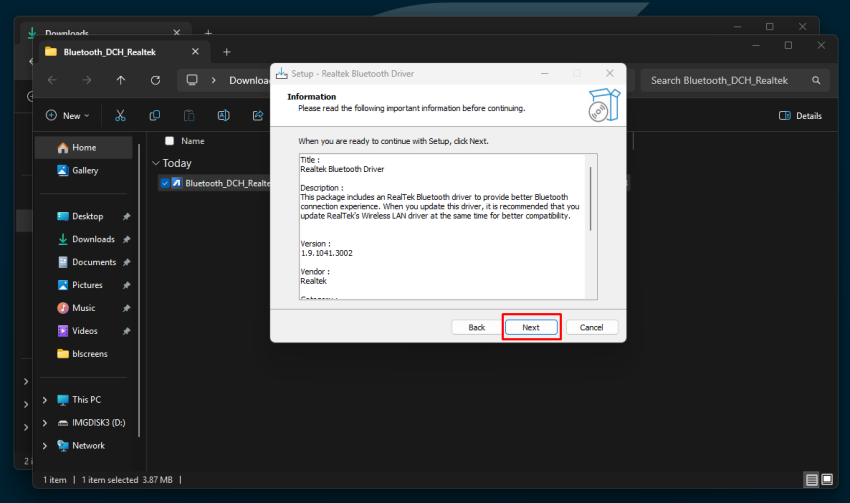
Accept the agreement and click Next.
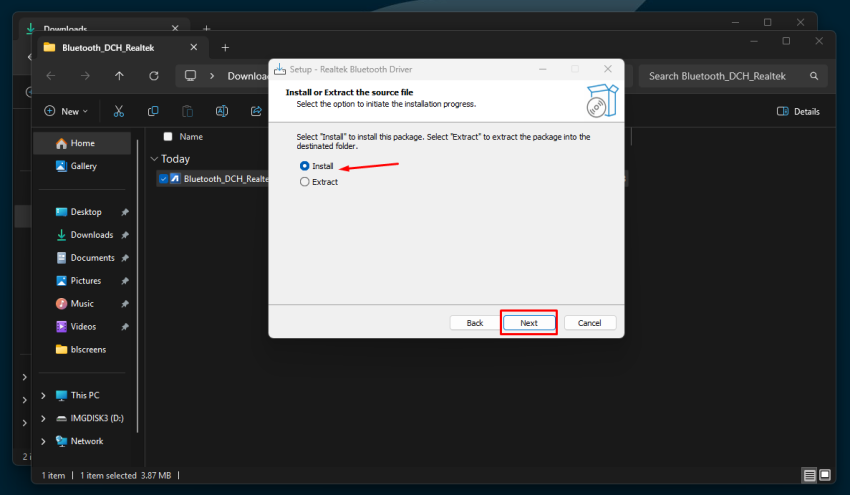
Select Install and Next.
Next.
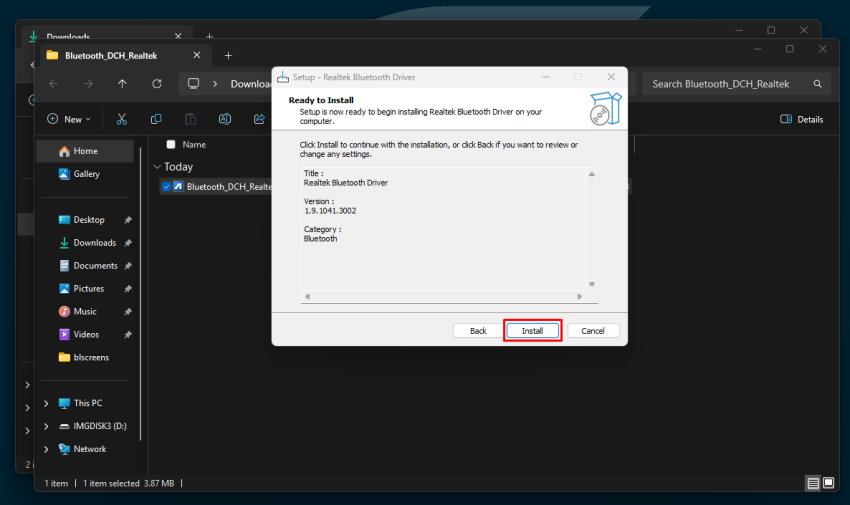
Install.
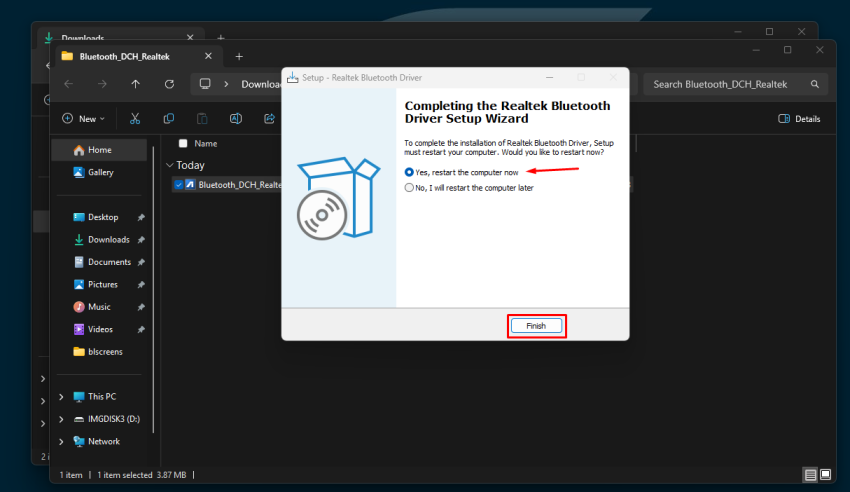
You should restart the Windows after the installation, as requested. Keep the selection and Finish.
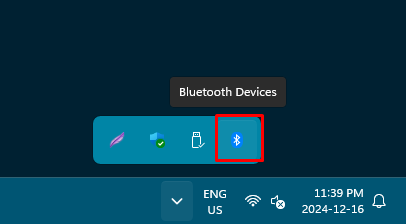
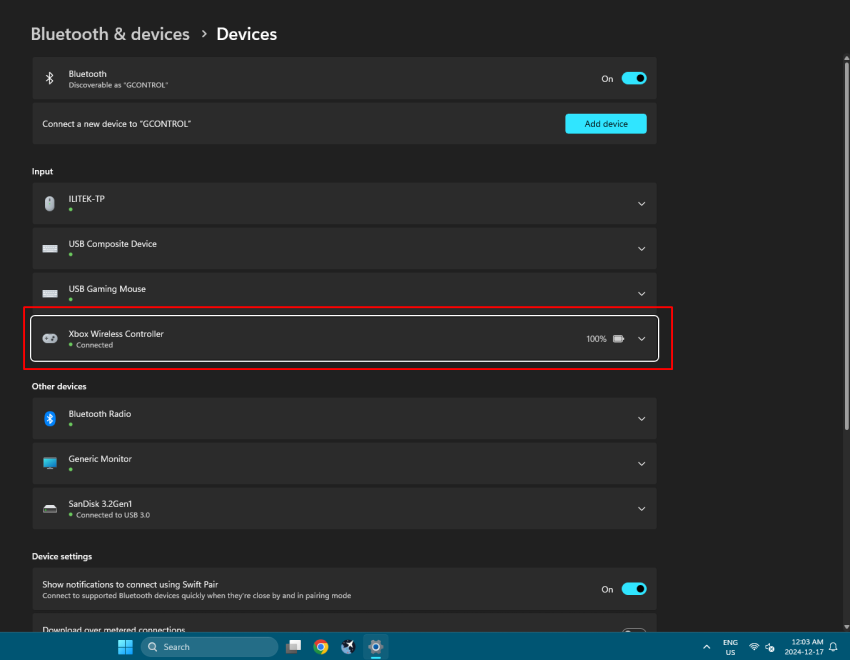
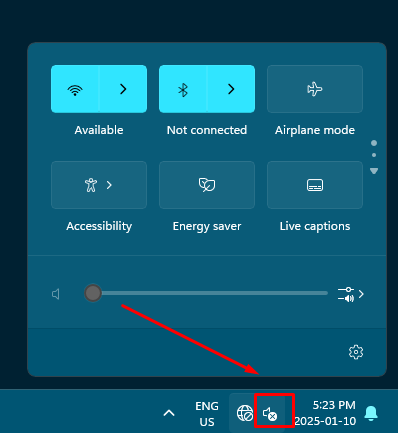
So now you can go to Bluetooth & devices using the search bar or use the Bluetooth icon as below:
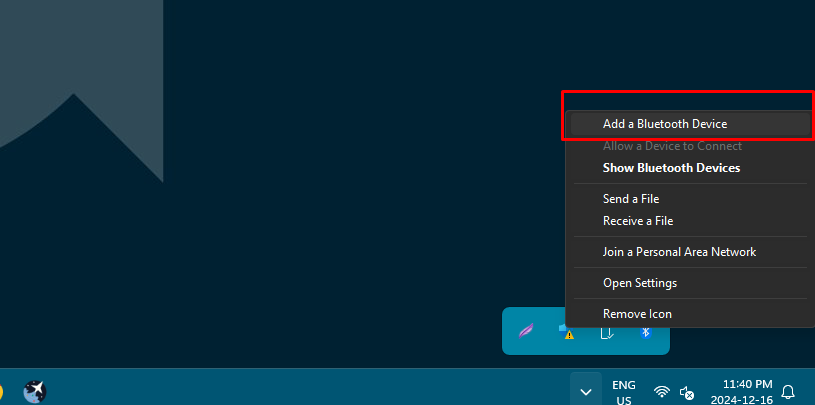
Add a Bluetooth Device.
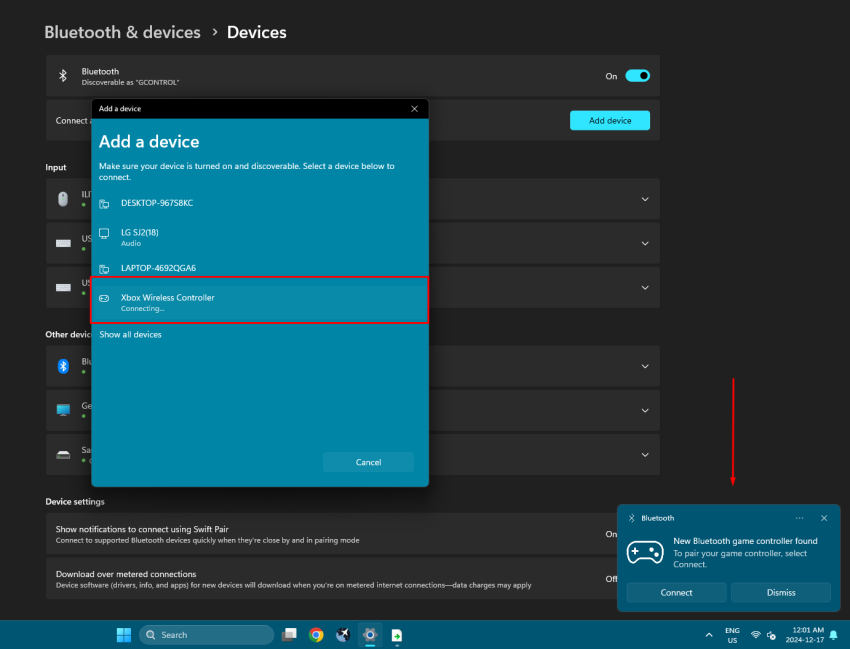
Add a device and choose your device on the list.
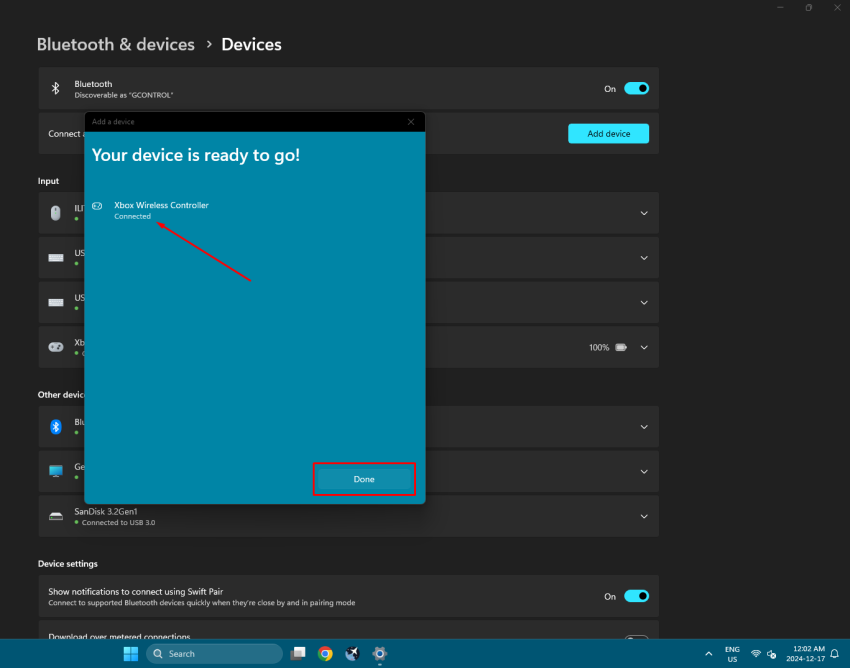
Done. You are ready to go!
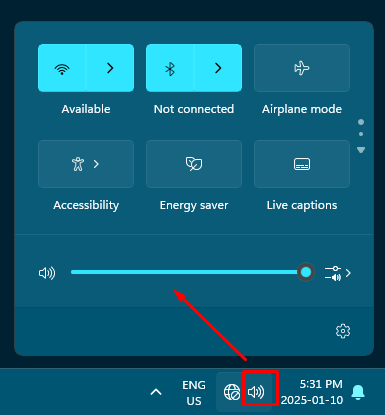
How to fix audio driver issues on your gControl.
If you’ve noticed that the speaker icon on your gControl has an “X” and the audio isn’t working, the steps below will help you fix it quickly and easily.
** This issue only affects the first units that were shipped. The next units will already come with the updated drivers, and Windows Update can handle most of the drivers your device needs.
So don’t worry. These steps are only needed if you still have the problem after updating Windows.
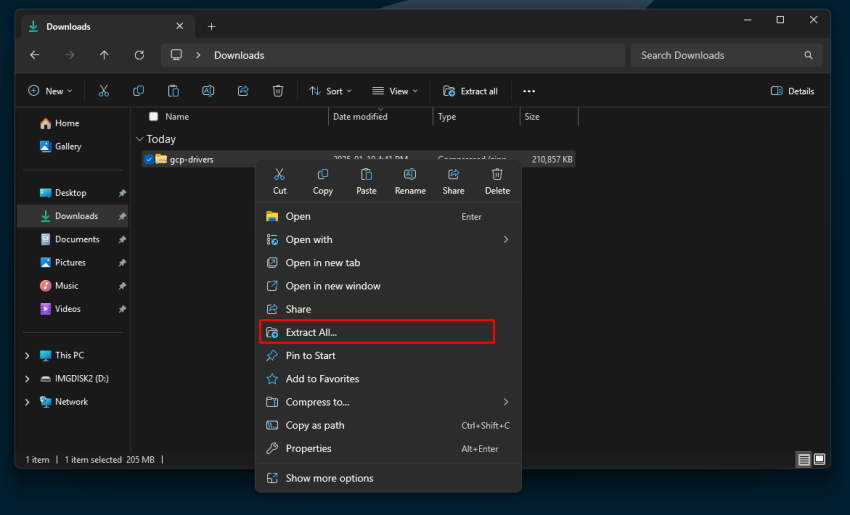
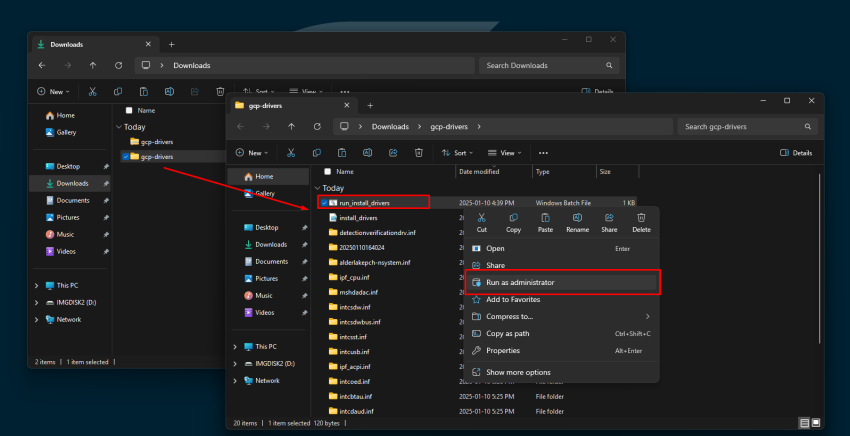
First, download the “gcp-drivers.zip” file by clicking here.
Leave the downloaded zip file in your Downloads folder (it will go there by default), and then right-click on the gcp-drivers.zip and click “Extract All…”
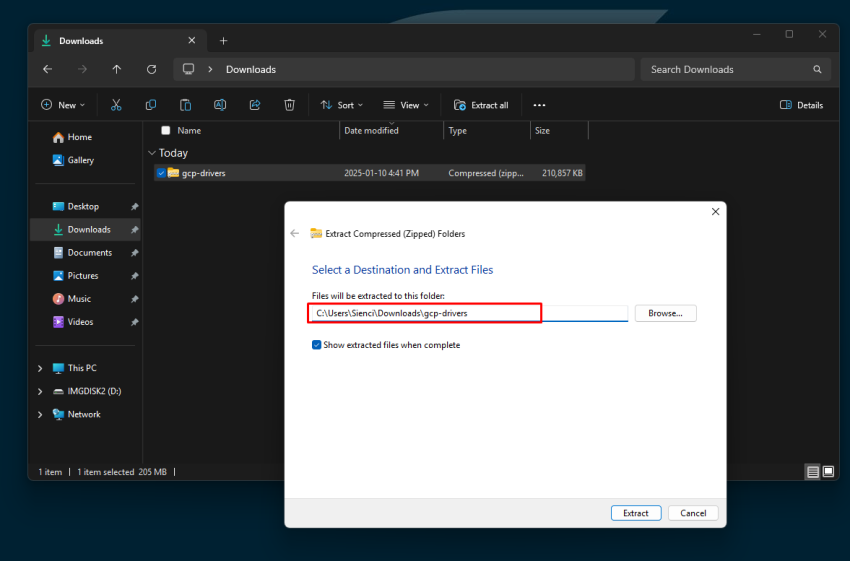
Click the “Extract” button and wait. The folder will appear once the process is completed.
With the gcp-drivers folder open, find the “run_install_drivers” file, right-click on it, and select “Run as administrator“. Click “Yes” on the next prompt.
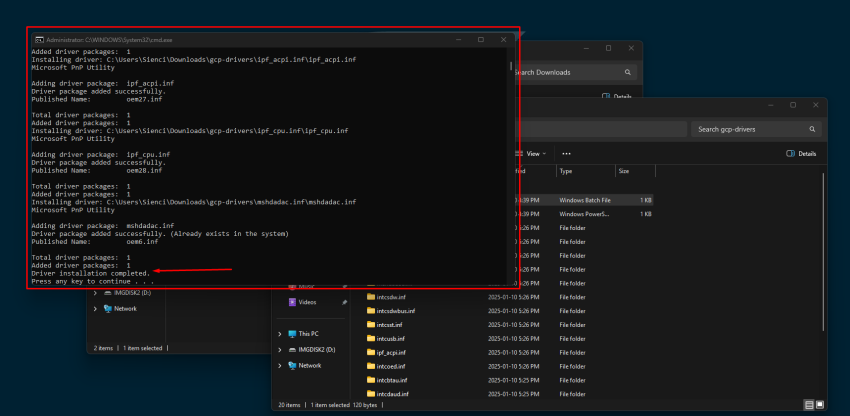
The command prompt will add the driver packages. Wait until you see the message “Driver installation completed.“. Then, press any key to close the window.
Restart the gControl, and you will see the speaker icon without the “X”, and the audio will work as expected.
Connect your SLB to the gControl Panel using an Ethernet cable
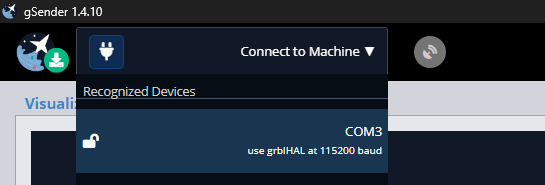
First, connect the USB/USB-C cable from your gControl to the SLB and on gSender connect to the machine as shown below:

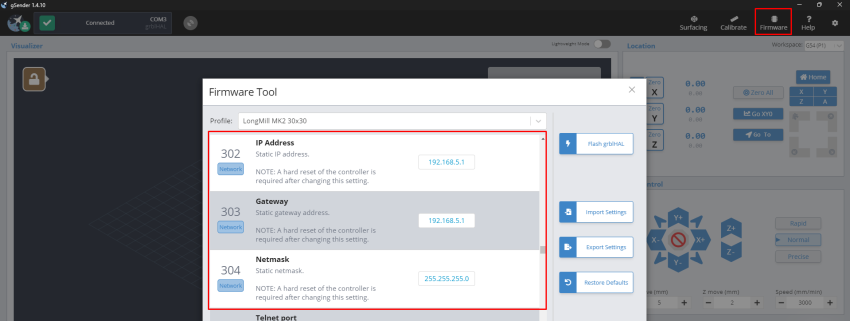
Go to Firmware and scroll down to find the 302, 303 and 304 options. By default, they should have these values:
302 (IP Address): 192.168.5.1
303 (Gateway): 192.168.5.1
304 (Netmask): 255.255.255.0
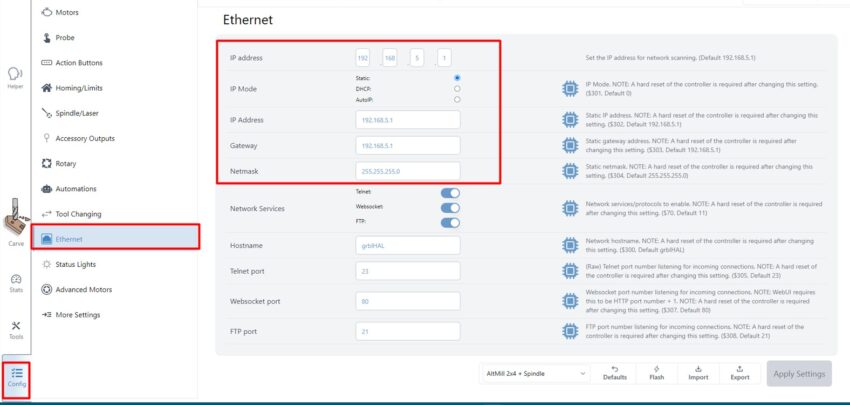
For the new gSender version:
After confirming, unplug the USB and connect the Ethernet cable from your gControl to the board. You should see a green light on and a yellow light blinking at the SLB port.
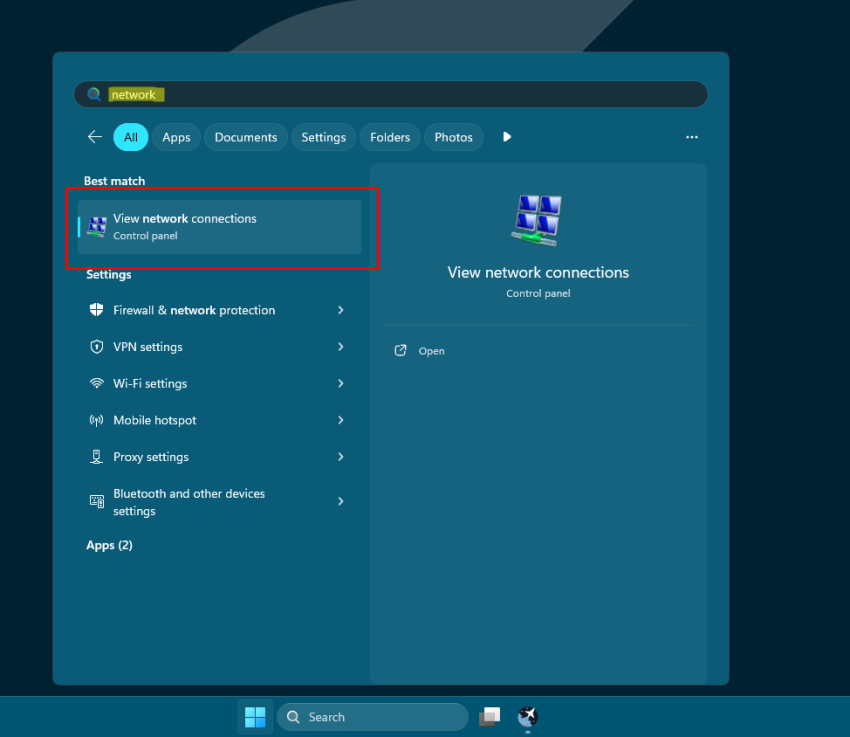
Now, on your gControl computer, find the Network Connections. If you write “network” in your search bar, a “View network connections” will appear; click on it.
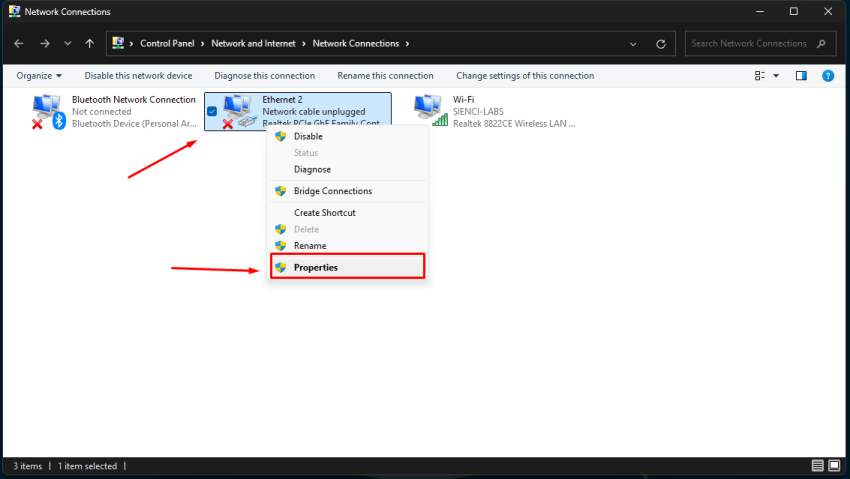
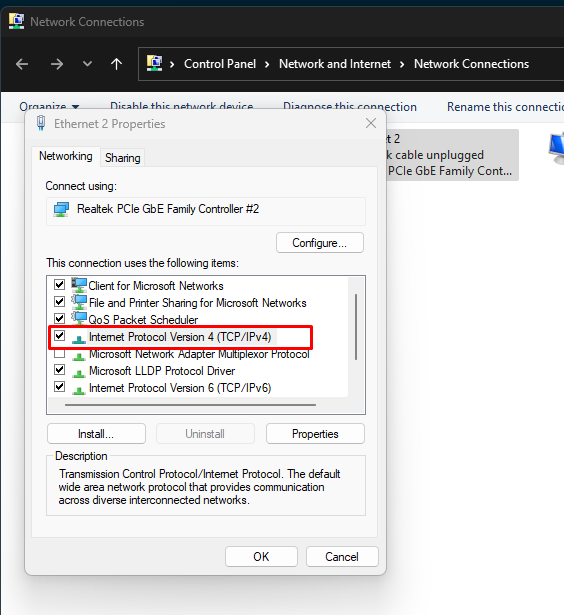
In Network Connections, right-click on “Ethernet 2” and click on Properties.
Double-click on Internet Protocol Version 4 (TCP/IPv4)
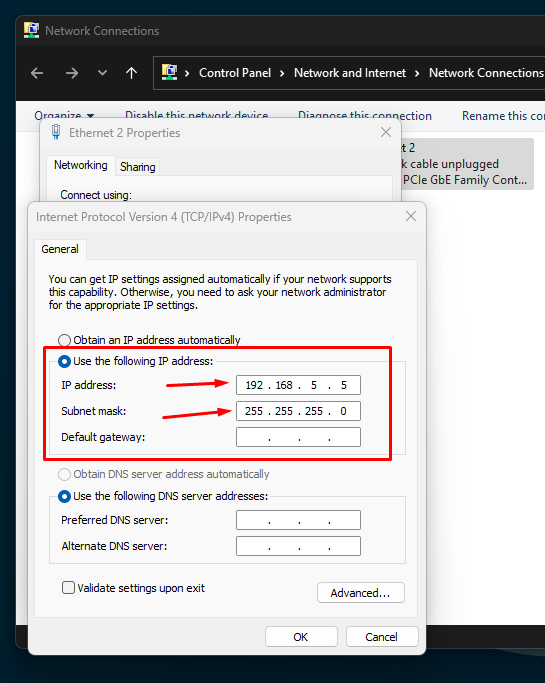
Select the option “Use the following IP address:” and fill in the fields IP address and Subnet mask as shown.
** You can assign any IPs from 192.168.5.2 to 192.168.5.254. I chose 192.168.5.5 for this tutorial.
Make sure this information matches and you enter the correct subnet mask. Click OK after that.
Probably after this configuration, your Ethernet 2 should be showing it:

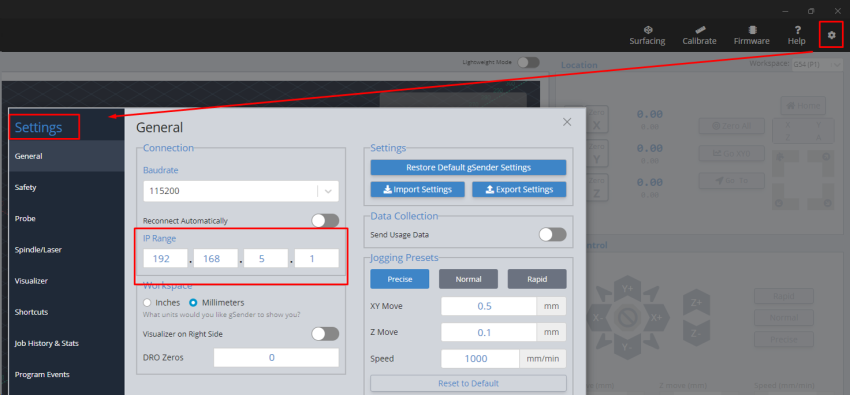
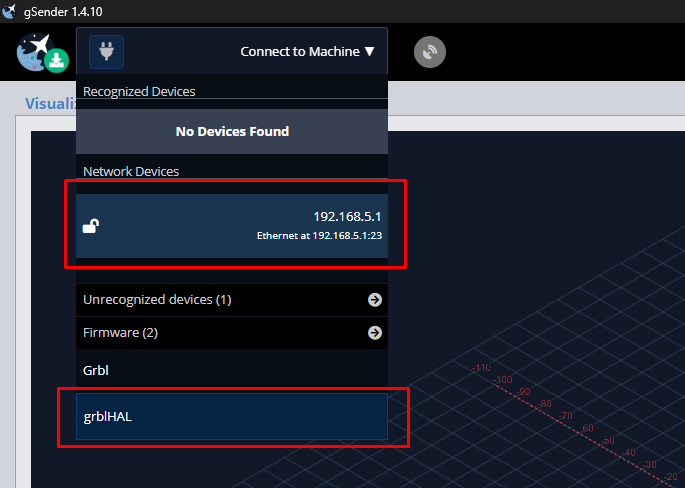
In gSender’s general settings, ensure the IP range matches the EEPROM IP.
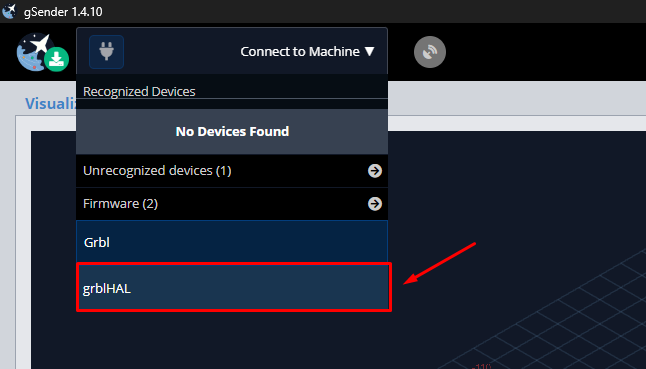
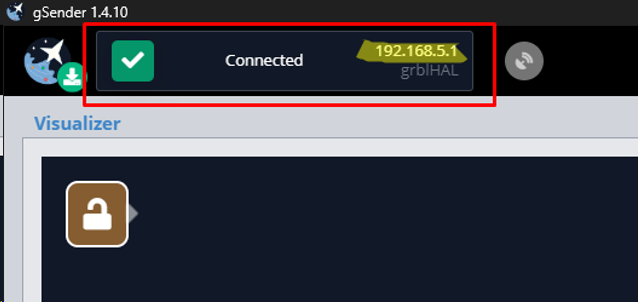
With grblHAL firmware selected, choose Network Devices and confirm it connects successfully.
How to Change the Display Scale on gControl
By default, the display scale is set to 125%. You can adjust it to fit your needs using these steps:
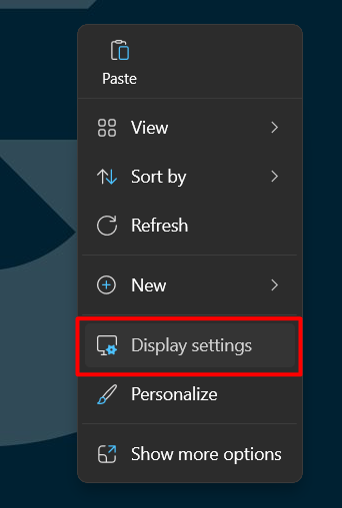
Step 1: Tap and hold (or right-click if you are using a mouse) on the desktop, and then select Display settings from the menu.
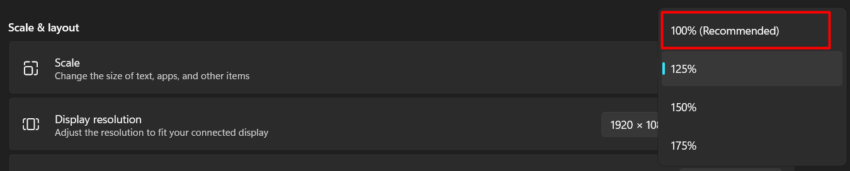
Step 2: In the Settings window, under System > Display, scroll down to the Scale & layout section.

Step 3: Click the drop-down menu and choose the scale percentage that works best for you. Common options include 100%, 125%, 150%, etc.
Step 4: Once selected, Windows will automatically apply the new scale. Some changes may take a few seconds.
Tips:
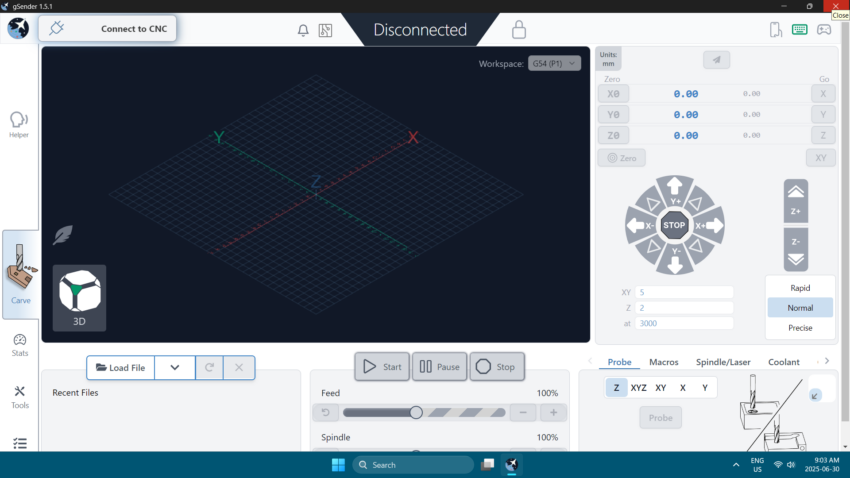
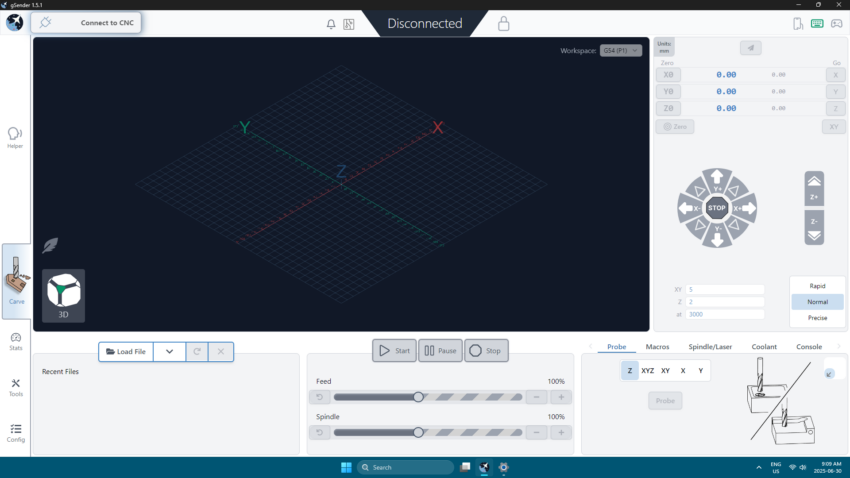
For the new gSender 1.5.1, using 100% scale gives the best layout and fit for the full interface.
gSender-1.5.1 with 125% Scale:
gSender-1.5.1 with 100% Scale:
However, if 100% feels too small, you can keep the scale at 100% and only increase the text size.
To change just the text size:
In the Display settings page, scroll down and tap Text size (or go to Accessibility > Text size).
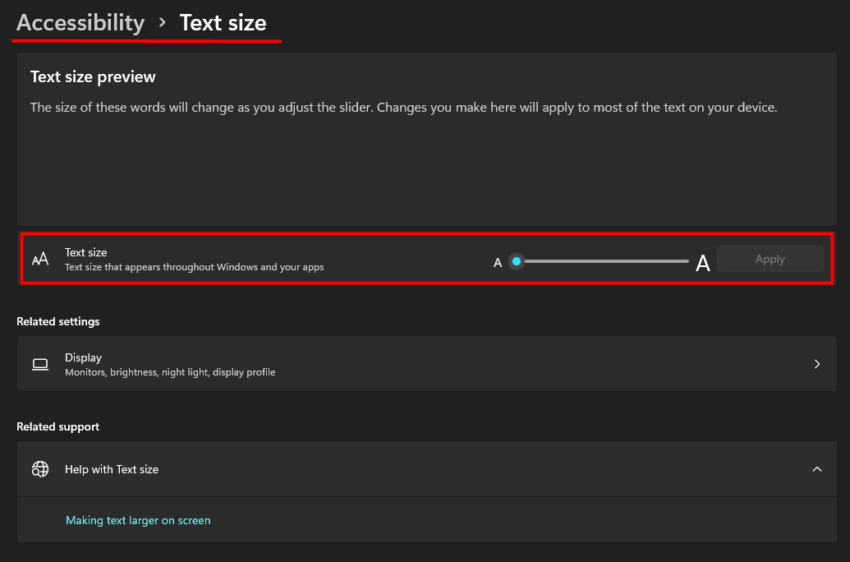
Use the slider to adjust the text size to your preference..
Tap Apply.
This way, gSender will stay sharp and properly sized, while text across Windows becomes easier to read.
How to Fix gSender Getting Stuck While Loading
If gSender gets stuck on the loading screen and won’t open on your gControl, try uninstalling the current version and follow the steps below before installing another version.
You can also try the steps without uninstalling, but I recommend removing the app first for better results.
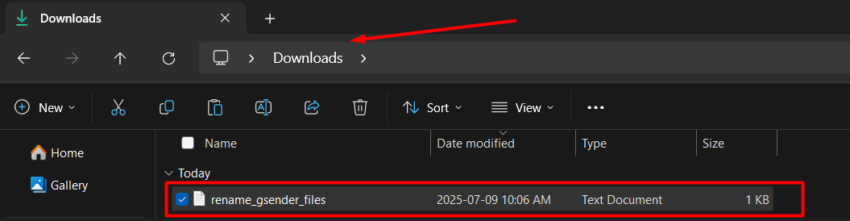
Step 1: Download the rename_gsender_files.txt
Step 2: After downloading the file, go to the Downloads folder:
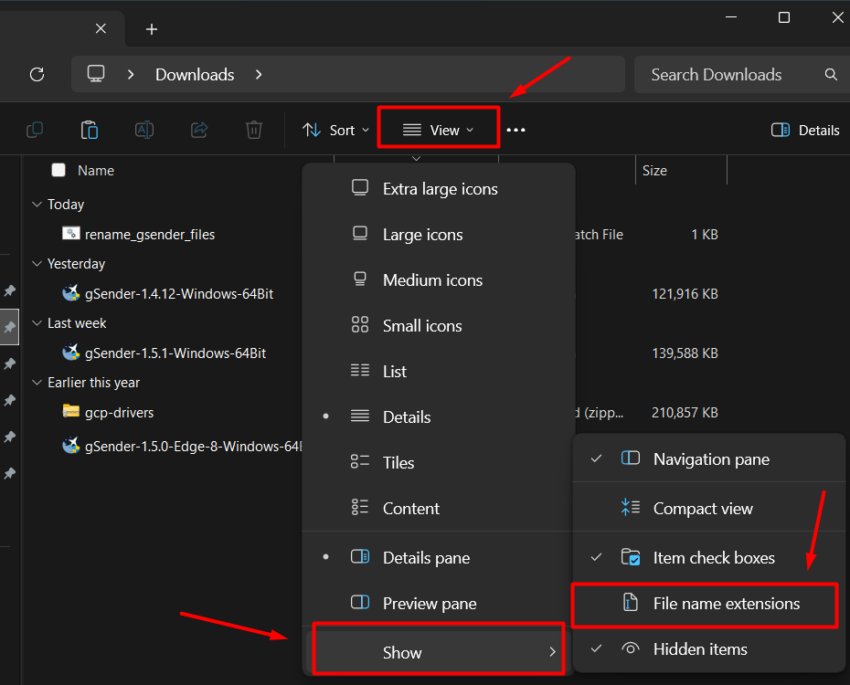
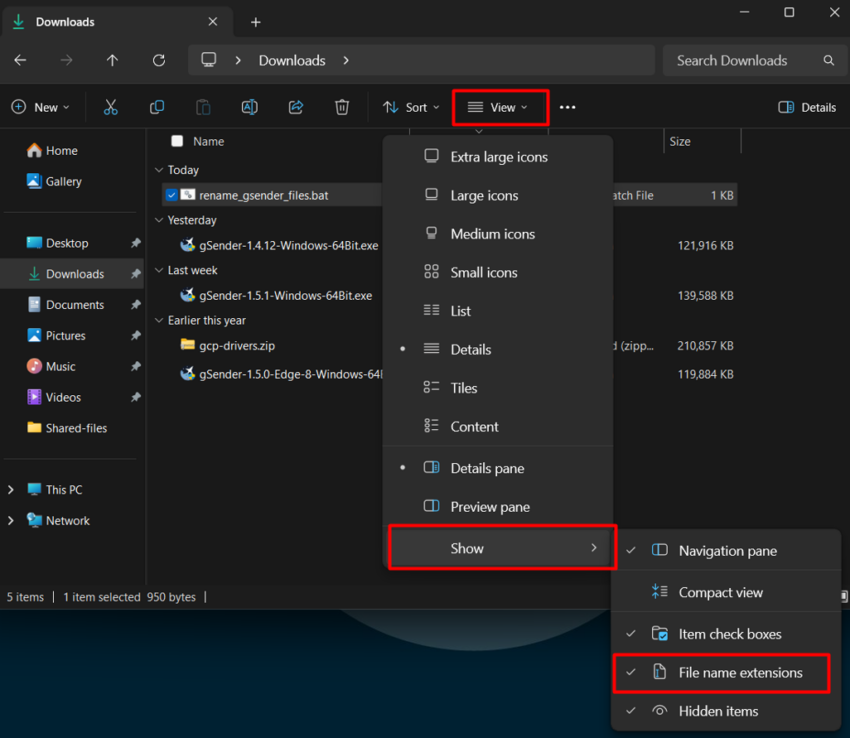
By default, Windows hides file name extensions. To show them, go to View > Show > File name extensions and make sure it’s selected.

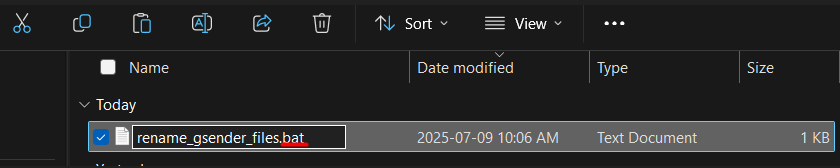
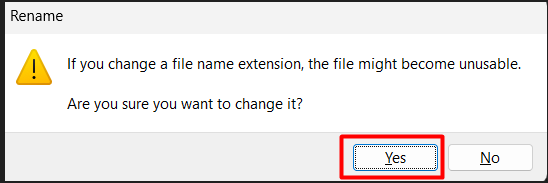
Step 3: Tap and hold the file (or right-click if you’re using a mouse), then click “Rename”. Change the file name from rename_gsender_files.txt to rename_gsender_files.bat.

Click Yes:
Click More info:
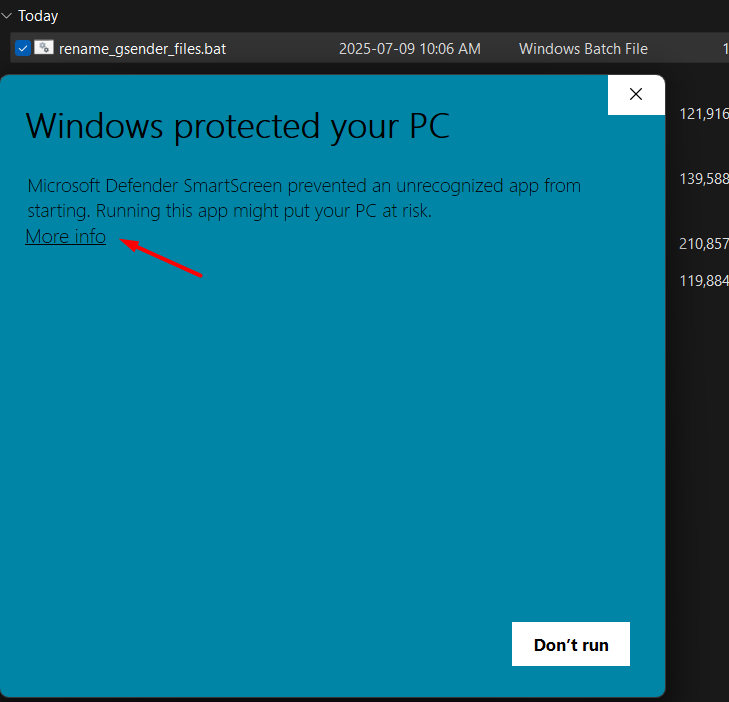
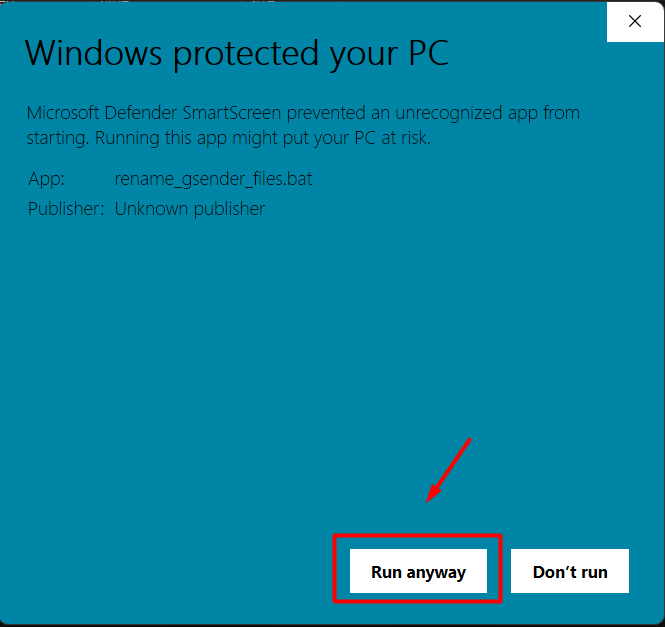
Click “Run anyway”:
The Command Prompt window will show the results. Press any key to close it.
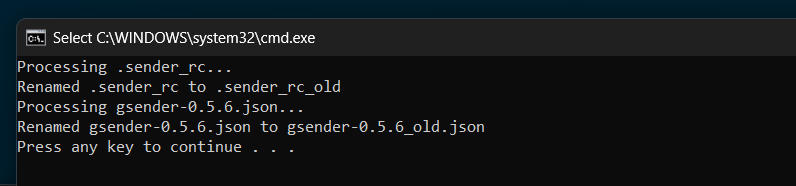
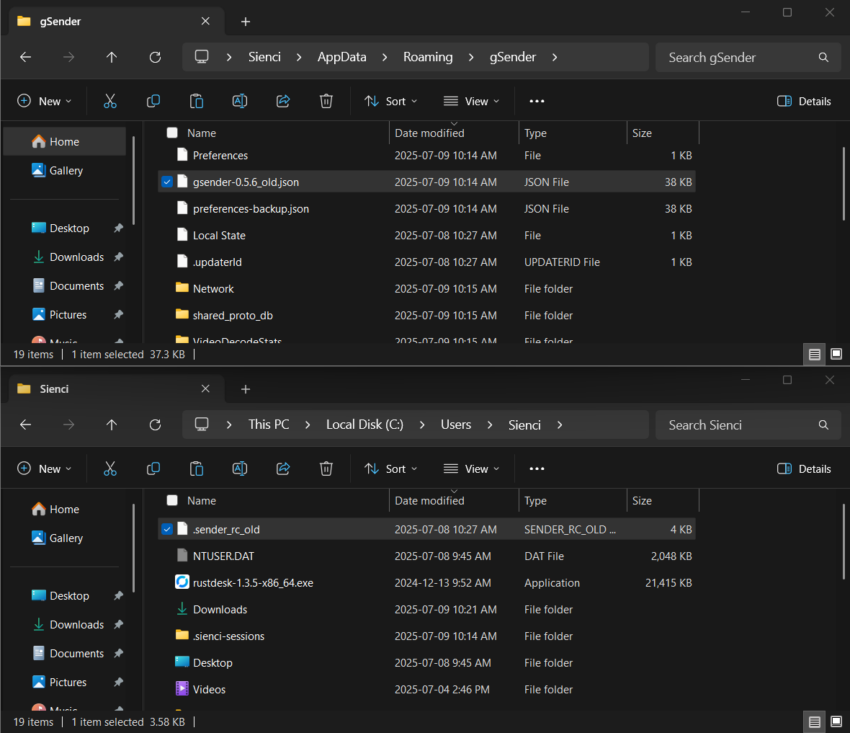
The .bat file you just ran will rename the files gsender-0.5.6.json and .sender_rc. This removes gSender’s reference to them, so the next time you open the app, it will automatically create new files.
If you prefer, you can deselect the option to show file extensions.
Step 4: After completing this process, try opening gSender if you kept it installed, or reinstall it if you had uninstalled it earlier.
gSender should now open without any errors.
Adding Drivers to Your gControl
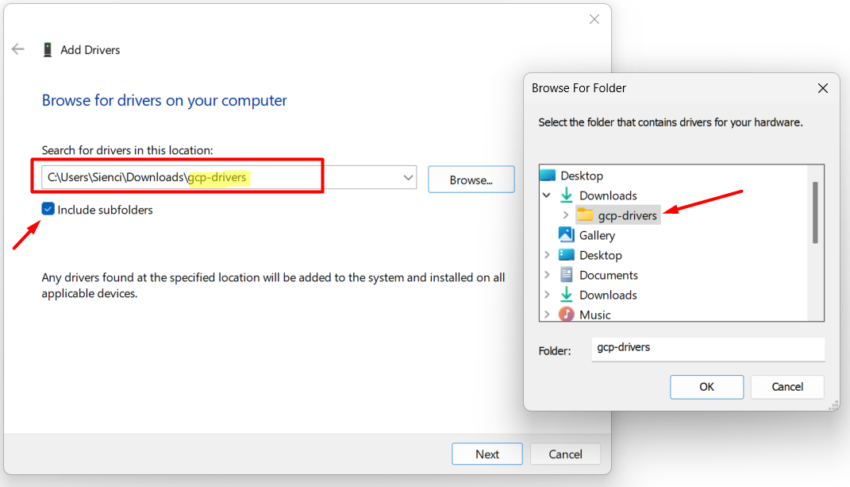
If any drivers are missing or need to be reinstalled and Windows doesn’t find them automatically, you can download the gcp-drivers folder. Leave the ZIP file in your Downloads folder, then right-click it and select “Extract All…”.
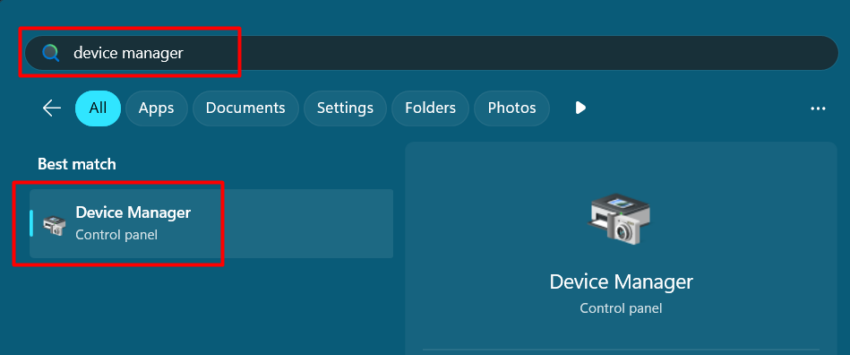
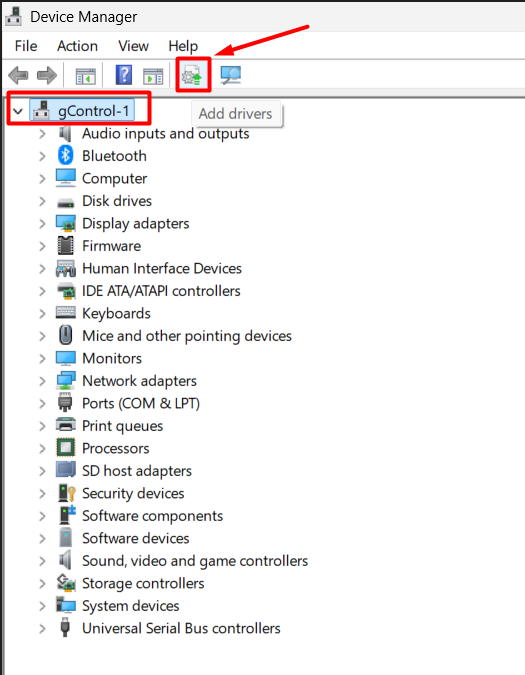
Next, open Device Manager by typing it in the search bar and selecting it. Click on your device name (for example, gControl-1), and then click the “Add drivers” icon.
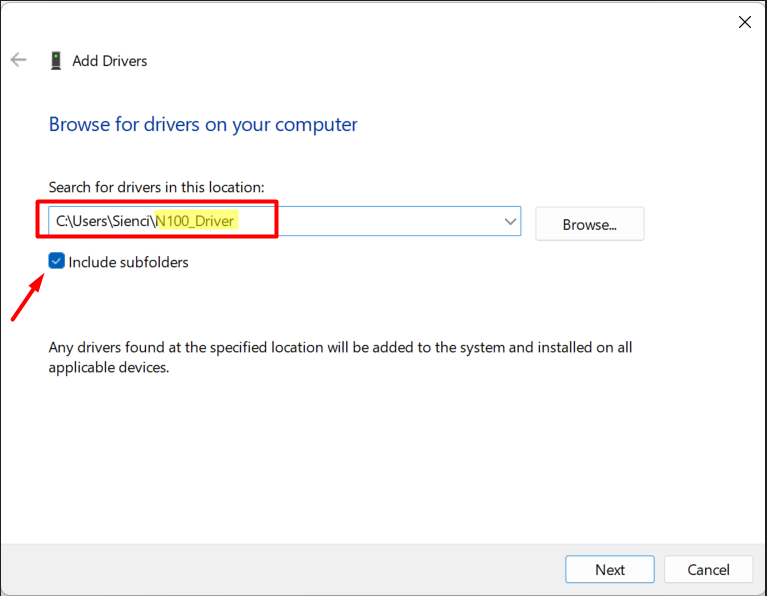
If you see the path C:\Users\Sienci\N100_Driver in the search bar, simply click Next, and Windows will automatically install the drivers. If the path doesn’t appear, click Browse, locate the extracted gcp-drivers folder in your Downloads, select it, and click Next.
Or
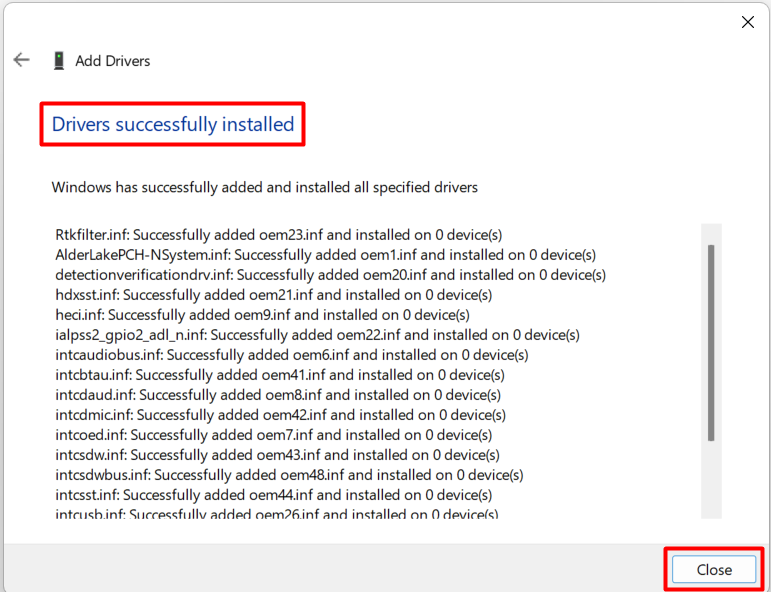
Windows will then automatically install all the necessary drivers.
How to Set the Power Button to Turn Off the gControl Screen
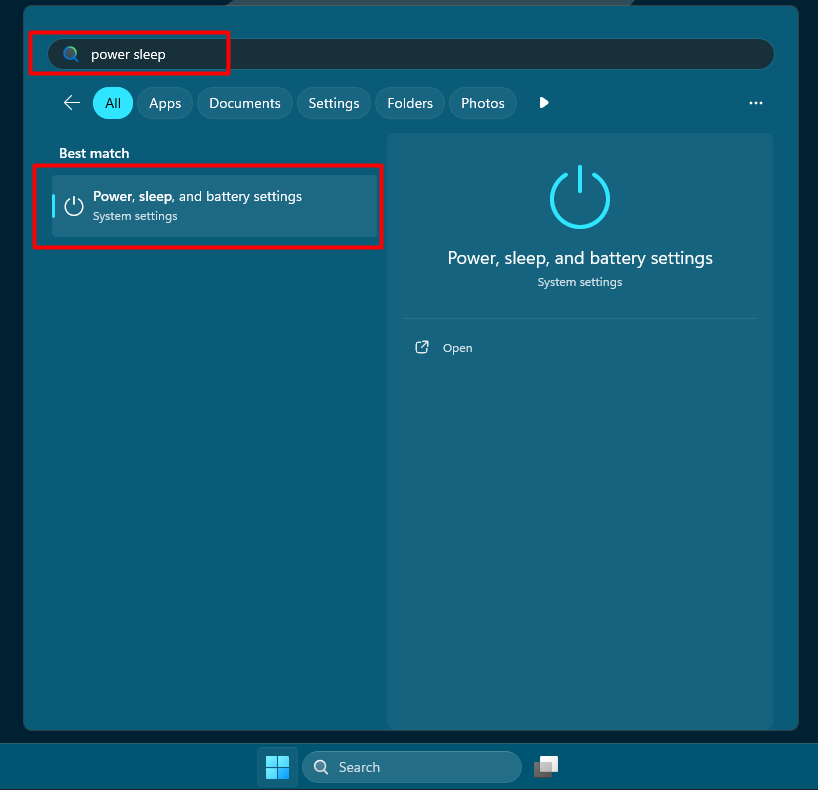
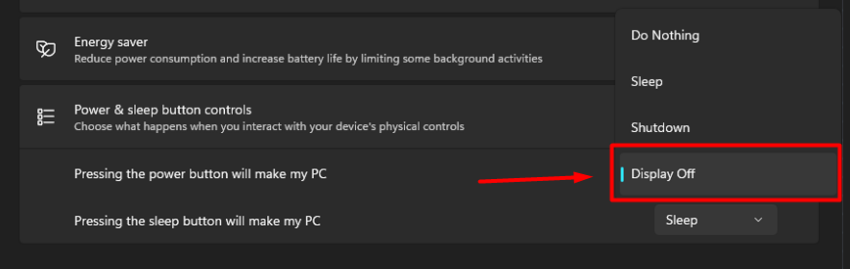
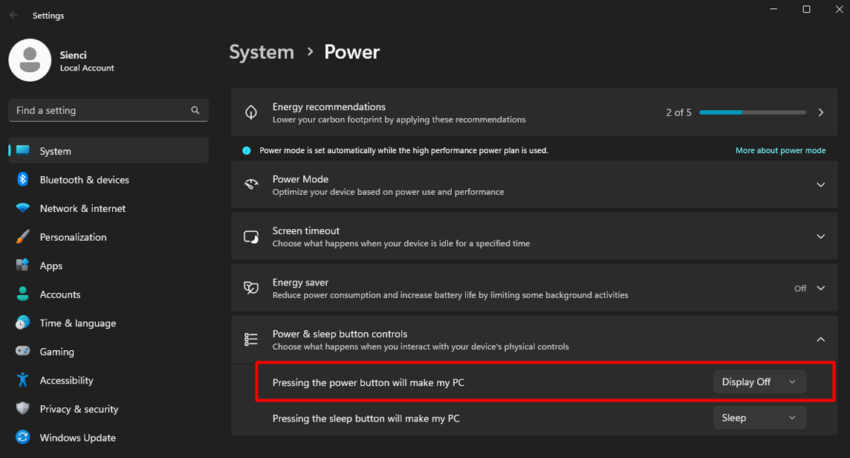
Step 1: Click the Search bar and type “power sleep”. In the results, you’ll see Power, sleep, and battery settings. Click it to open.
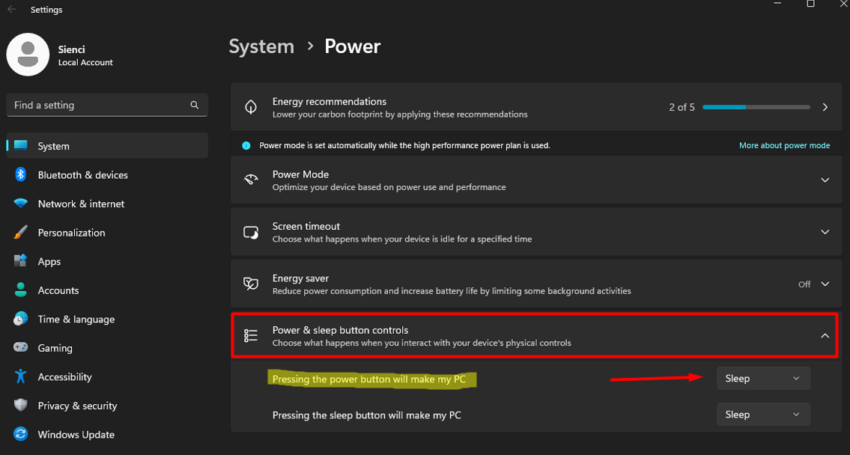
Step 2: Scroll down and expand Power & sleep button controls.
Find the option “Pressing the power button will make my PC” and change it from Sleep to Display off.
Step 3: After setting it to Display off, close the Settings window. Press the silver power button to test. The gControl screen will turn off while the system keeps running.
Check it out: Watch a short video showing how it works.