
Download
If you haven’t yet, download gSender for 🪟 Windows, 🍎 Mac, 🥧 Pi, or 🐧 Linux.
Since the software packages we use to build gSender don’t support 10+ year old systems, here are the most recent versions you can download for each operating system:
- Mac OS High Sierra, Mojave, or Catalina (v1.4.12 – Mar 11, 2025)
- Any 32-bit system or Windows 7/8 (v1.2.2 – Jul 7, 2023)
- Mac OS El Capitan or Sierra (v1.1.7 – Oct 27, 2022)
If you downloaded the more experimental ‘gSender Edge‘, then remember to also read what features it uniquely offers and how to use them: https://resources.sienci.com/view/gs-edge-features/
Windows Install
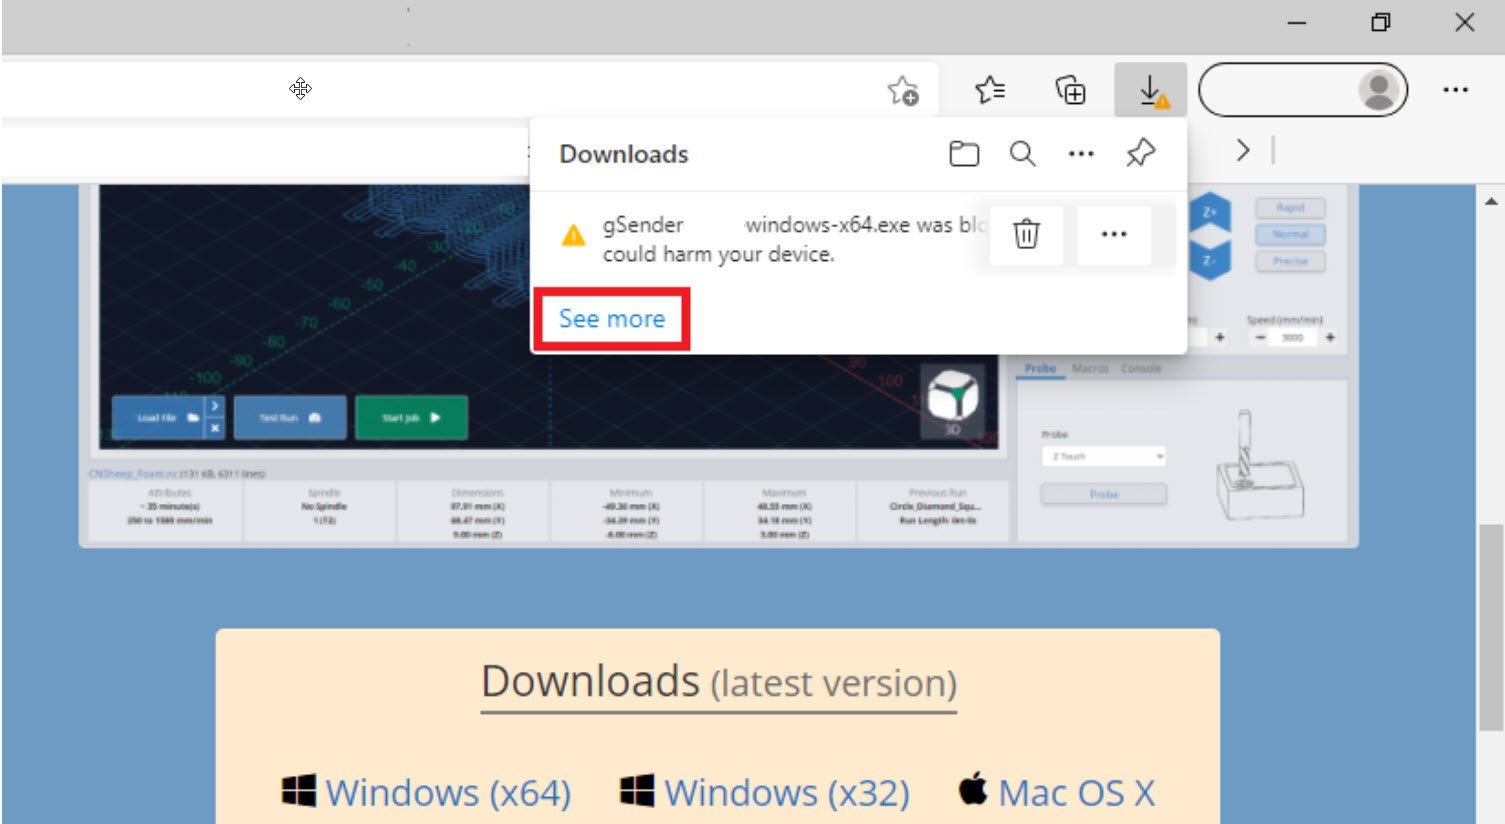
We make sure gSender is perfectly safe to use, so if you see a security warning when you download the file, bypass it by selecting “See more” then allow it to continue. If you’re still having difficulty, follow the instructions here or watch the video here for Microsoft Edge.
Once the EXE file is downloaded, double-click to run it. If you see another security popup, click ‘More Info’ and then click ‘Run anyway’. If you don’t feel that you can trust gSender, then no pressure to use it.

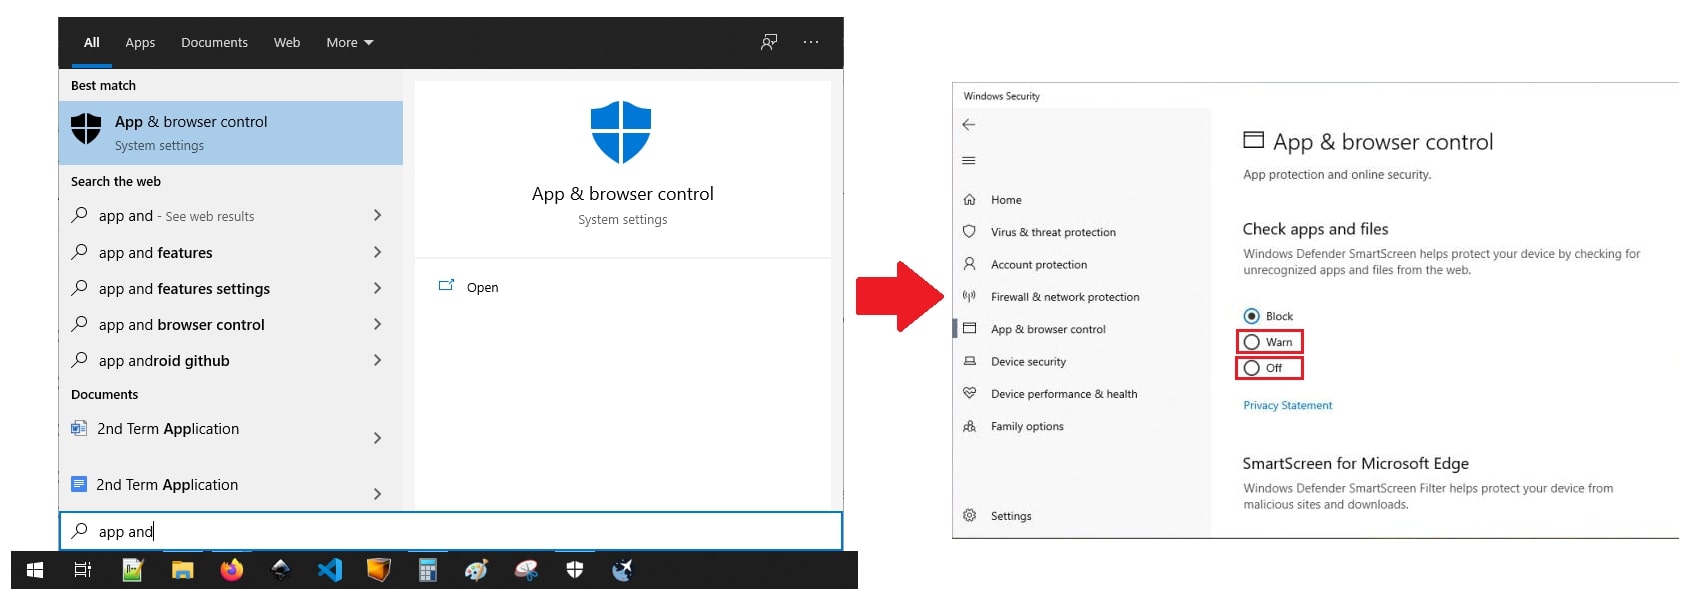
If the “More info” option isn’t available, go to “App & browser control” and switch “Check app and files” to either “Warn” or “Off” just for the installation of gSender. You can always turn it back on afterwards.
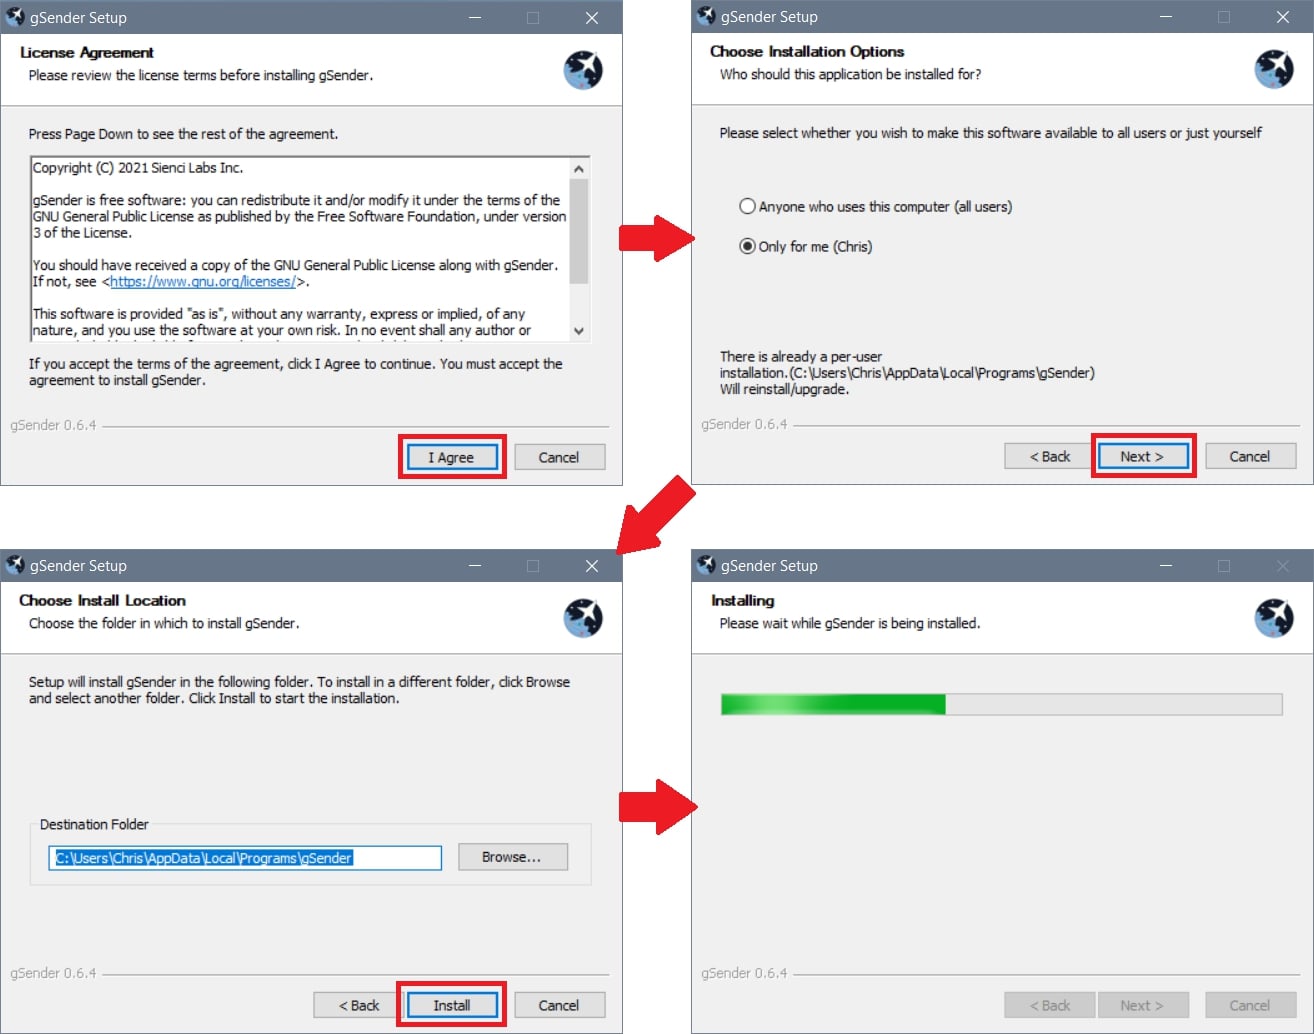
gSender is provided “as is” which means that even though we try our best to make it amazing, there should be no expectation it’ll run your CNC perfectly and it could even cause issues. If you understand this and agree, you’ll be able to choose your install options from there (who to install for and where) and then begin installing.
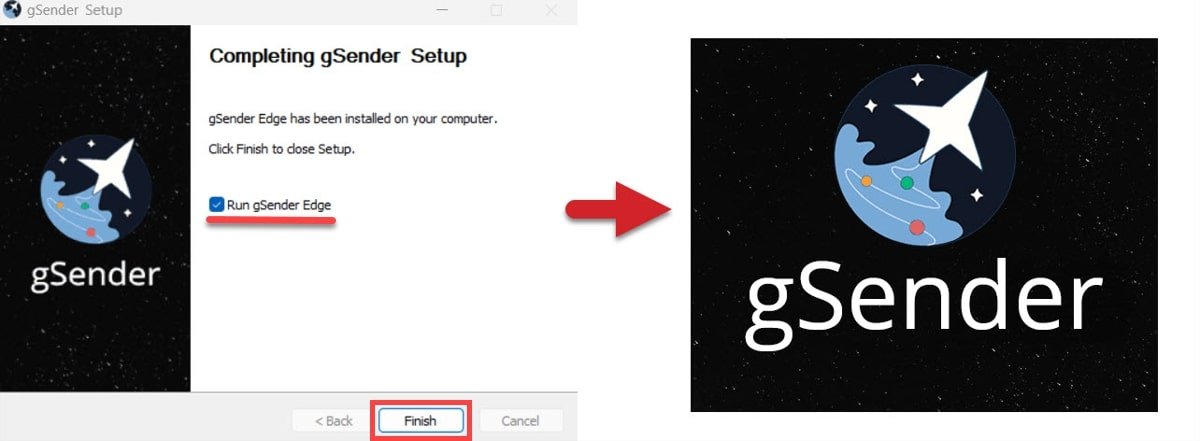
Once you see the ‘Completion’ screen you should be good to go! Click ‘Finish’ then open gSender and get ready to connect to your CNC.
Open Faster
Some security software can significantly slow down the time it takes for gSender to open. We’re still looking into how we can fix this, but for the time being we’ve found that making an exception will make gSender open much much faster. Please be careful doing this, we won’t take responsibility if you run into other issues editing your computers security settings.
For most Windows computers go to Settings ➜ Update & Security ➜ Windows Security ➜ Virus & threat protection ➜ Manage Settings ➜ Add or remove exclusions ➜ Add an exclusion ➜ then add the folder C:\Program Files\gSender. This has been reported to speed up open time by up to 30-40 seconds.
Mac Install
Note: we’ve been having problems creating an Arm build for Mac, but for now you should still be able to install the Intel version and use Rosetta just fine.
Once you’ve downloaded gSender, double-click to run it. A window will pop up that will look like the one below. Click and drag the gSender app to the applications folder to save it to your computer.
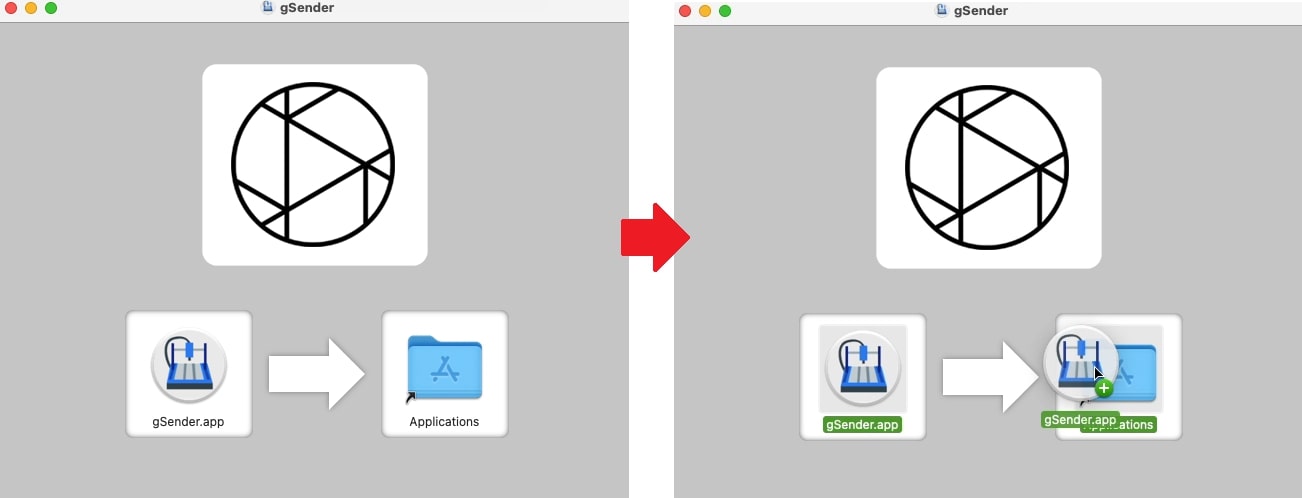
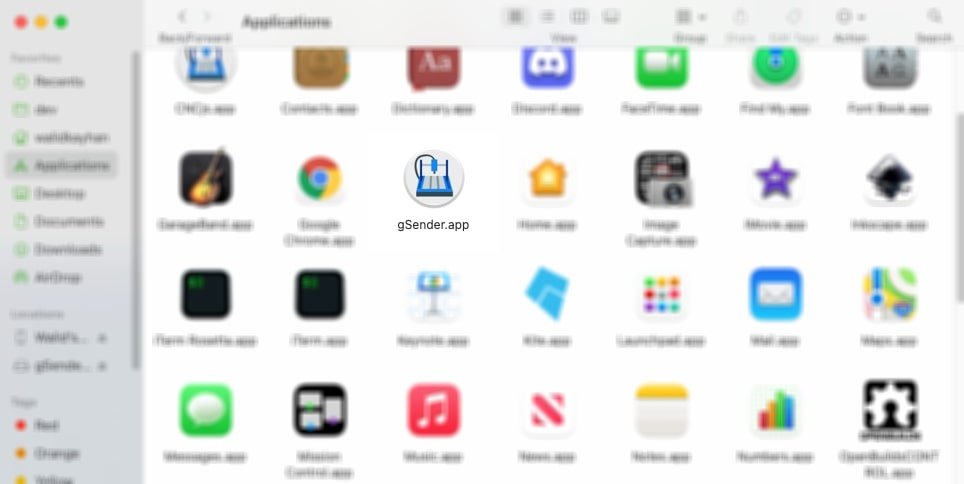
Go to your applications folder and you should find gSender ready to use once you follow the same install process as Windows.
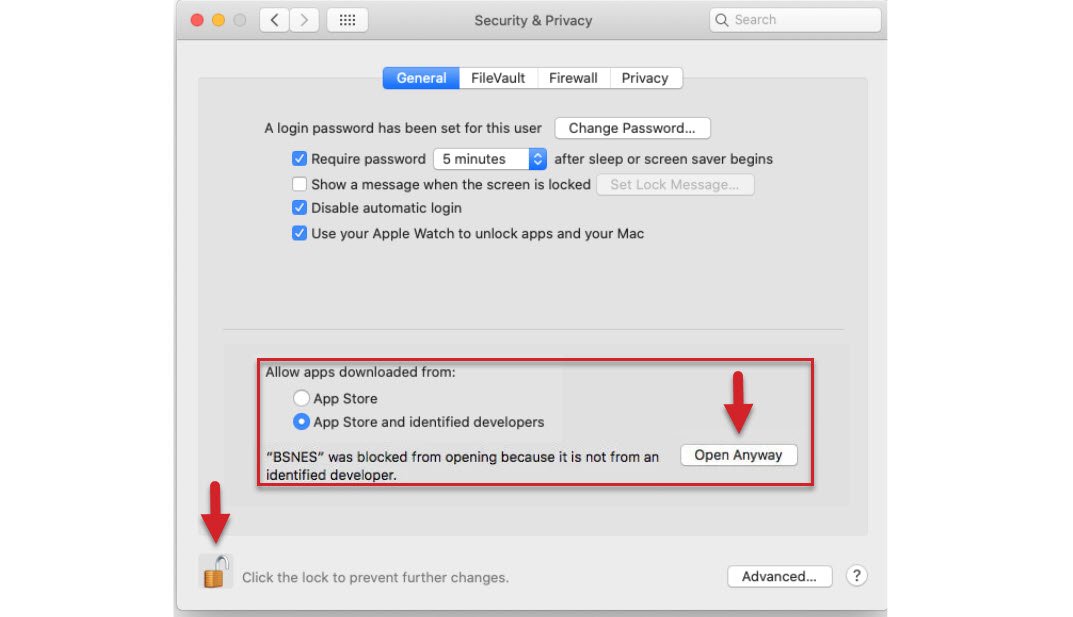
If you’re having issues installing gSender on your Mac:
- Open System Preferences.
- Go to the Security & Privacy tab.
- Click on the lock and enter your password so you can make changes.
- Change the setting to ‘App Store and identified developers’
- After, you’ll see the option to override app blocking by clicking the temporary button to ‘Open Anyway’
- You’ll be asked one more time if you’re sure, but clicking Open will run the app.
gSender Updates
gSender will automatically notify you when new updates are available, allowing you to download them quickly and get running with the latest version. When you see the green download icon on the top left corner of your screen, over the gSender logo, you know you have an update available. You can also navigate to the Stats Tab, then click on About in the center/bottom of the screen, to see if any updates are available. If you update accidentally and want to go back, you can also always downgrade.
If you don’t see these notifications, your system might not support it or your computer Firewall may be blocking them but you should still be able to download the newest version manually and install it over-top of the old version.
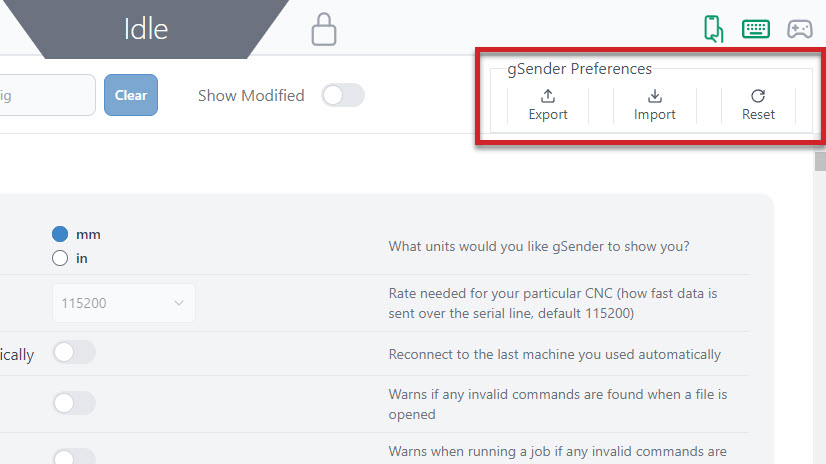
gSender updates always have the chance of encountering quirks, so if you have an important carve coming up or are just satisfied with your current setup then we’d typically recommend holding off until updating will be less ‘mission-critical’. Also, if you’ve spent time setting up shortcuts, gamepad profiles, start/stop code or you have specific probe settings, we recommend you Export your gSender preferences before updating. This way you will have all of your customizations saved so you can import them into the new version or use as a backup in case the you need to revert back to an older version.
One example we often see is users will think they are using default gSender settings, but forget that they changed to the AutoZero touch plate. When upgrading and then attempting to probe, errors will happen unless you remember to go into the Config tab ➜ Probe and check it’s still set to AutoZero instead of the Standard probe block.
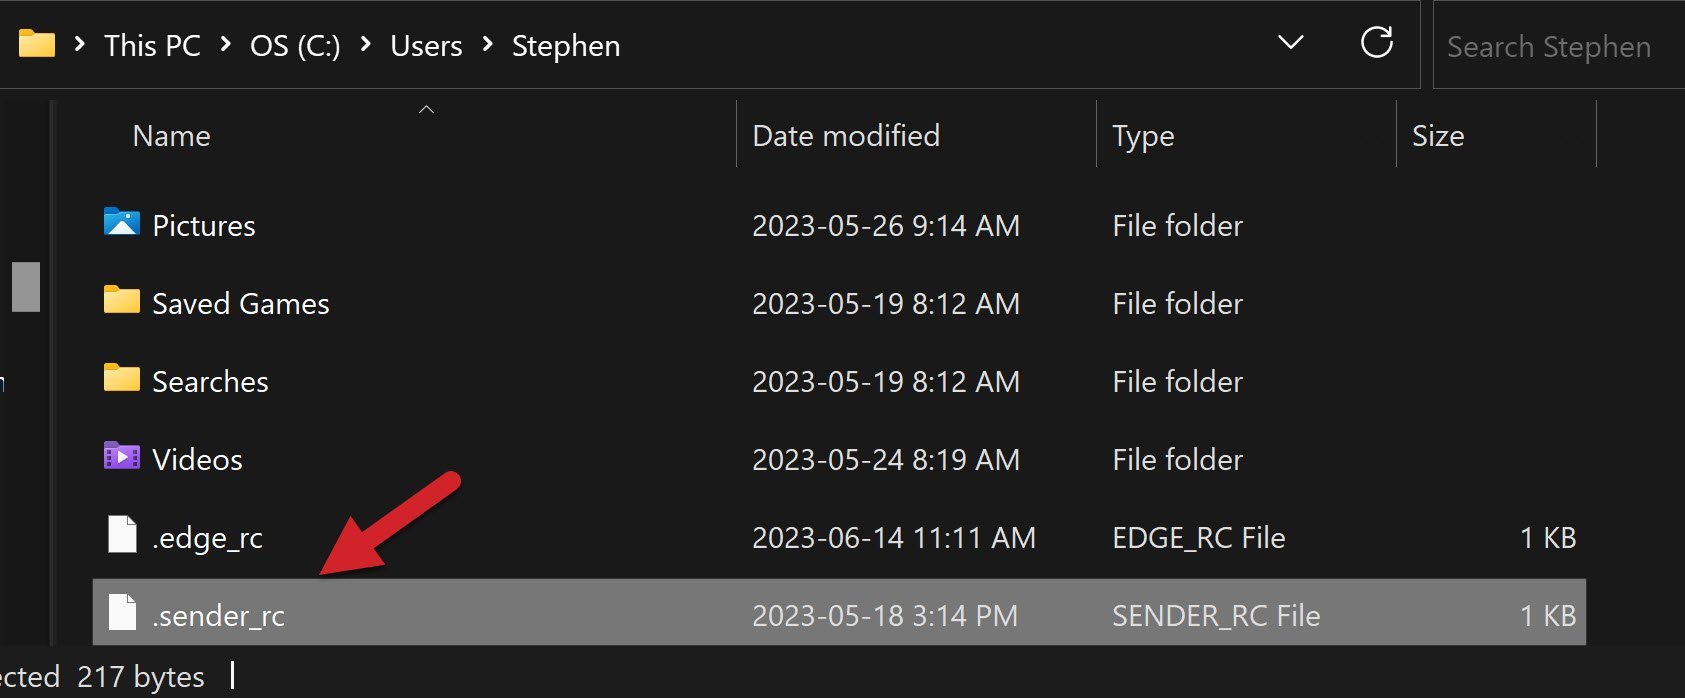
If you upgrade to a new version, or downgrade to an older version, and gSender won’t open or run (blank screen):
You’ll want to find a file called “.sender_rc” and rename it so gSender can generate a new version without errors. Sometimes you might also want to delete the “.sienci-sessions” folder too.
- For Windows: the file can usually be found on your hard drive, at: C:/users/{your username}/.sender_rc. Rename it to whatever you like, like “.sender_rc_old“, then try to reinstall gSender again.

- For Mac/Linux: the file is in the home directory as a hidden file. You can either:
- In Finder go to Go ➜ Computer ➜ Drive ➜ Users ➜ {your username} then un-hide the “.sender_rc” file by pressing
CMD + Shift + .keys. Rename it to whatever you like, like “.sender_rc_old“, then try to reinstall gSender again. - Go into the Mac/Linux console and enter the command
mv ~/.sender_rc ~/.sender_rc_old. You’ll be able to double check the renaming was successful by sendingls -al | grep senderin the console, where if you only see.sender_rc_old, you have successfully remanded and are ready to try to reinstall gSender.
- In Finder go to Go ➜ Computer ➜ Drive ➜ Users ➜ {your username} then un-hide the “.sender_rc” file by pressing
- If this solves your problem, you’ll still be able to recover your old Start/Stop events and macros from the renamed file; just open it in a text editor and copy the macros you want to save so you can paste them back into gSender.
Older Versions
If you just updated gSender and are finding that it’s not working for you, downgrading again is always available:
- If you go here: https://github.com/Sienci-Labs/gsender/releases, the newest version will always be at the top and shown in bold text like “v1.4.3” for example
- Scroll down to find older versions and choose the next version down or whatever version number you remember using
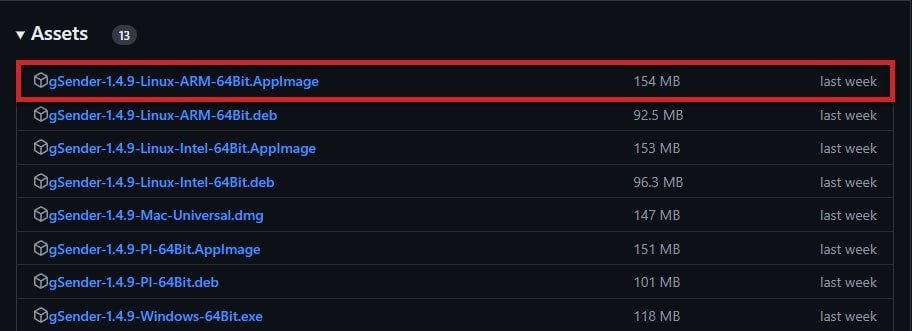
- Once you’re at the version you want, scroll down to find “Assets” and click the text to open the list of downloads
- Find the right one for you, Windows is “.exe”, Mac is “.dmg”, etc. and click the file name to start downloading it. Once it’s downloaded, you can install it over your current gSender version and continue from there
Chromebook
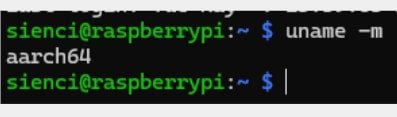
You can run gSender by using Linux inside of ChromeOS as long as you’re running 64-bit. Set up Linux on your Chromebook with these instructions. Open the command line and type: cat /etc/os-release or uname -m to see what architecture/operating system you are using, so you’ll know which gSender file to download. In the example below you can see we are running aarch64, which means we will want to download “arm-64bit.AppImage”.
Download the .appimage file from the latest release of gSender and double click to launch. You will need to have the g-code files you want to carve in the same folder too. If you have success and find we’ve missed any steps here, let us know and we will update our resources!
Pi Install
If you’re considering a Pi setup, that’s great! There are a lot of potential perks that can come from having a cheap, mini, fanless computer to run your CNC without the downside of Windows updates and other quirks. A couple things you should know though before diving in:
- While most gSender users run simple 64-bit Windows or Mac based systems, RasPi is a whole other world of hardware and software configurations, making it really hard for us to offer all possible installs or help troubleshoot the variety in setups
- RasPi OS builds have been going through a large fluctuation recently swapping from 32-bit based to 64-bit which is still causing compatibility issues in the community since some libraries have kept up and others haven’t, this has introduced a whole new variable of matching up OS install with software build and has eventually forced upon us the ability to only support 64-bit
- RasPi compatibility is ultimately something that we built due to community demand but still don’t use much ourselves. In addition, anyone who tends to use RasPi likes to troubleshoot things themselves meaning that it’s hard for us to know if we’re missing anything in our instructions
We hope all of this explains why you’ll find the RasPi side of gSender support is inherently the least well documented of all the install options. We’ve tried our best to cover some of the more common setups, but we’d still recommend you have some familiarity with Linux if you continue with this installation since our support won’t be able to cover the many specific problems of various Pi builds.
Starting notes:
- We provide 2 different variations of Pi binary – .AppImage, .deb.
- Pi versions are all indicated by the “Pi-64Bit” tag in the executable name.
- Supported PI OS (Raspbian/Pi OS):
- To determine which OS you’re running, enter a terminal and type
cat /etc/os-release. The name and pretty name should verify your OS and version
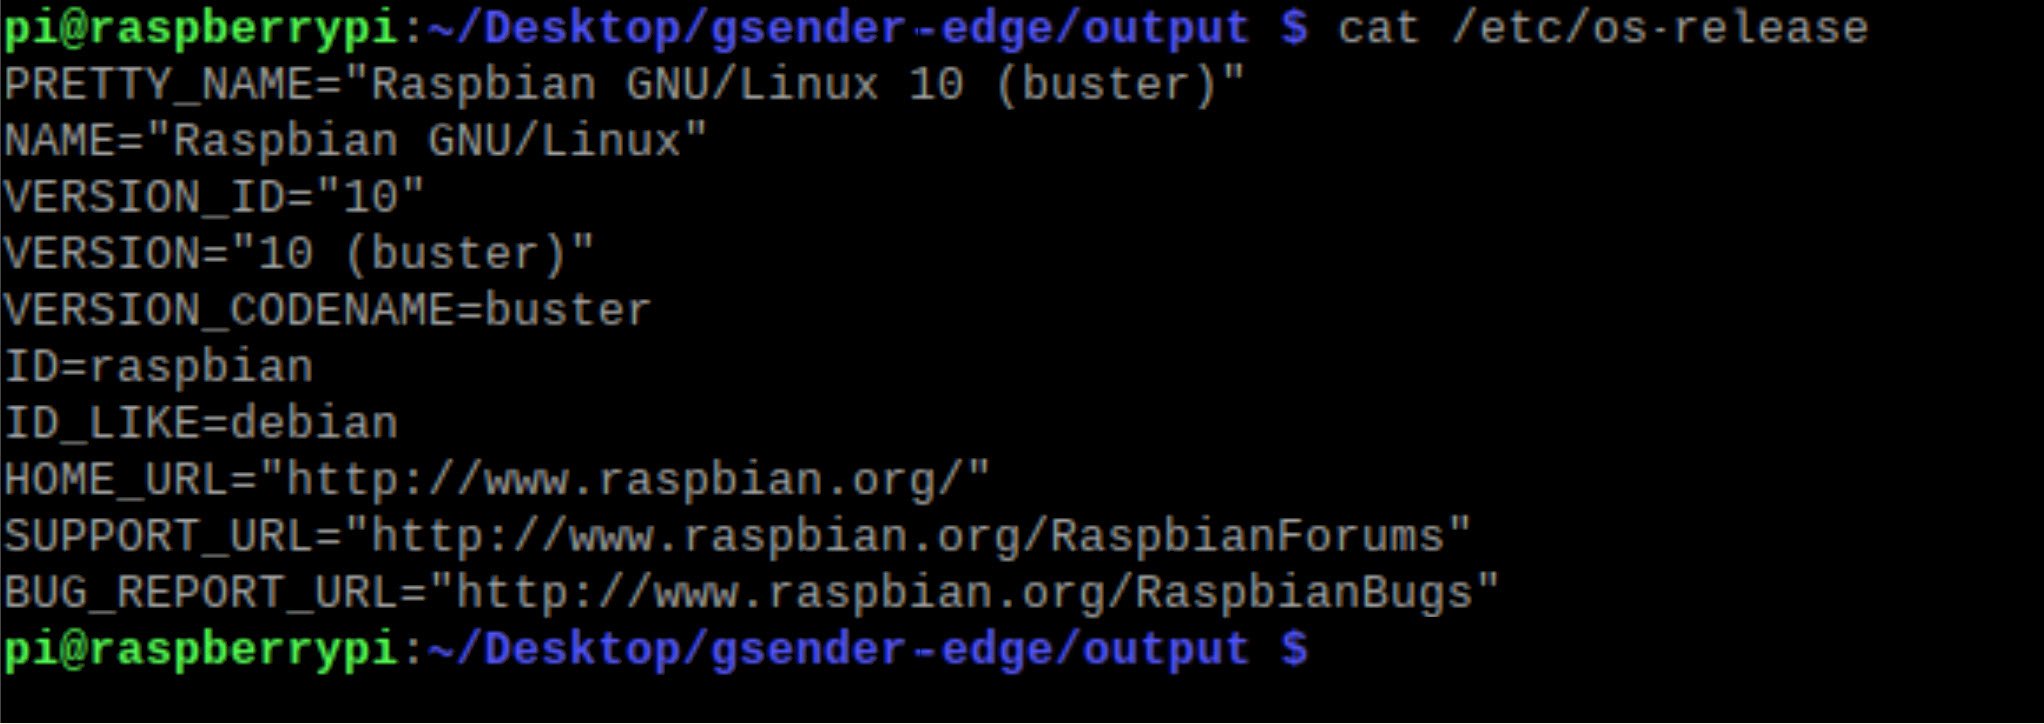
- To determine which OS you’re running, enter a terminal and type
For most simple Pi setups, you’ll want to:
- Download the AppImage
- Right click and go to the permissions tab
- Make sure “executable” permission is set on the file
- Run the program
Default Pi credentials:
User: pi
These are needed when performing ‘sudo’ super user access, a type of administrator access needed to alter system-specific things. Once you’re set up with your Pi we recommend creating a new user account with different credentials as a security precaution, especially if you’re running gSender in remote mode or connecting your Pi to the internet. If these credentials don’t work for you then either check with your manufacturer or congratulations you’ve already created your own account and changed the default password 😉
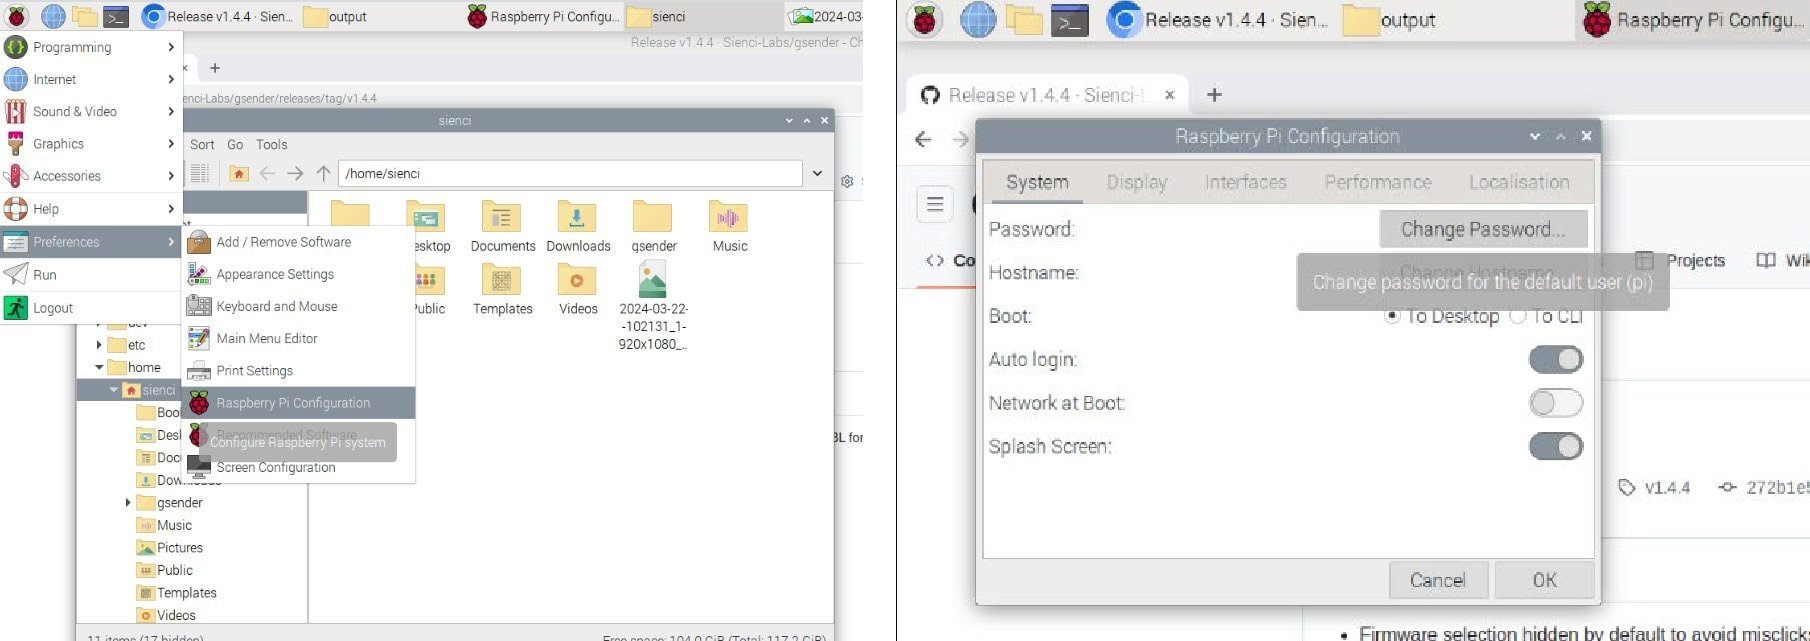
To change the default pi user password. It’s just menu ➜ Preferences ➜ Raspberry Pi Configuration and then the “Change Password” option
Error log location:
All application logs can be found in “~/.config/gSender/logs” and can be shared for any app-specific problems.
Common Pi Issues
Sizing for Smaller Screens
gSender can size responsively but only to a minimum point. Because of this, some Pi users might find gSender isn’t fitting their screen properly. This can be accommodated on most Pis by:
- Click the Pi icon on the top right
- Preferences ➜ Screen configuration ➜ Configure ➜ Screens
- Click HDMI-1 (or whichever screen that is connected to the Pi), then you’ll find you can select your Resolution
- We’d suggest you choose a minimum resolution of 1280×1024. Once chosen, you should be able to verify if this fix has worked for you or you can go back and continue to tweak it as needed.
This should allow gSender to show on your screen fully without it being cut off.
Visualizer is blank
This is most likely related to webGL not being enabled. You can check inside Chromium/Chrome by visiting https://webglreport.com/ and checking that both WebGL 1 and WebGL 2 have the green ‘supported’ banner. If these aren’t present, then to enable webGL:
- Inside Chrome/Chromium, navigate to chrome://settings
- In the ‘System’ section, ensure the “Use hardware acceleration when available” checkbox is checked
- Relaunch Chrome for the changes to take effect then go to chrome://flags
- Ensure that “Disable WebGL” is not activated
- Relaunch Chrome for the changes to take effect and now these updated settings should be used by gSender’s Electron builder
Can’t open the port to connect
Make sure your user is part of the dialout group. To add your account to this group, go to a terminal and type sudo usermod -a -G dialout <user> (replacing “<user>” with your username). Restart after this change and try again.