
All CNCs require maintenance. Doing maintenance on your LongMill is quick and easy, plus regular checkups will ensure that:
- Things are caught before potentially affecting your carves
- Your machine will run at the top of its game for many years
Typical Maintenance
The normal areas you’ll want to keep your eyes on will be:
- Cleaned rails and wheels
- Tightened eccentric nuts / v-wheels
- Tensioned Delrin nuts, a.k.a. robot heads
- Lubricated linear rails
- Checking for loose fasteners
with rails, v-wheels, and Delrin nuts being checked and cleaned every 10-20 hours, and linear guides and loose hardware being checked every 20-30 hours. The v-wheels and Delrin nuts also wear out over time (they’re consumables) so on average they’ll need replacing every 1500-2000 hours. You’ll know when to replace them when the eccentric nuts can’t be rotated any further to tighten up the v-wheels or the tensioning screw on the nut doesn’t allow for any more adjustment.
If you don’t have great dust pickup or you tend to push your machine harder or longer for production then you’ll have to perform maintenance more often. For example, always cutting hard materials with no dust boot will require much more regular checkups versus light PCB cutting.
Tuning your LongMill
While the instructions in the video below are specific to the MK2 48×30, the adjustment and tuning of the motor couplers, anti-backlash nuts, and v-wheels will be similar for other LongMills.
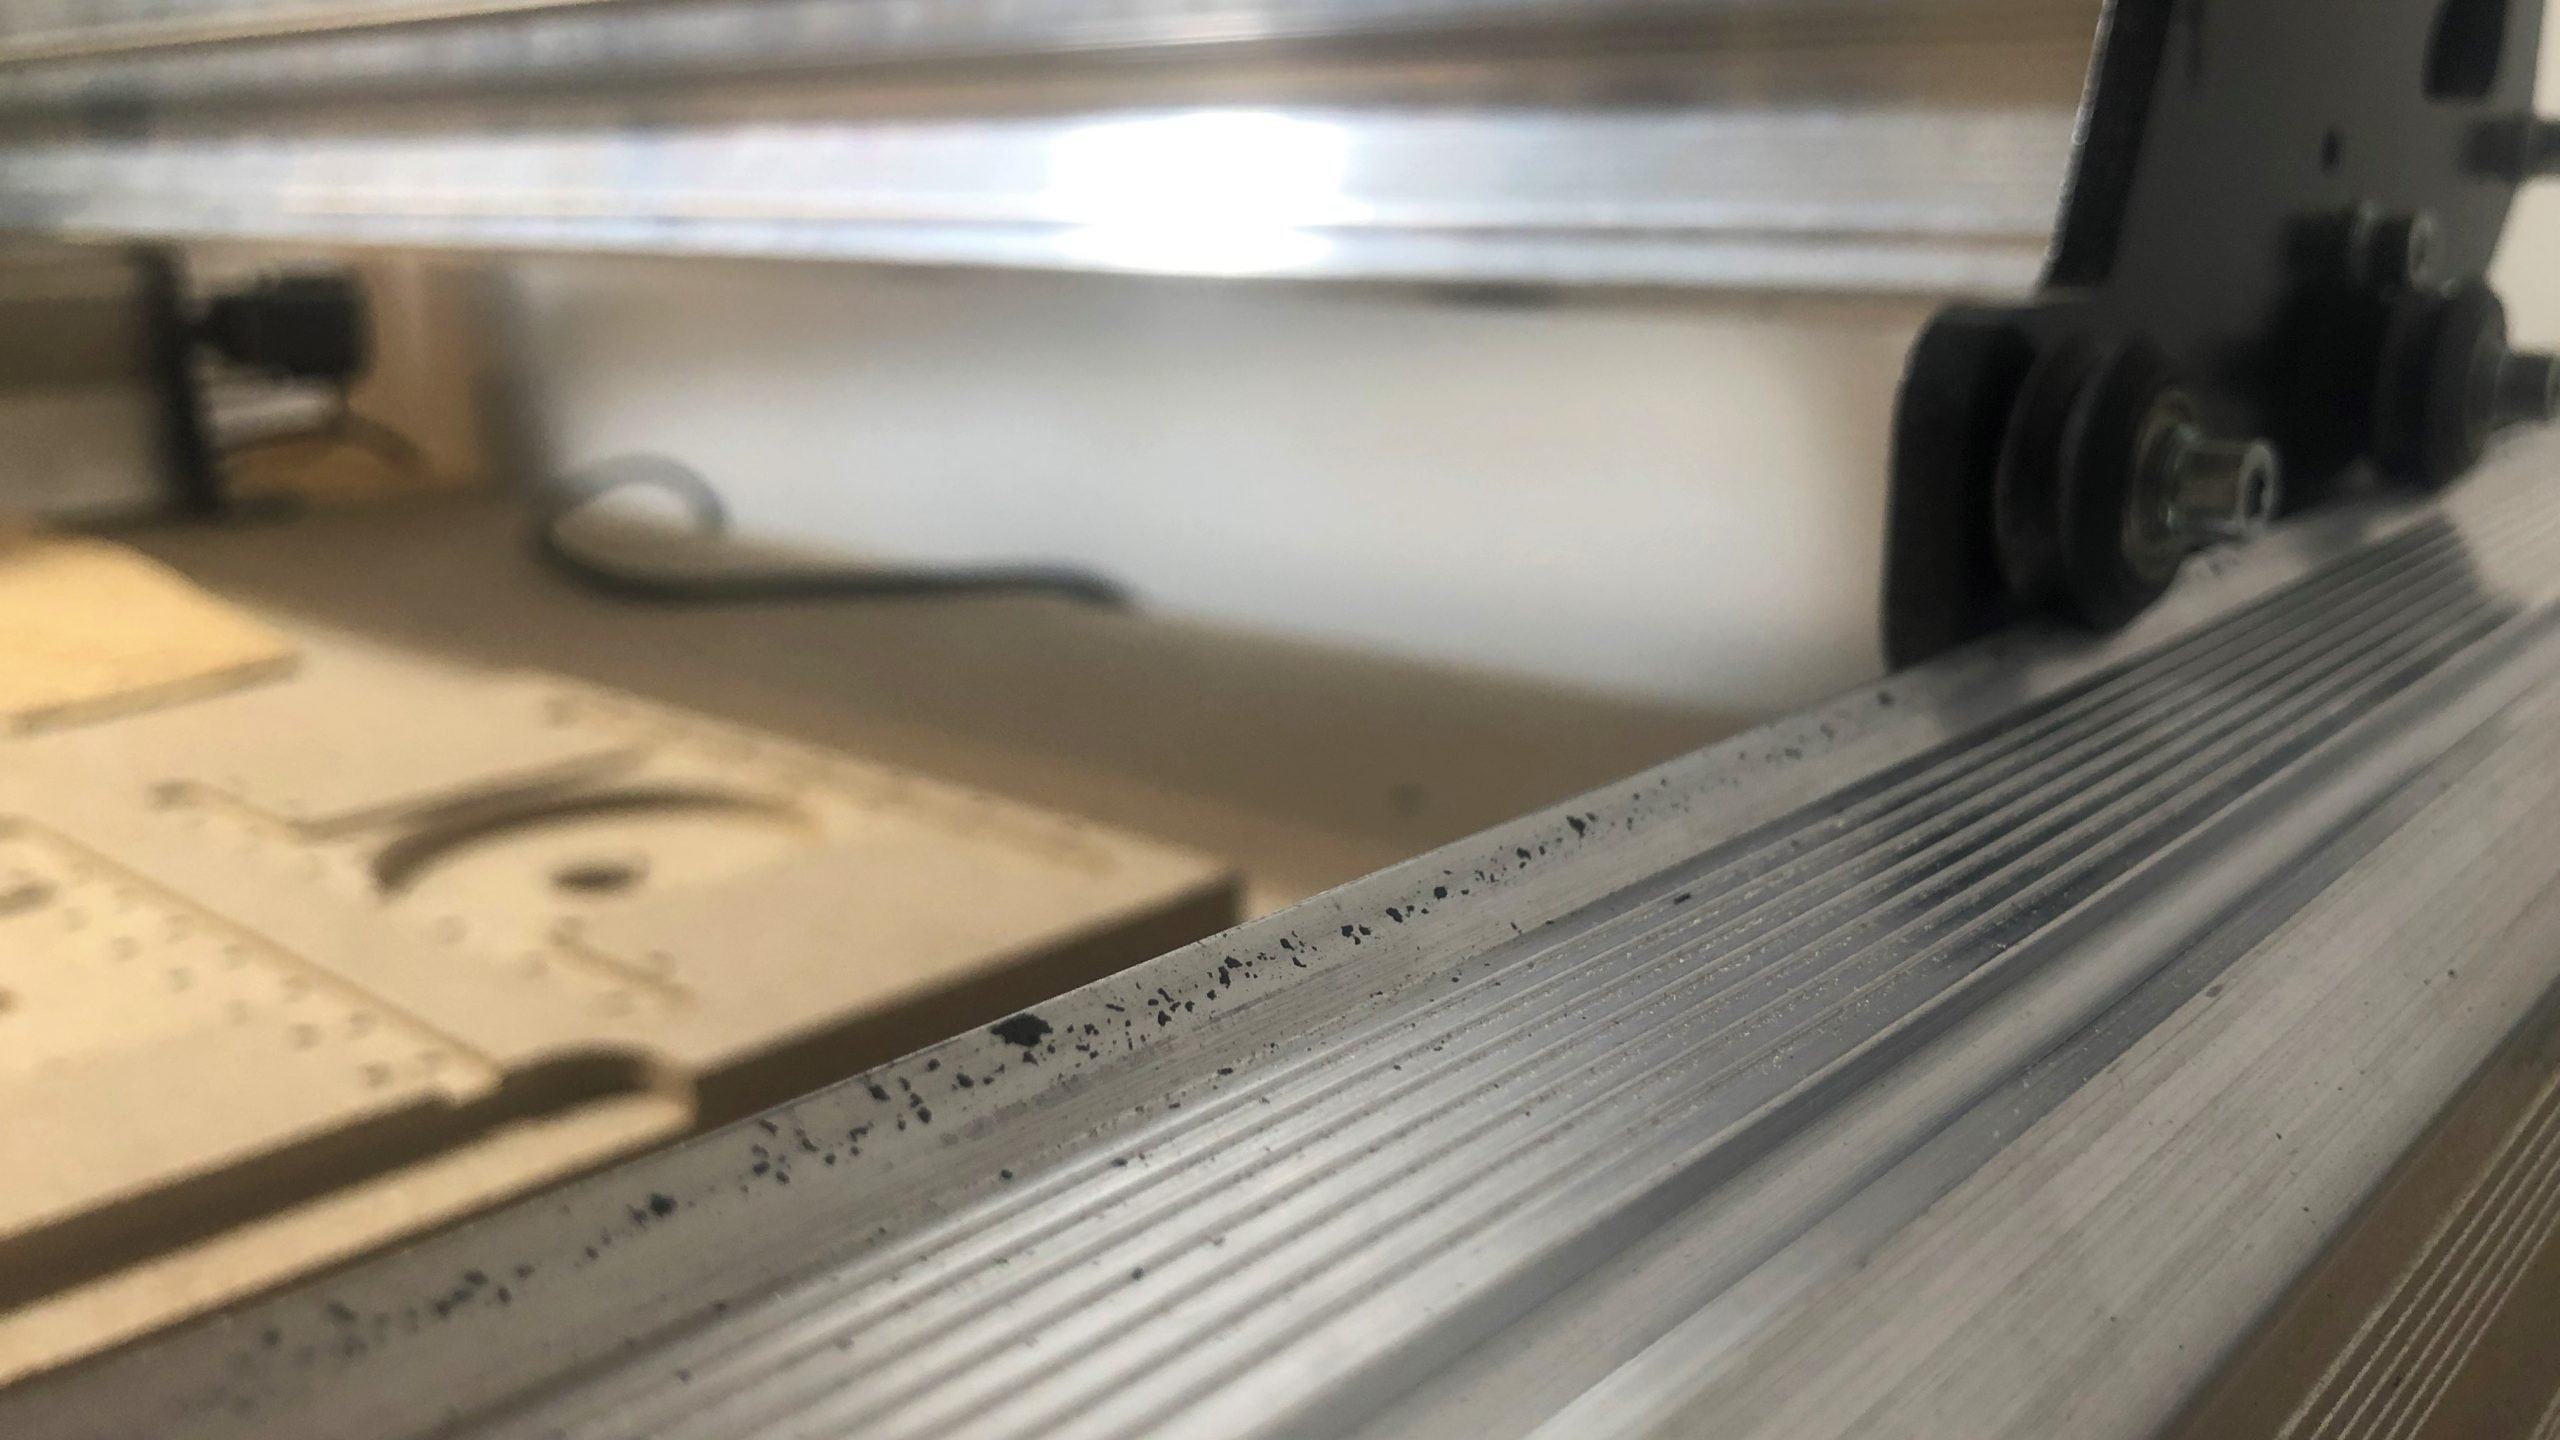
Cleaning your Rails and Wheels
Over time on the rails you’ll notice black splotches and on the wheels a faint grey buildup. This happens when ambient dust settles on the rail edges and the wheels repeatedly roll over it. The gunk on both the wheels and rails is easy to get off with a small brush, plastic scraper, wood scrap, or even your fingernails. Remember to clean the rails on both the top and bottom edges and try your best to get into the crevices of all the wheels. A trick for the wheels is to put a thin material into the top of the wheel groove while you rotate the wheel; this works well to push out the gunk along the entire circumference.
If you have good dust collection this is something that you won’t have to do as often.
Adjusting the Eccentric Nuts
Eccentric nuts are ‘eccentric’ or ‘off center’ nuts and this means that by turning them you can change the gap between the v-wheels attached to them and the fixed v-wheels on the other side of the rail. This ‘tightening’ system allows the wheels to clamp onto the rails just the right amount to create rigid yet smooth motion.
You can see in the animation below, as the eccentric nut rotates, it makes the v-wheel tighten or loosen onto the rail.
You can see below what it looks like when an eccentric nut is all the way open (largest gap between wheels) and all the way closed (smallest gap between wheels) for both the Y and X-axes.
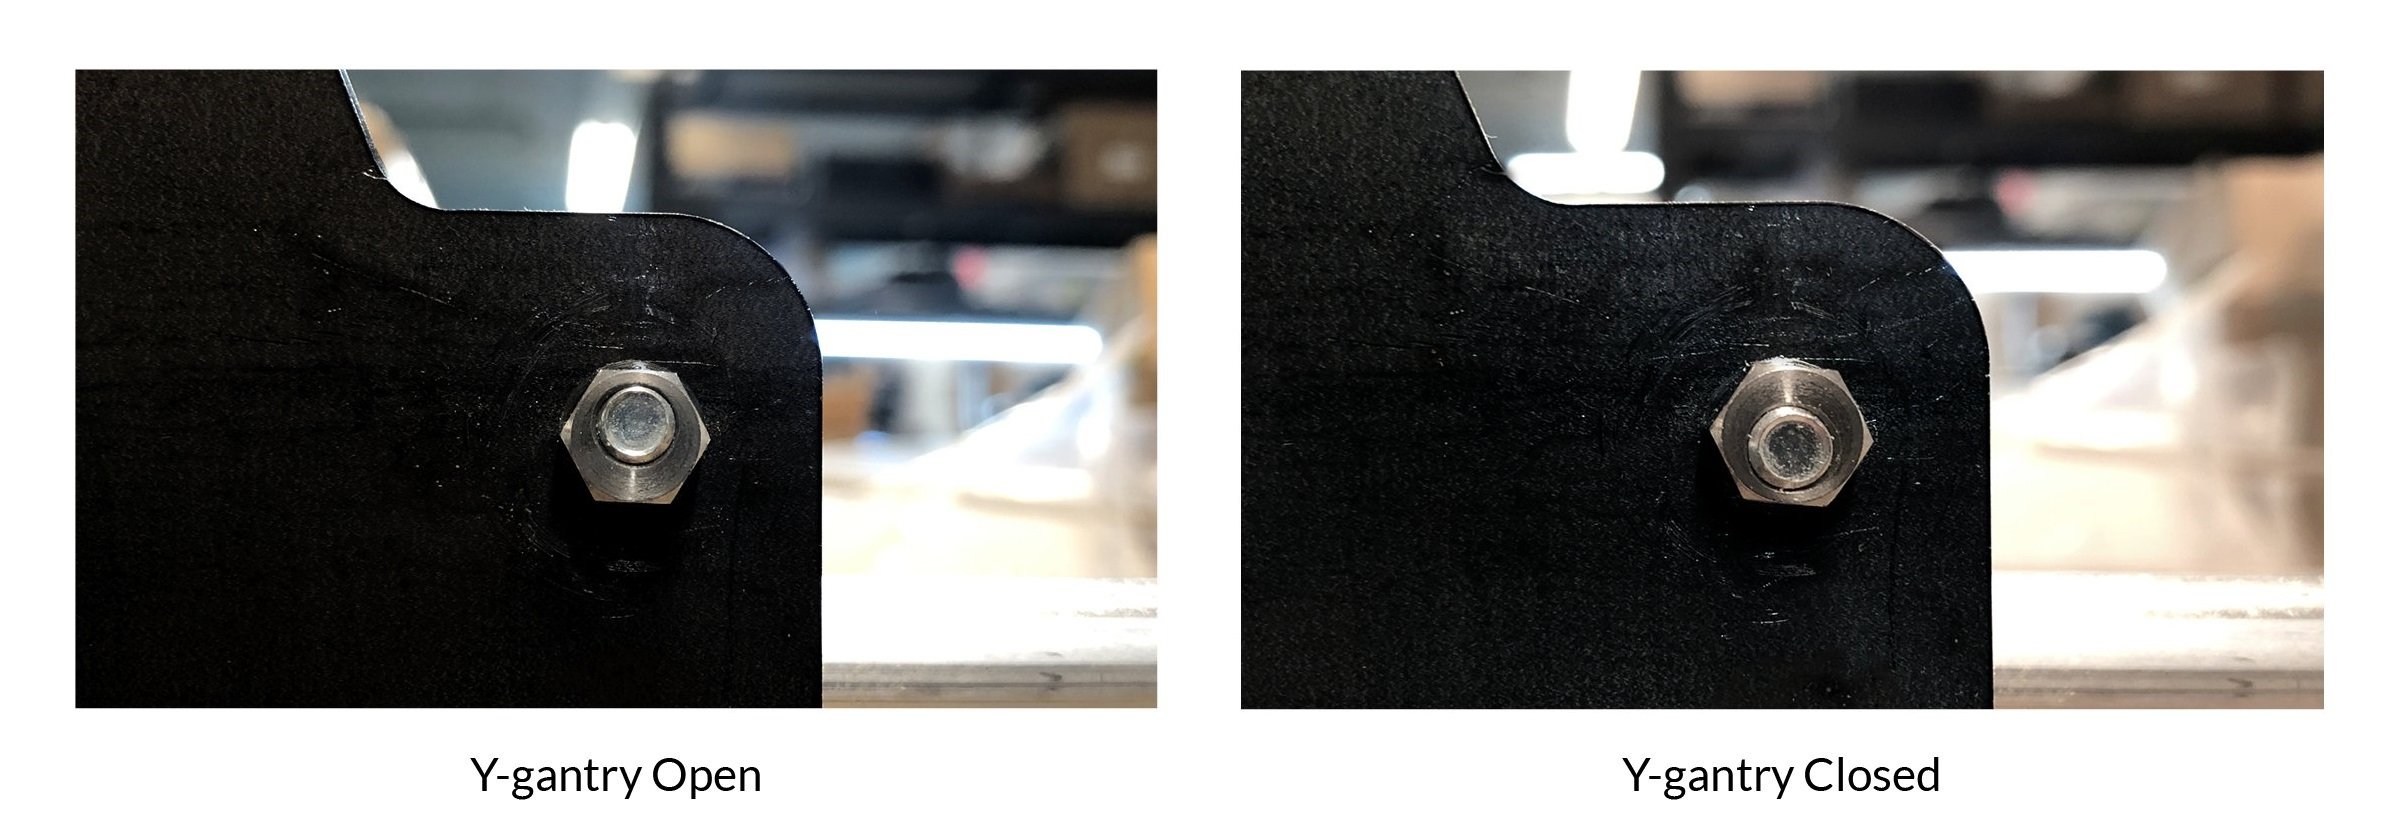
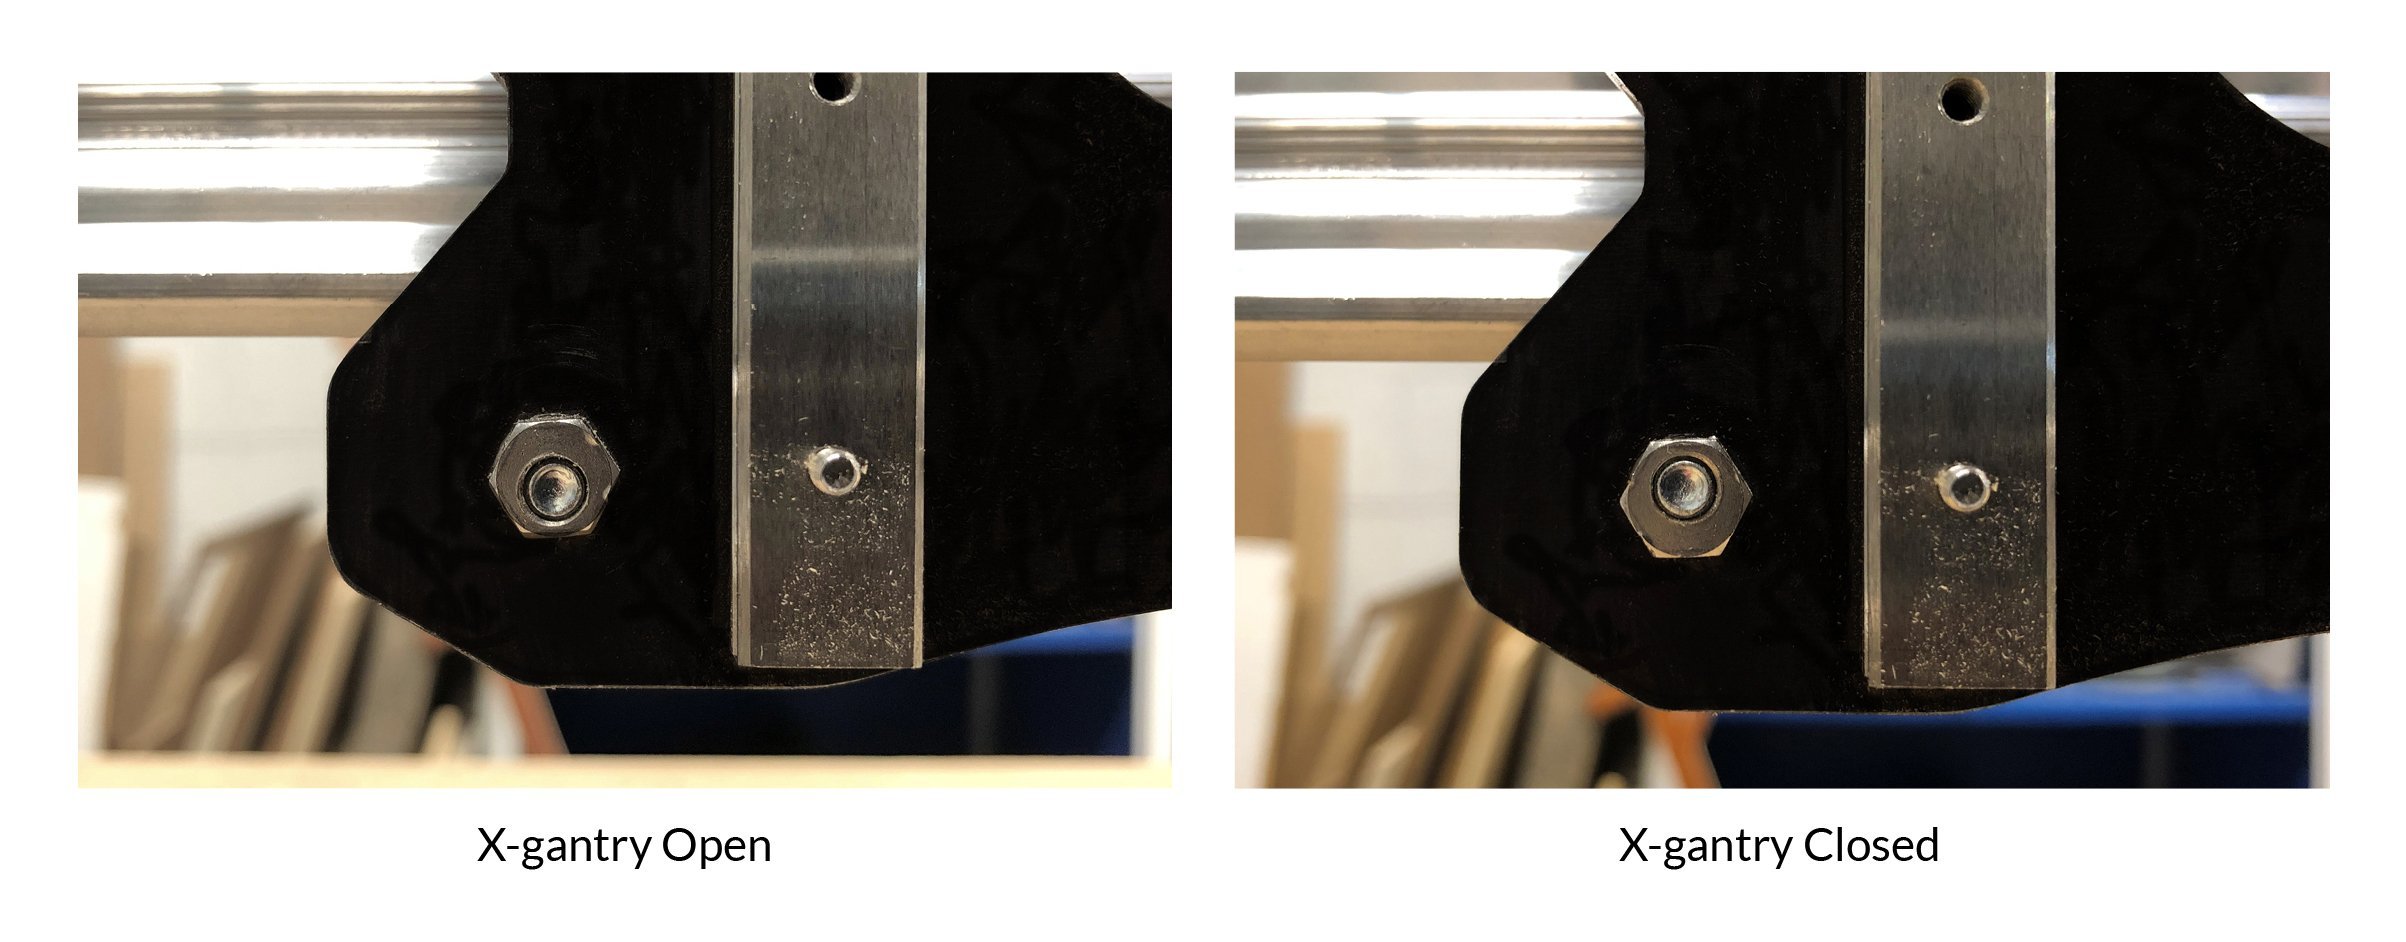
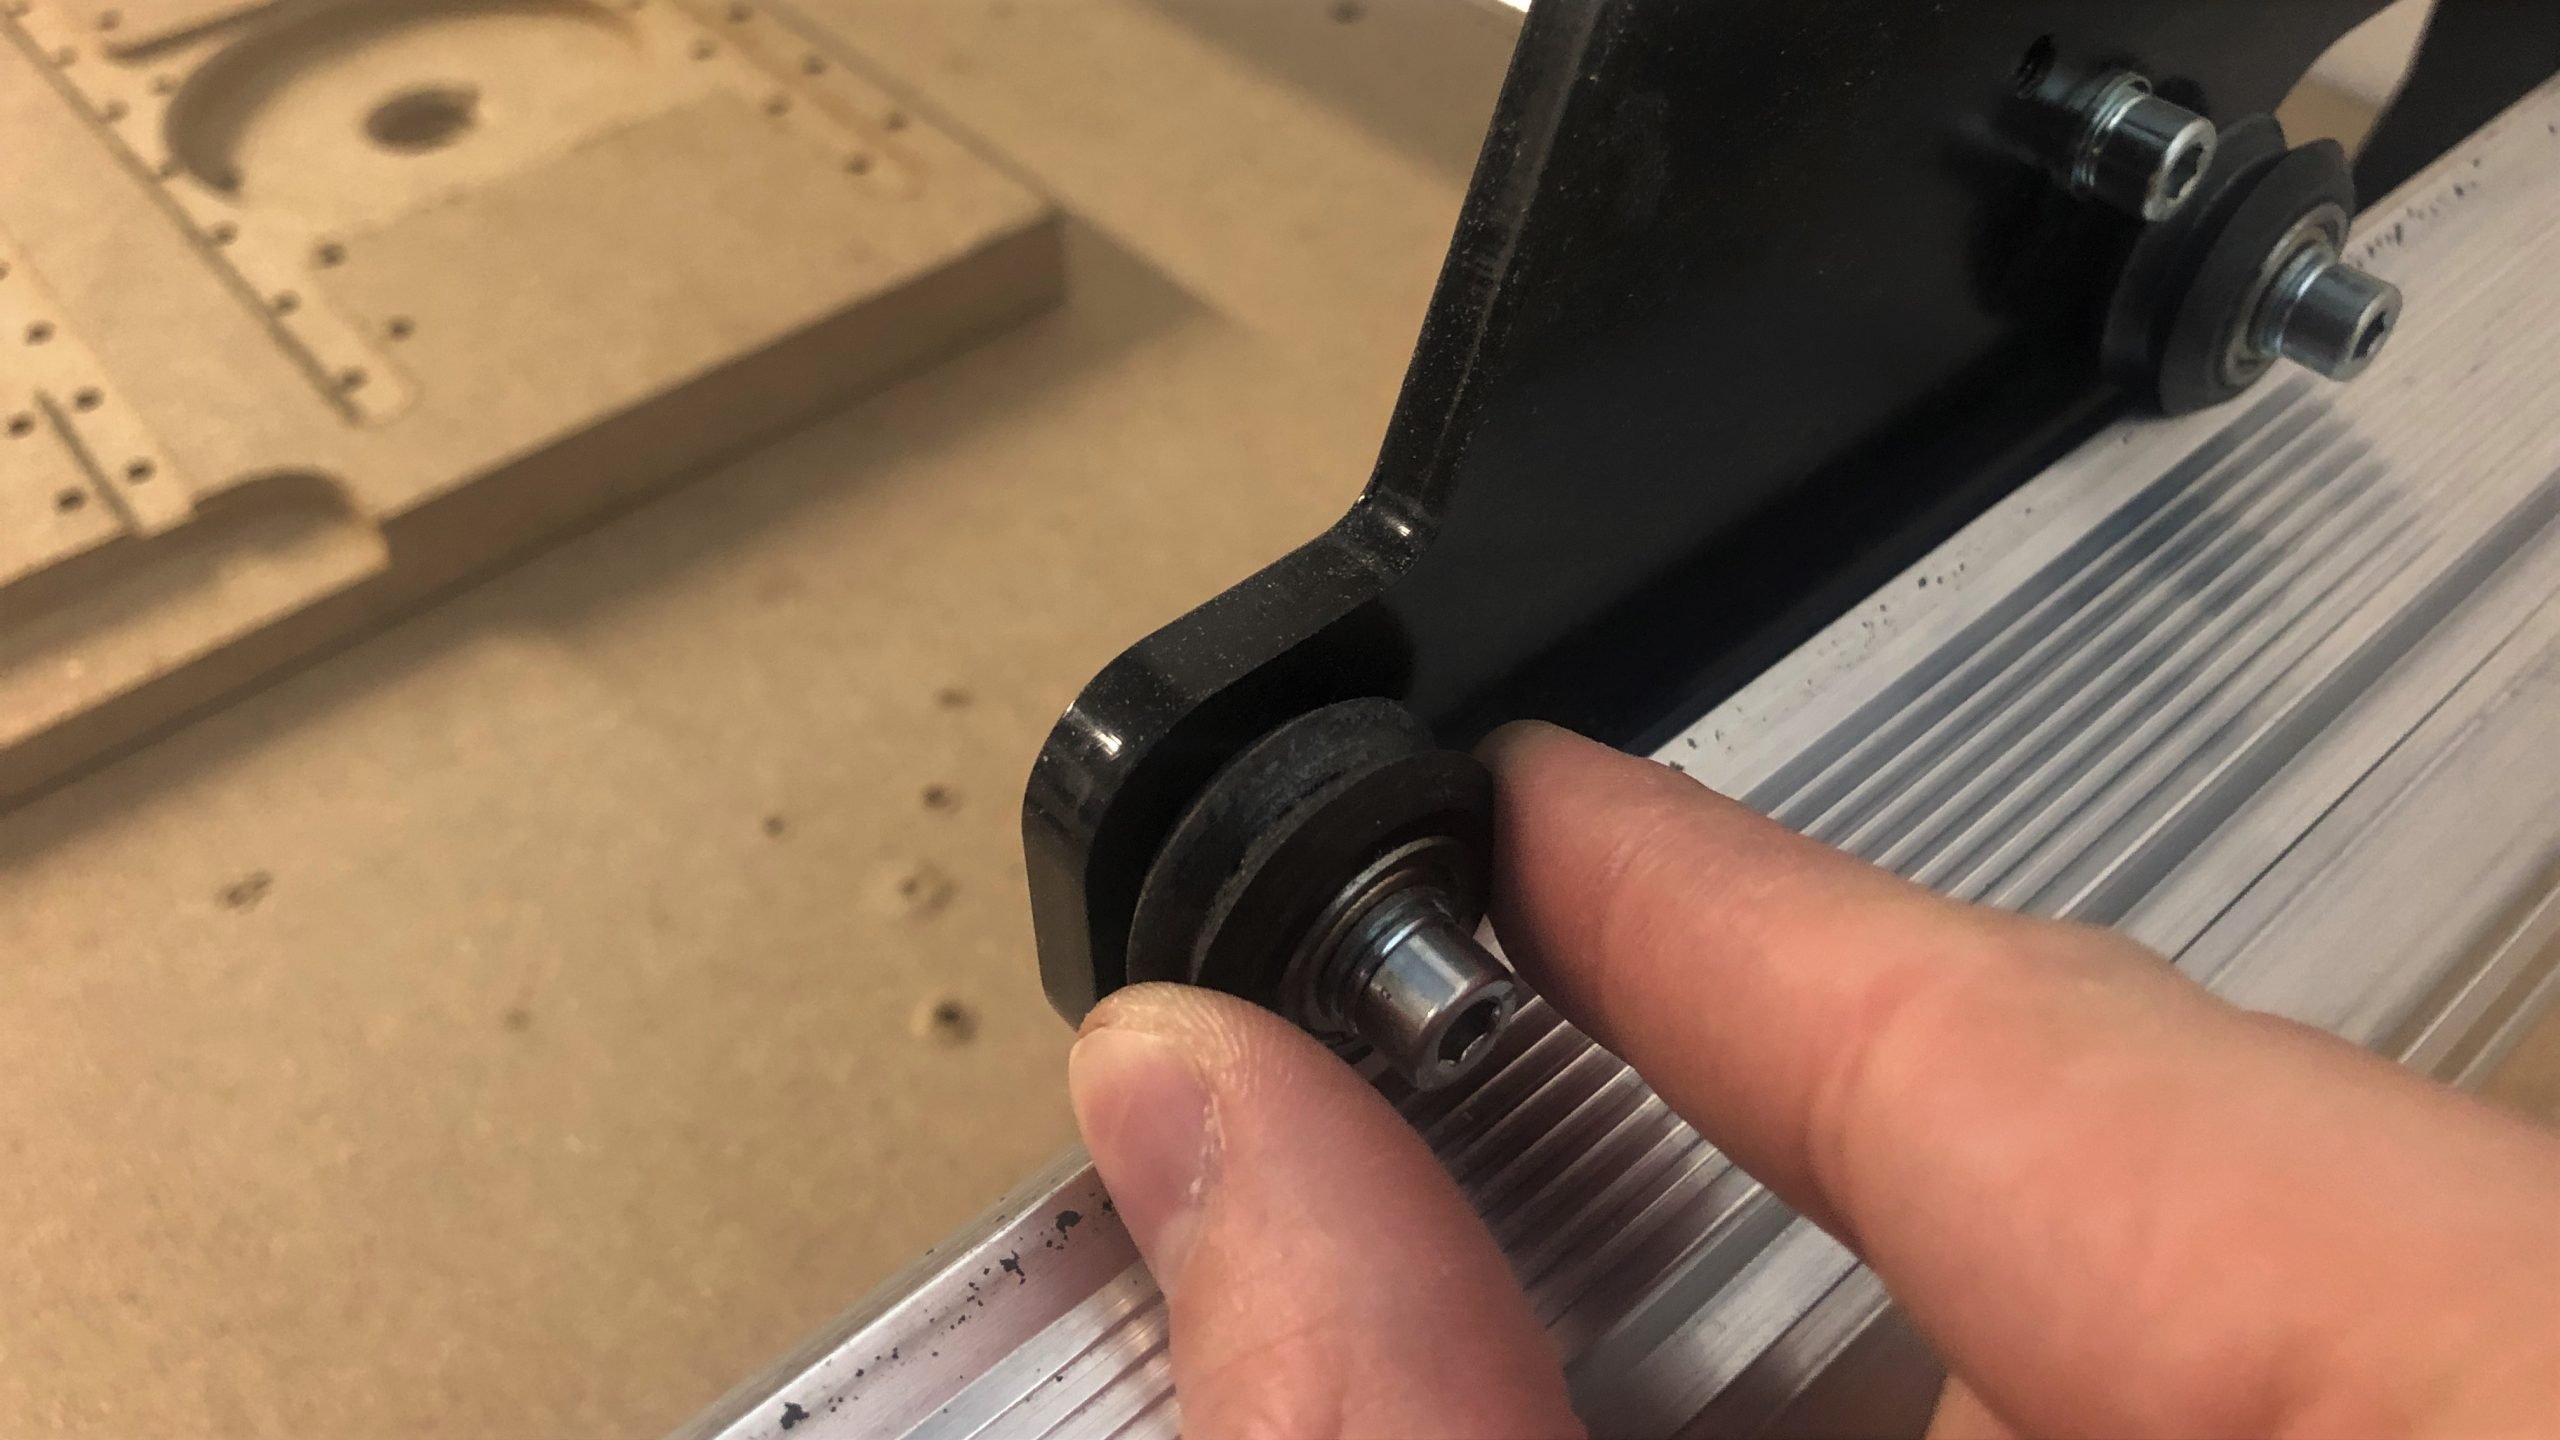
One simple way to tell if your wheels have the right spacing to clamp onto the rails is to check them by hand. The ‘sweet spot’ is where you’re able to barely turn each wheel with your fingers, if they spin easily or not at all then the wheel spacing is either too far apart or too close together.
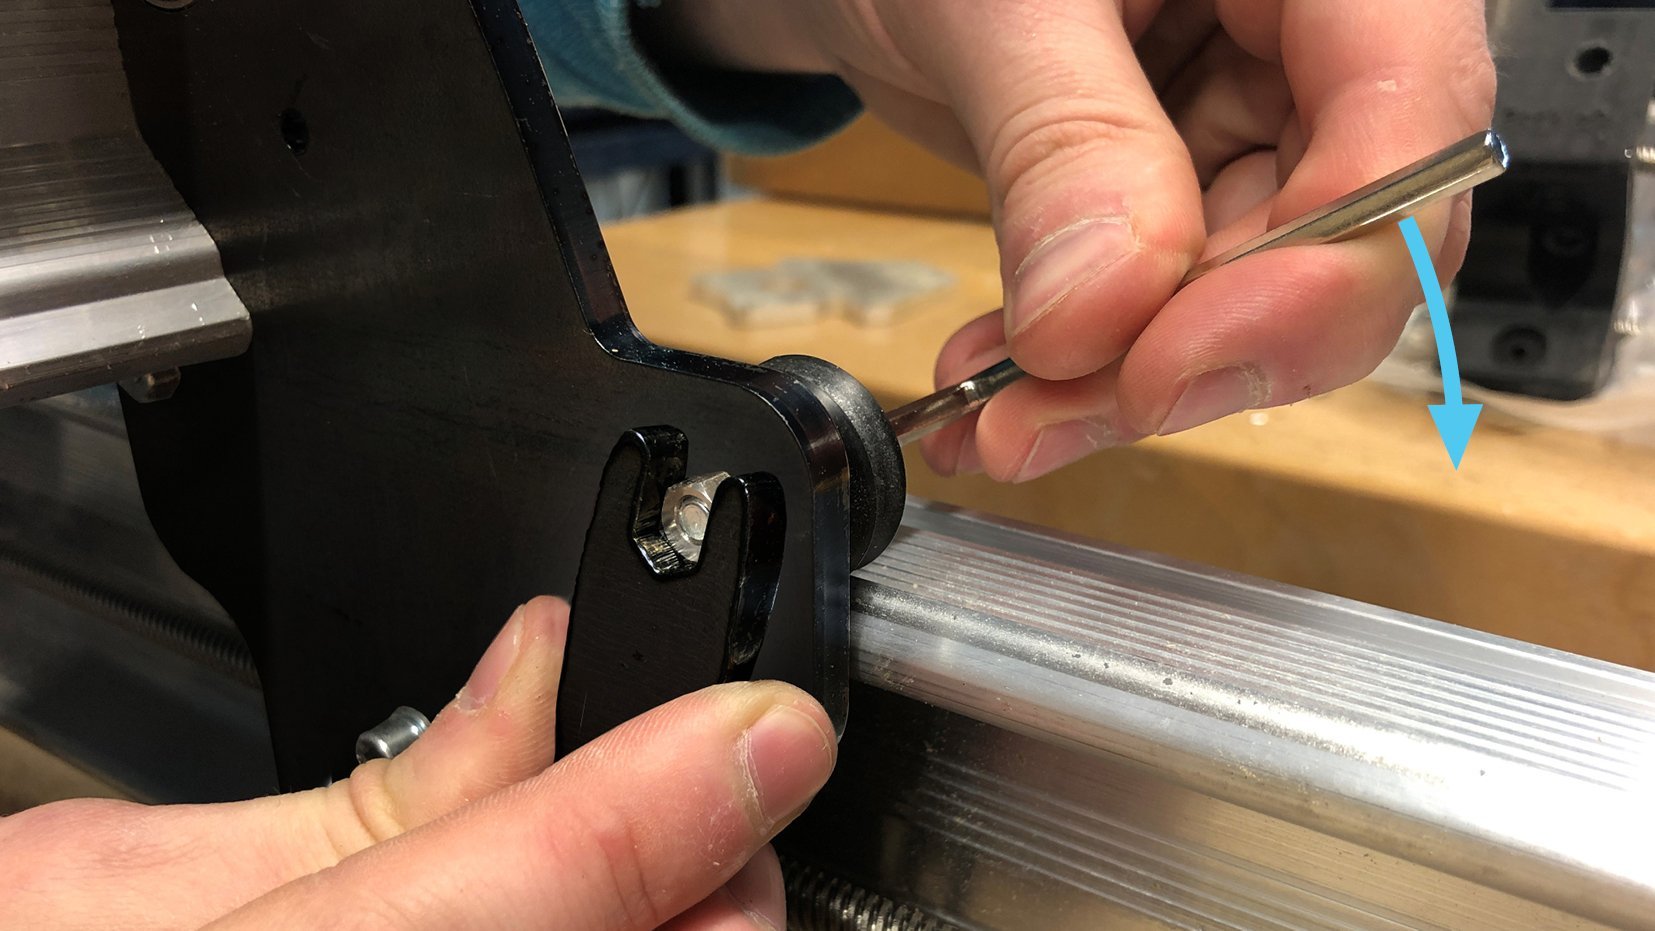
If you’ve noticed any wheels have worn out, you’ll need to ‘tighten’ them back down. Get your LongMill wrench and an M5 Allen key and start by loosening the wheel bolt far enough that you can rotate the eccentric nut with the wrench (pictured).
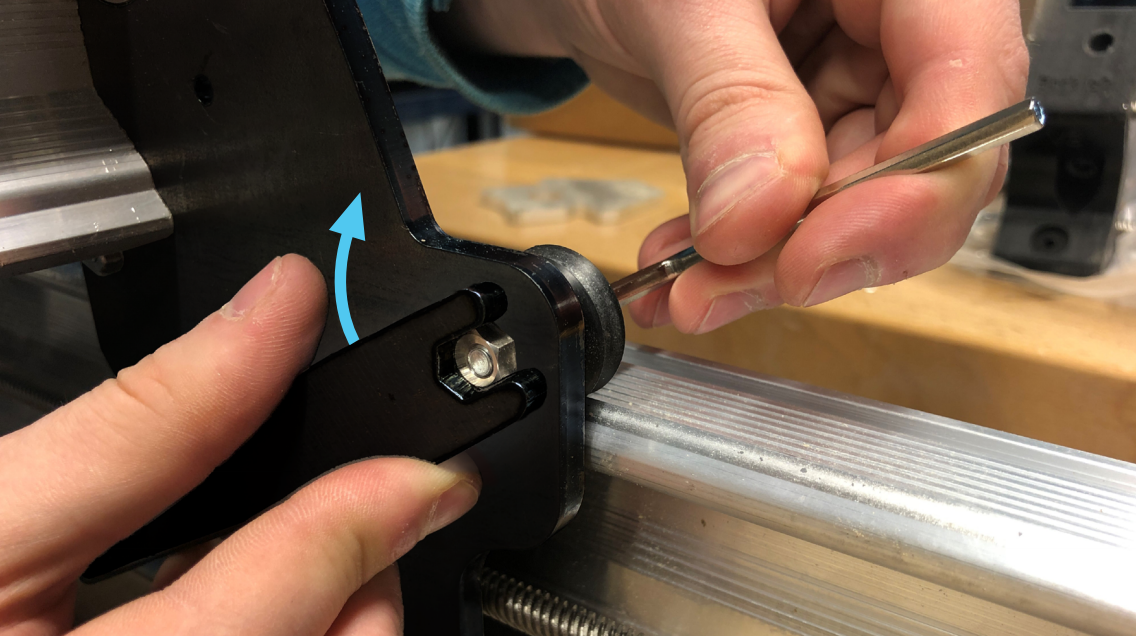
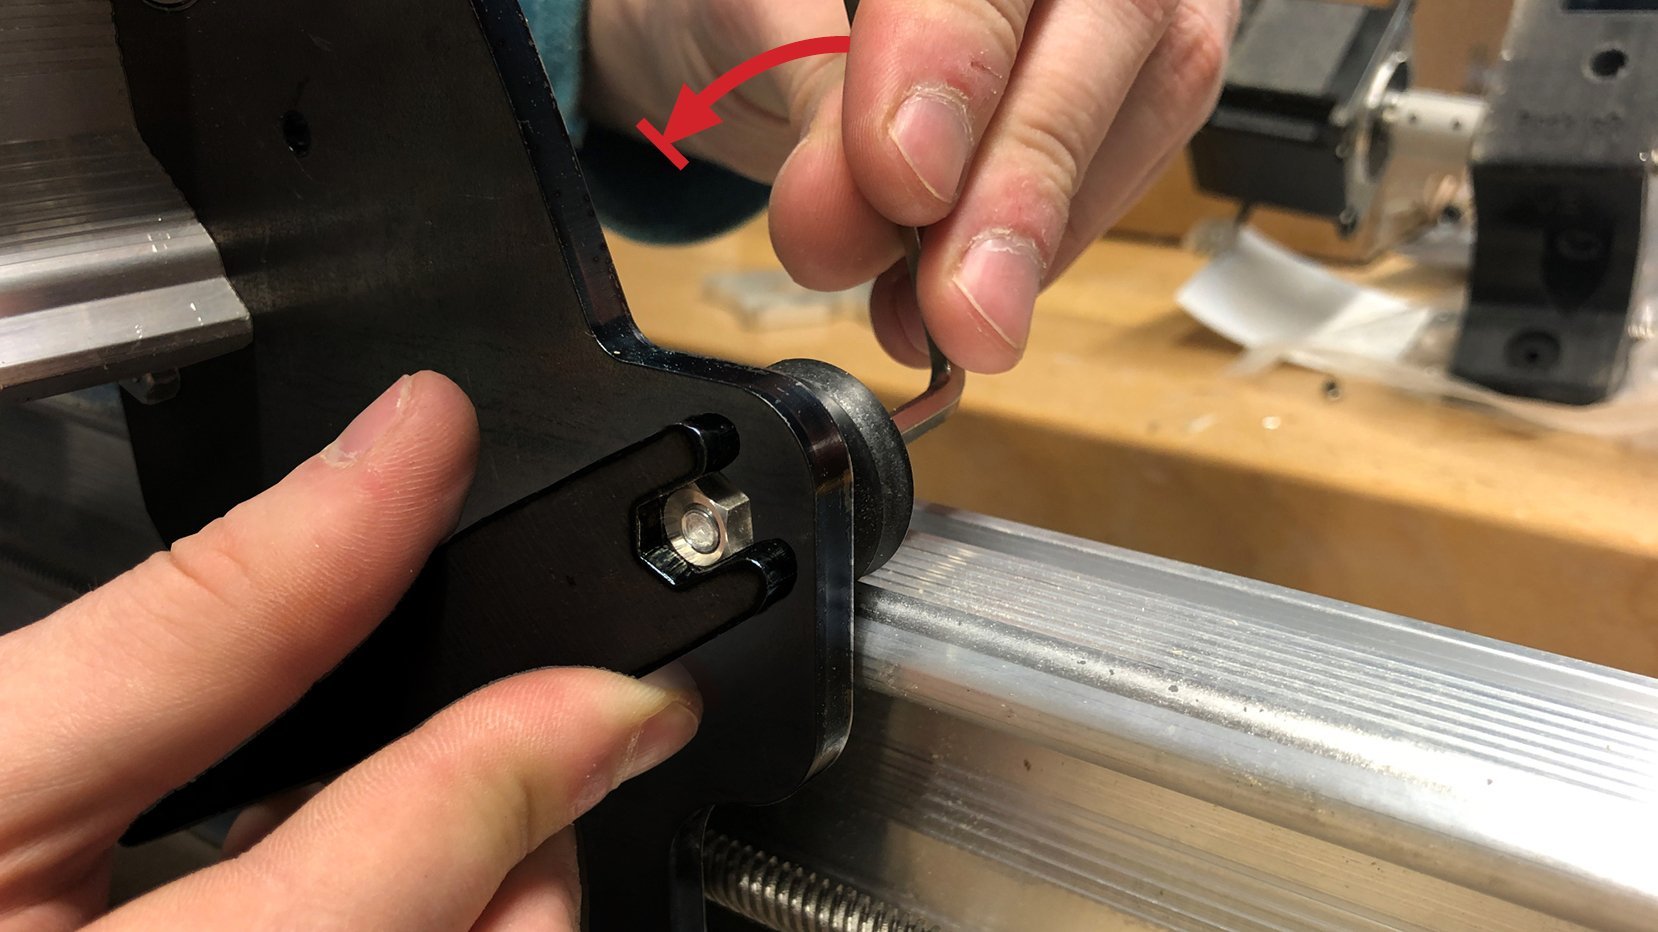
Turn the nut so the eccentric hole gets closer to the rail which will bring the wheel closer to the rail as well (in this case turning the nut clockwise brings the wheel closer to the rail). This adjustment should be very small since it can have a big impact on the wheel placement, plus over-tightening the wheels can put added stress on your machine and also cause premature wear.
Once you’re satisfied with the nut placement, re-tighten the M5 bolt with the Allen key to confirm the new location. At this point you’ll want to check both the wheel you just tightened as well as its static ‘partner’ wheel on the opposite side of the rail for the right ‘sweet spot’. Whichever wheel is on top will always be harder to spin.
And that should conclude the process! If the wheels still don’t feel right go back and repeat the steps as needed. If you wish, you can also watch this video for a better visual demonstration on how to adjust your eccentric nuts. There’s also a community-made video on our Facebook group that does a great job explaining it.
Adjusting your Anti-backlash nuts
The LongMill comes with four Delrin anti-backlash nuts that allow users to reduce backlash and compensate for wear over time. This is normally noticeable as a slight wiggle in that axis of the machine and if left unchecked will reduce the accuracy of your cuts and sturdiness of your CNC. You can read more about backlash and how it can affect the precision of your machine on this awesome page: http://www.machinetoolhelp.com/Repairing/What_is_backlash.html
If you’ve got the white, spring loaded anti-backlash nuts installed, these use springs to continue adjusting themselves so they don’t need any manual upkeep. If you start to notice wiggling in your machine anyway, then the nut has probably worn out and needs replacing. The T8 size is used on all axes, except if you have a 48″ X-axis which uses one T12 nut.
If your machine still uses the older, black nuts, follow these steps:
-
If you have the dust shield add-on for your machine, remove it so you can access the mechanics underneath.
-
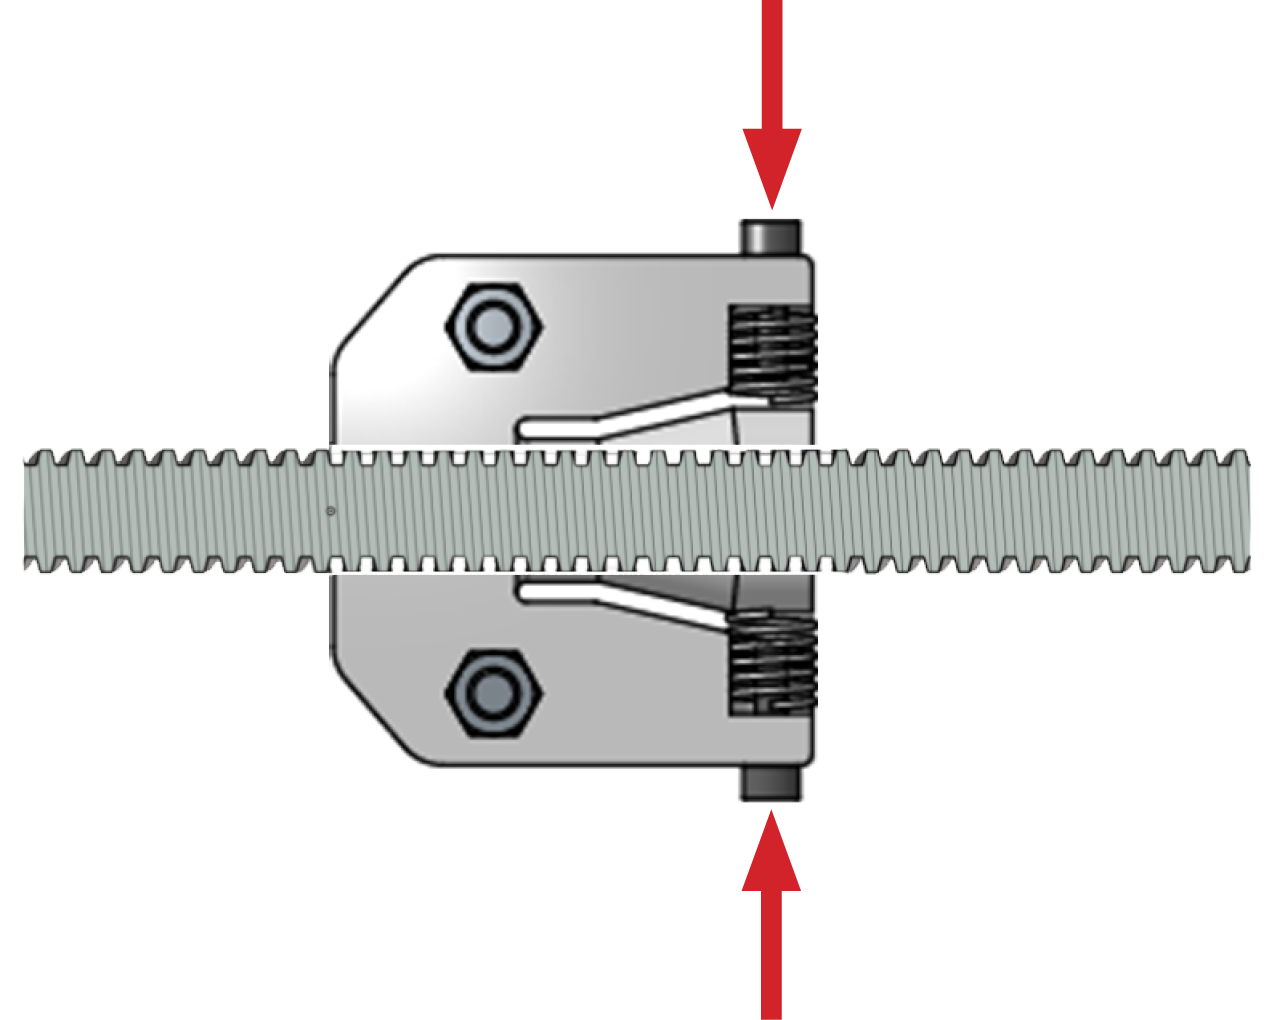
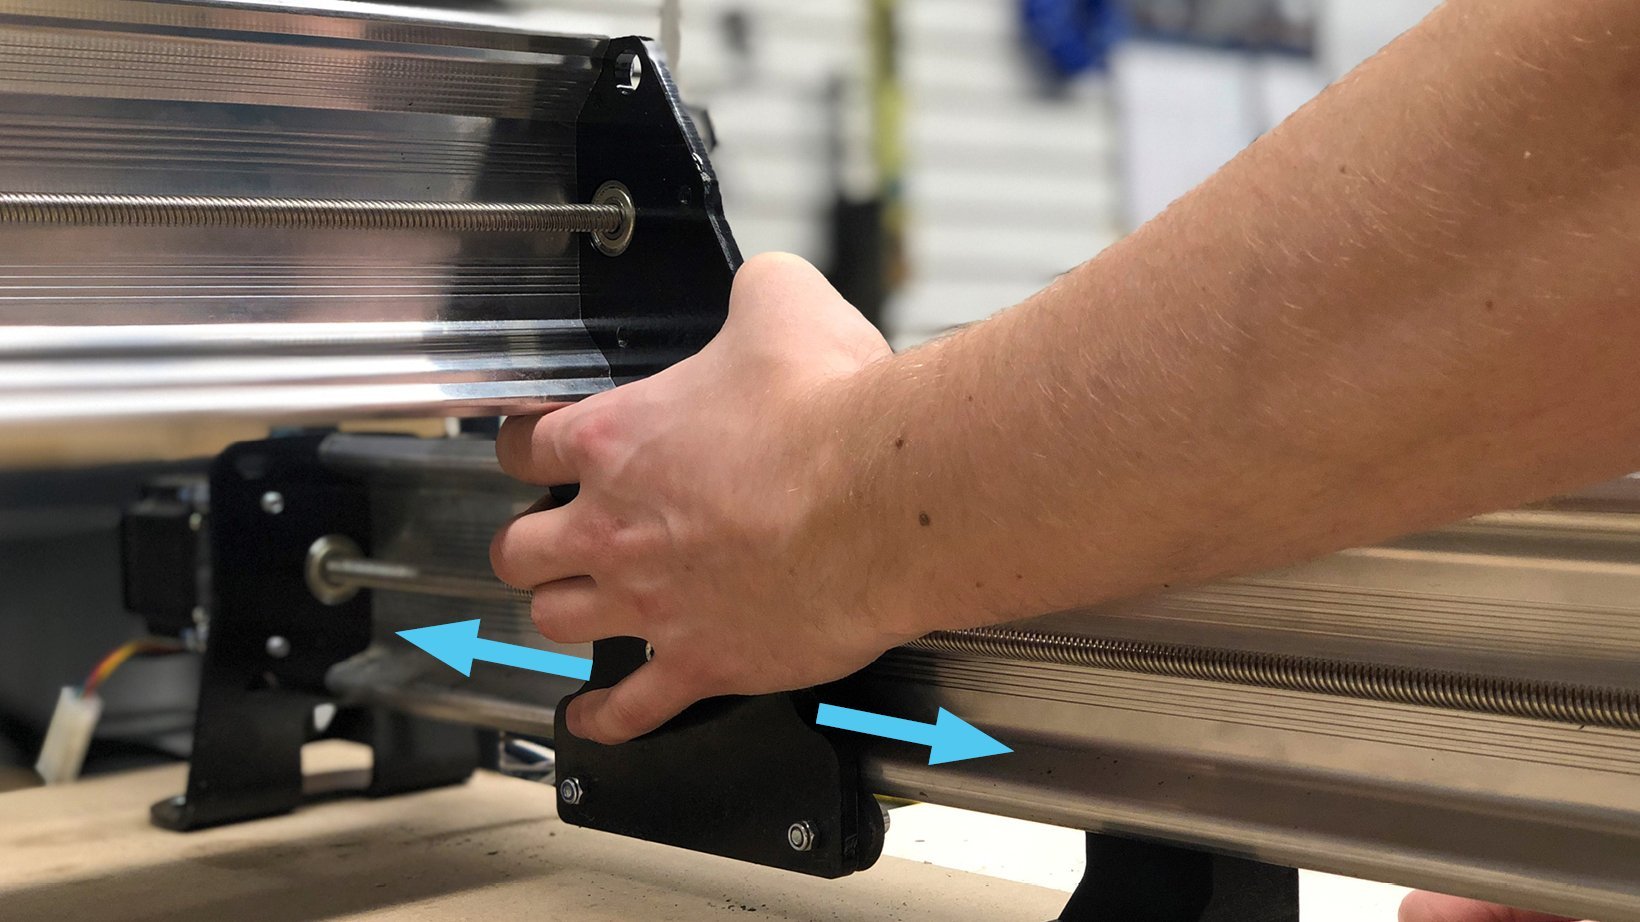
Check X, Z, and both Y plates by moving each of them back and forth. If you can feel them wiggle a little bit even though the lead screws are stationary you may need to tension the anti-backlash nut.
-
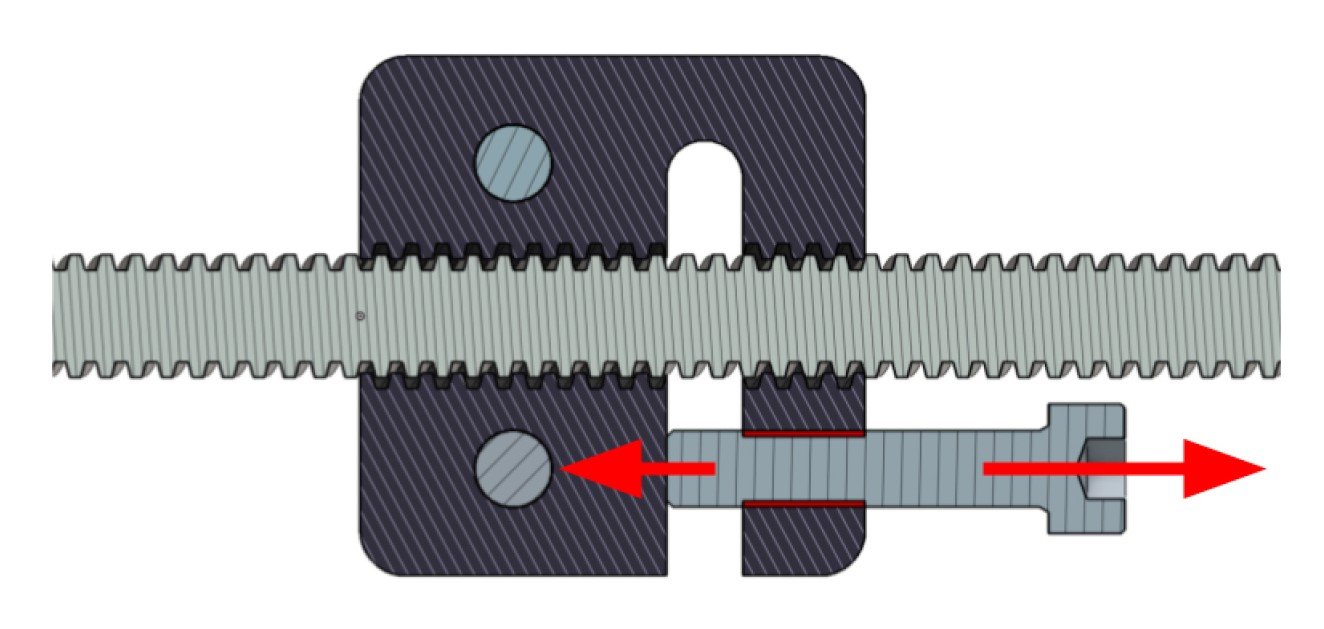
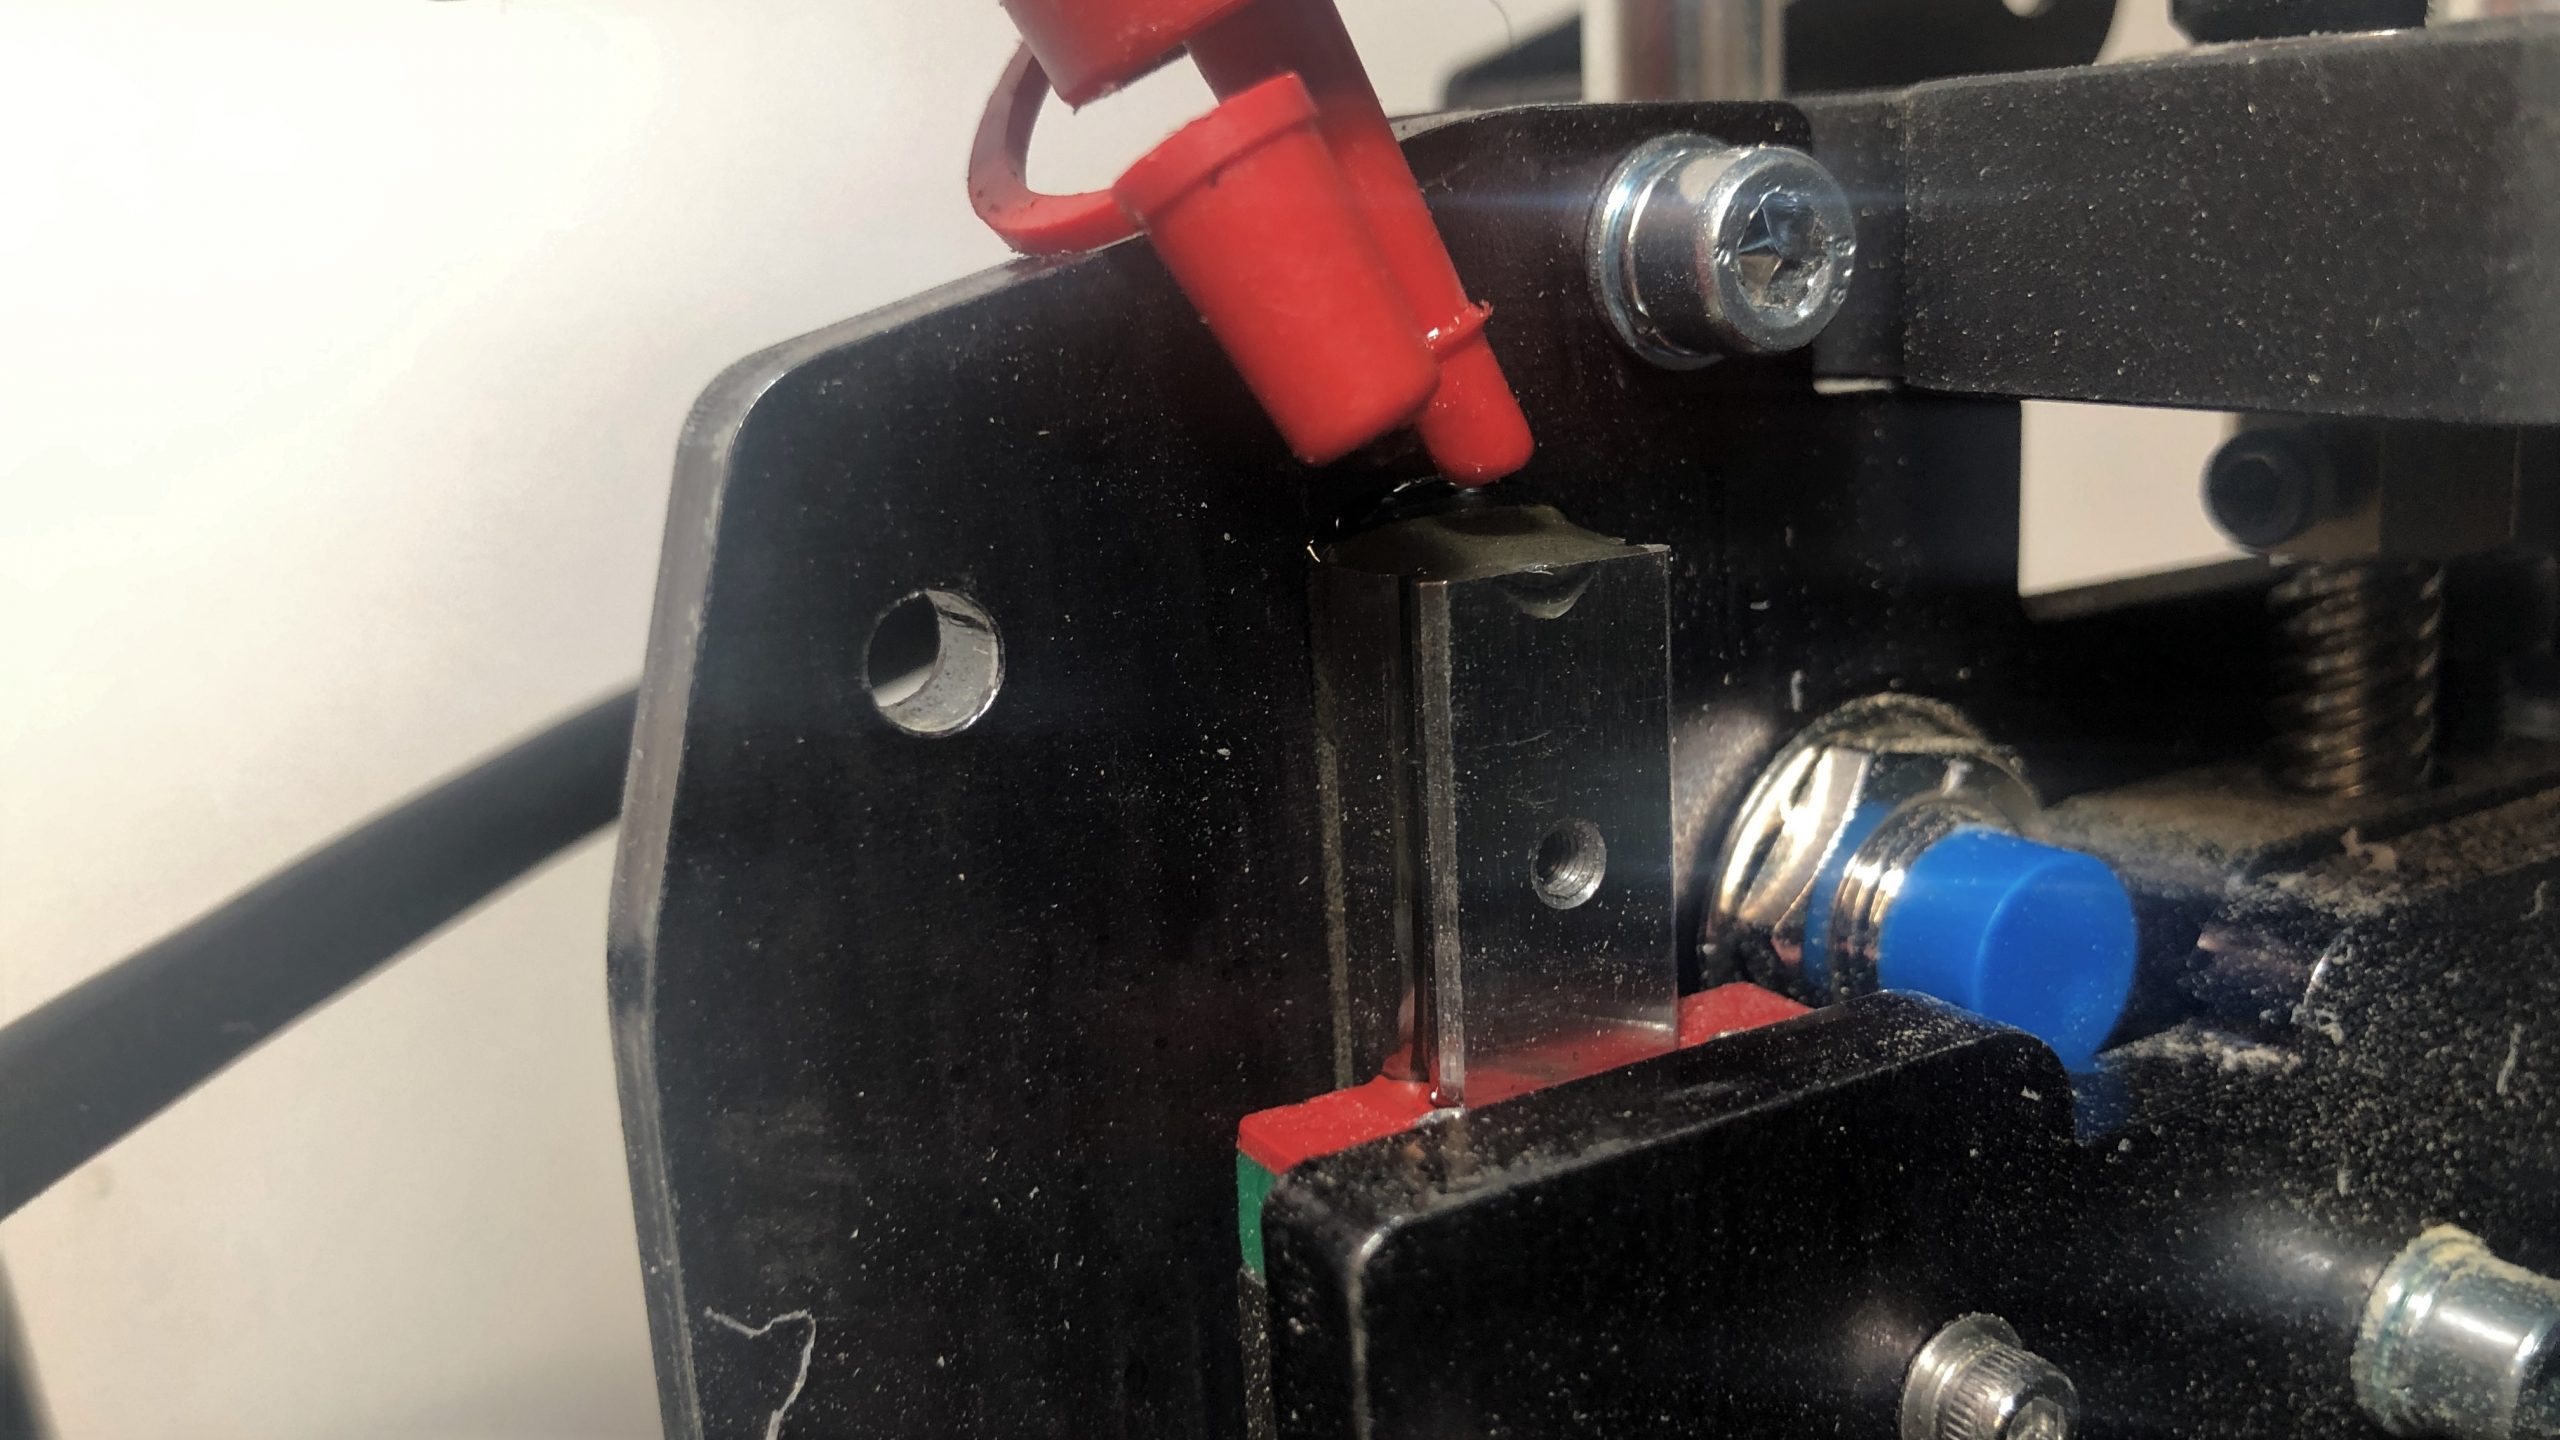
You can see in the picture below how tightening this screw widens the nut to remove any looseness. For the plates that you noticed were wiggling, use an M5 allen key to reach the tensioning screws (locations are shown in the pictures below). Adjusting each screw should only happen a very very tiny rotation at a time before checking again for looseness in the plate. These screws normally require very little rotation and if you over-tighten them it can put added stress on your machine and also cause premature wear. Remember that once the Delrin nut is worn excessively, the M5 bolt head could start to rub or bind against the lead screw and damage it so it should be replaced.
")


Maintaining your Linear Guides
The frequency of lubricating your linear guides will vary depending on the type of cutting you do and the frequency of machine use. Generally we recommend servicing them every 20-30 hours. If you experience grinding noises or roughness in your gantry, we recommend checking them more often:
- Wipe your linear guides with a clean cloth, paper towel, rag, or shop towel to remove any dust that may have accumulated on your linear guides. Move your Z-axis up and down if needed.
- Most general-purpose lubrication options such as the 3-in-1 oil should suffice. It is not recommended to use dry lubricants or anything with particulates such as graphite in the lubricant.
- Apply a liberal of machine oil or grease to your linear guides. Move your Z-axis up and down to ensure that the bearings inside have a chance to get coated.
Here are some links to more info about lubrication if you’re interested:
- https://www.thomsonlinear.com/en/support/tips/what-should-be-used-to-lubricate-linear-bearings
- https://www.hiwin.com/pdf/lubricating_instructions.pdf
Checking for Loose Hardware
‘Loose hardware’ on your LongMill generally refers to all the visible bolts and nuts, including the set screws on the ACME locking nuts and the couplers. It’s best practice to do a check around the whole CNC on occasion to check the bolt tightness and re-tighten the fasteners you find loose. This is because vibrations from cutting can slowly loosen bolts and nuts over time, even though we try to mitigate this by using nylock nuts and spring washers wherever we can.
Some key areas to check:
- Set screws on all couplers and ACME locking nuts
- M5 screws holding the feet onto the Y-rails and Y-axis plates onto the X-rail
- M5 screws mounting the stepper motors to their steel plates
- M5 screws on the router mount from in front and where it’s held in from behind
- M3 screws holding the Z-axis steel plate on and the linear rails to the X-axis plate
- Any assorted fasteners on any add-ons you may have received with your MK2
Replace V-wheels, Nuts
V-wheels and Delrin nuts wear out over time and you’ll know when to replace them when the eccentric nuts can’t be rotated any further to tighten up the v-wheels or the tensioning screw on the nut doesn’t allow for any more adjustment. This can also happen for the white anti-backlash nuts which eventually start to become loose.
To see a great general process of how to fully replace loose wheels, watch this great video by Bucky’s Customs:
Next, see how to go through the process of removing old nuts off your machine to replace them with fresh ones. Remember once the new ones are in place, if you have the black type you’ll have to re-tension them, and if you have the white ones you might want to jog back and forth a bit to break them in.
Community Comments
Barry: https://www.facebook.com/groups/mill.one/permalink/1229321364205859/