
Congratulations on receiving your new Vortex Rotary Axis! Check out our unboxing and assembly video or continue reading below.
When you open up the box:
- You will find 2 hardware boxes
- The first box contains most of the parts that are made out of metal, including the headstock and tailstock bodies and the stepper motor that powers the rotary axis
- The second box contains a lot of the plastic components of the Vortex together with a hardware bag that contains fasteners among other smaller parts
- In between the 2 boxes are 2 Styrofoam pieces that fill the void and also houses the chuck
- At the very bottom you will find 1 or 2 track pieces depending on the configuration ordered, wrapped in cardboard
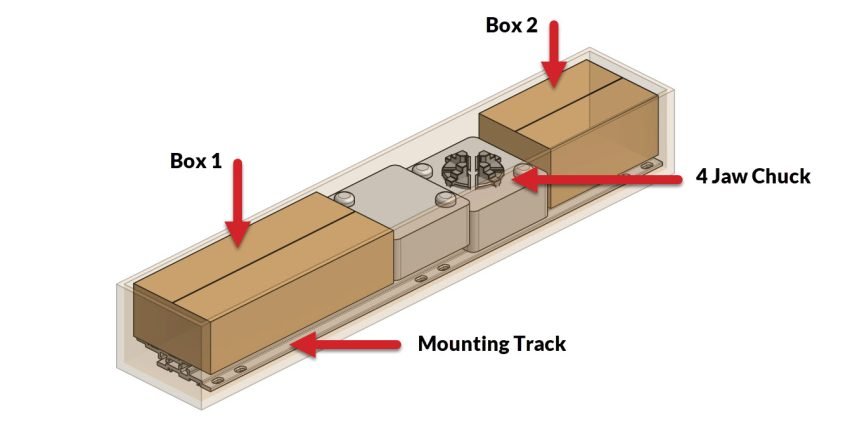
Before you start assembly, you will want to take the 2 boxes and the Styrofoam piece that contains the chuck out of the packaging and place them in your assembly area. You can set the track(s) aside for now.
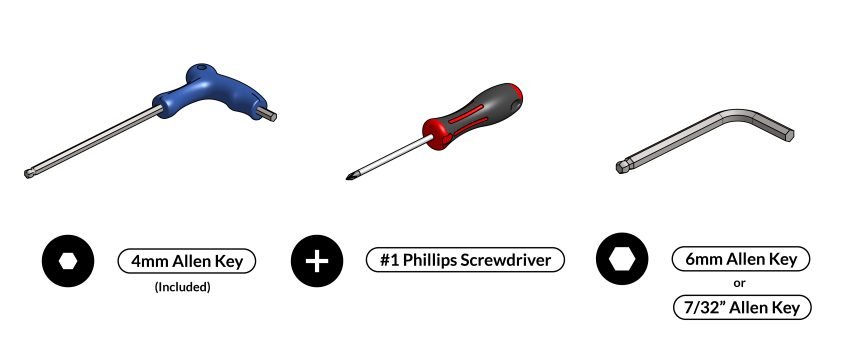
Tools You’ll Need
You’ll need these tools on hand for assembly. Most people will have these in their shop and there is a size 4 Allen key that comes with your Vortex kit:
- Metric Allen key size 4
- Phillips screwdriver #2
- Metric Allen key size 6 or Imperial Size 7/32”
- #8 wood screws
Missing/Broken Parts?
We got you – your kit has spares and redundancy included. If a part is lost or isn’t going together how you expect, no worries; just check through the bags and you’ll likely find what you need to continue assembly. Expect a couple of bolts left over at the end and feel free to set these aside for future machine maintenance.
We supply extra parts so that:
- If a part doesn’t work properly the extra one can be used instead
- If you lose something (especially small things) you don’t have to search the floor
- We reduce the chance of packing too few on our end
If a part is missing completely, check that you’re looking for the right thing and ensure you look through all the packaging you received with your Vortex.
If a part arrives broken and doesn’t have a spare, the Vortex’s warranty covers replacement parts and we’ll even be happy to help you out if you break it yourself. Just shoot us a message here (https://sienci.com/contact-us/) and we’ll get back to you as soon as we can.
Assembly Tips
-
- Read the instructions
Many issues during assembly can be solved by re-examining the instructions. Check that you didn’t skip a page and that you completed the previous step correctly. Some steps are hard to explain and some parts have names that are hard to remember so looking at the pictures more closely can also help you to better understand what needs to be done. Reading is encouraged if you’d like more detail on where to locate the part, what function it serves on the machine, and other elaborative information. - Remember the language
This manual contains some technical language as well as a distinct visual language. Keeping these in mind will make the assembly easier for you to understand and ensure that less mistakes happen.
- Read the instructions
| • Section title pages: show the part of the machine you’ll be working on next |  |
| • Blue outlines and arrows: show where parts start and where they end up |  |
| • Rotation arrows: come as either blue or red, blue indicating a loose placement of the part and red indicating a firm tightening required to fasten the part into place |  |
| • Caution triangles: marks something that requires attention |  |
Connect With the Community
If you are looking to get quick advice or to share your excitement about the Vortex, post in our forum or Facebook group! We have a large and friendly group of CNC enthusiasts who enjoy engaging in conversations and sharing their CNC experiences.
Final Words
You’ve got this! We want you to succeed and have designed this Vortex to give you a great rotary axis experience while not requiring much experience or assembly accuracy from you.
We’ve got many resources at your disposal on our site and amongst our community. Ask questions, take breaks when needed, and soon you will be helping others by answering those questions you once had. 🙂
Assembly will take just over an hour, and includes: assembling the Headstock, Tailstock, Track, and finally Electronics.