Using the Vortex with other CNC machines
We’d love to see rotary axis projects with the Vortex on machines of all shapes and sizes, so we’ll briefly walk through some of the considerations and steps needed to use the Vortex Rotary Axis with machines and controllers other than our own.
It should be noted that at this time we cannot offer full support for the Vortex used in combination with machines other than the LongMill due to the lack of tested compatibility with other machines. This guide merely serves as a reference for anyone curious of or in the process of adapting the Vortex Rotary Axis to their machine.
Firmware
First off, you’ll need to make sure your machine/controller firmware will be suitable for this. If you’re unable to make changes to the firmware of your controller or are not comfortable doing this, it may not be wise to continue.
Because the Vortex’s A-axis motor will require a different ‘resolution’ (ie. how many steps in the motor for one degree of rotation) than what your controller is currently set to, we’ll need to adjust this. To figure out what value to set this to, you can use the simple formula of:
2.469 / [micro stepping value] = steps per degree setting
Your micro stepping value will depend on the motor driver setting used by your controller. In the case of the Sienci Labs LongBoard, this is ⅛ – therefore we set this value to Many other controllers will typically use values such as 1/16 or 1/32 microstepping, so check with your controller’s manufacturer if you’re not sure.
For context, this value of 2.469 comes from a combination of factors such as the assumed 200 steps per revolution for Vortex’s motor, the pulley reduction inside the Vortex, and the obvious assumption of 360 degrees in one revolution.
You’ll also likely want to modify your maximum feed rate, and acceleration values. We recommend using 8000 mm/min, and 750 mm/sec^2, respectively, but you might want to change these as needed for your setup or preferences.
Wiring
A notable feature of the Vortex Rotary Axis is its ability to ‘intercept’ the Y-axis motor signal/power between the controller and motors. With the flip of this switch you’re able to enable use of an A-axis instead of your Y-axis. This is highly convenient for machines/controllers limited with up to 3 axis of simultaneous control such as most popular grbl-based controllers.
If your controller happens to have support for an independent A-axis already, you’ll likely want to skip this section and wire the Vortex A-axis motor cable directly to your controller’s A-axis output.
Follow the diagram shown below to reconfigure your controller’s Y-axis wiring and ‘insert’ the Vortex’s switching module in between this connection. Depending on the connector type used on the motor cables for your machine, you may need to (destructively) remove and strip wiring to adapt this to the green terminal-style connectors used across the Vortex. Do this at your own risk as we cannot offer support for any faulty cable connections or repair to your machine’s factory condition.
An alternative way to do this non-destructively, is to purchase or create new wires with your Y-axis motor’s appropriate connectors, then purchase the appropriate connectors to interface with the controller-side of the Vortex’s wiring harness.
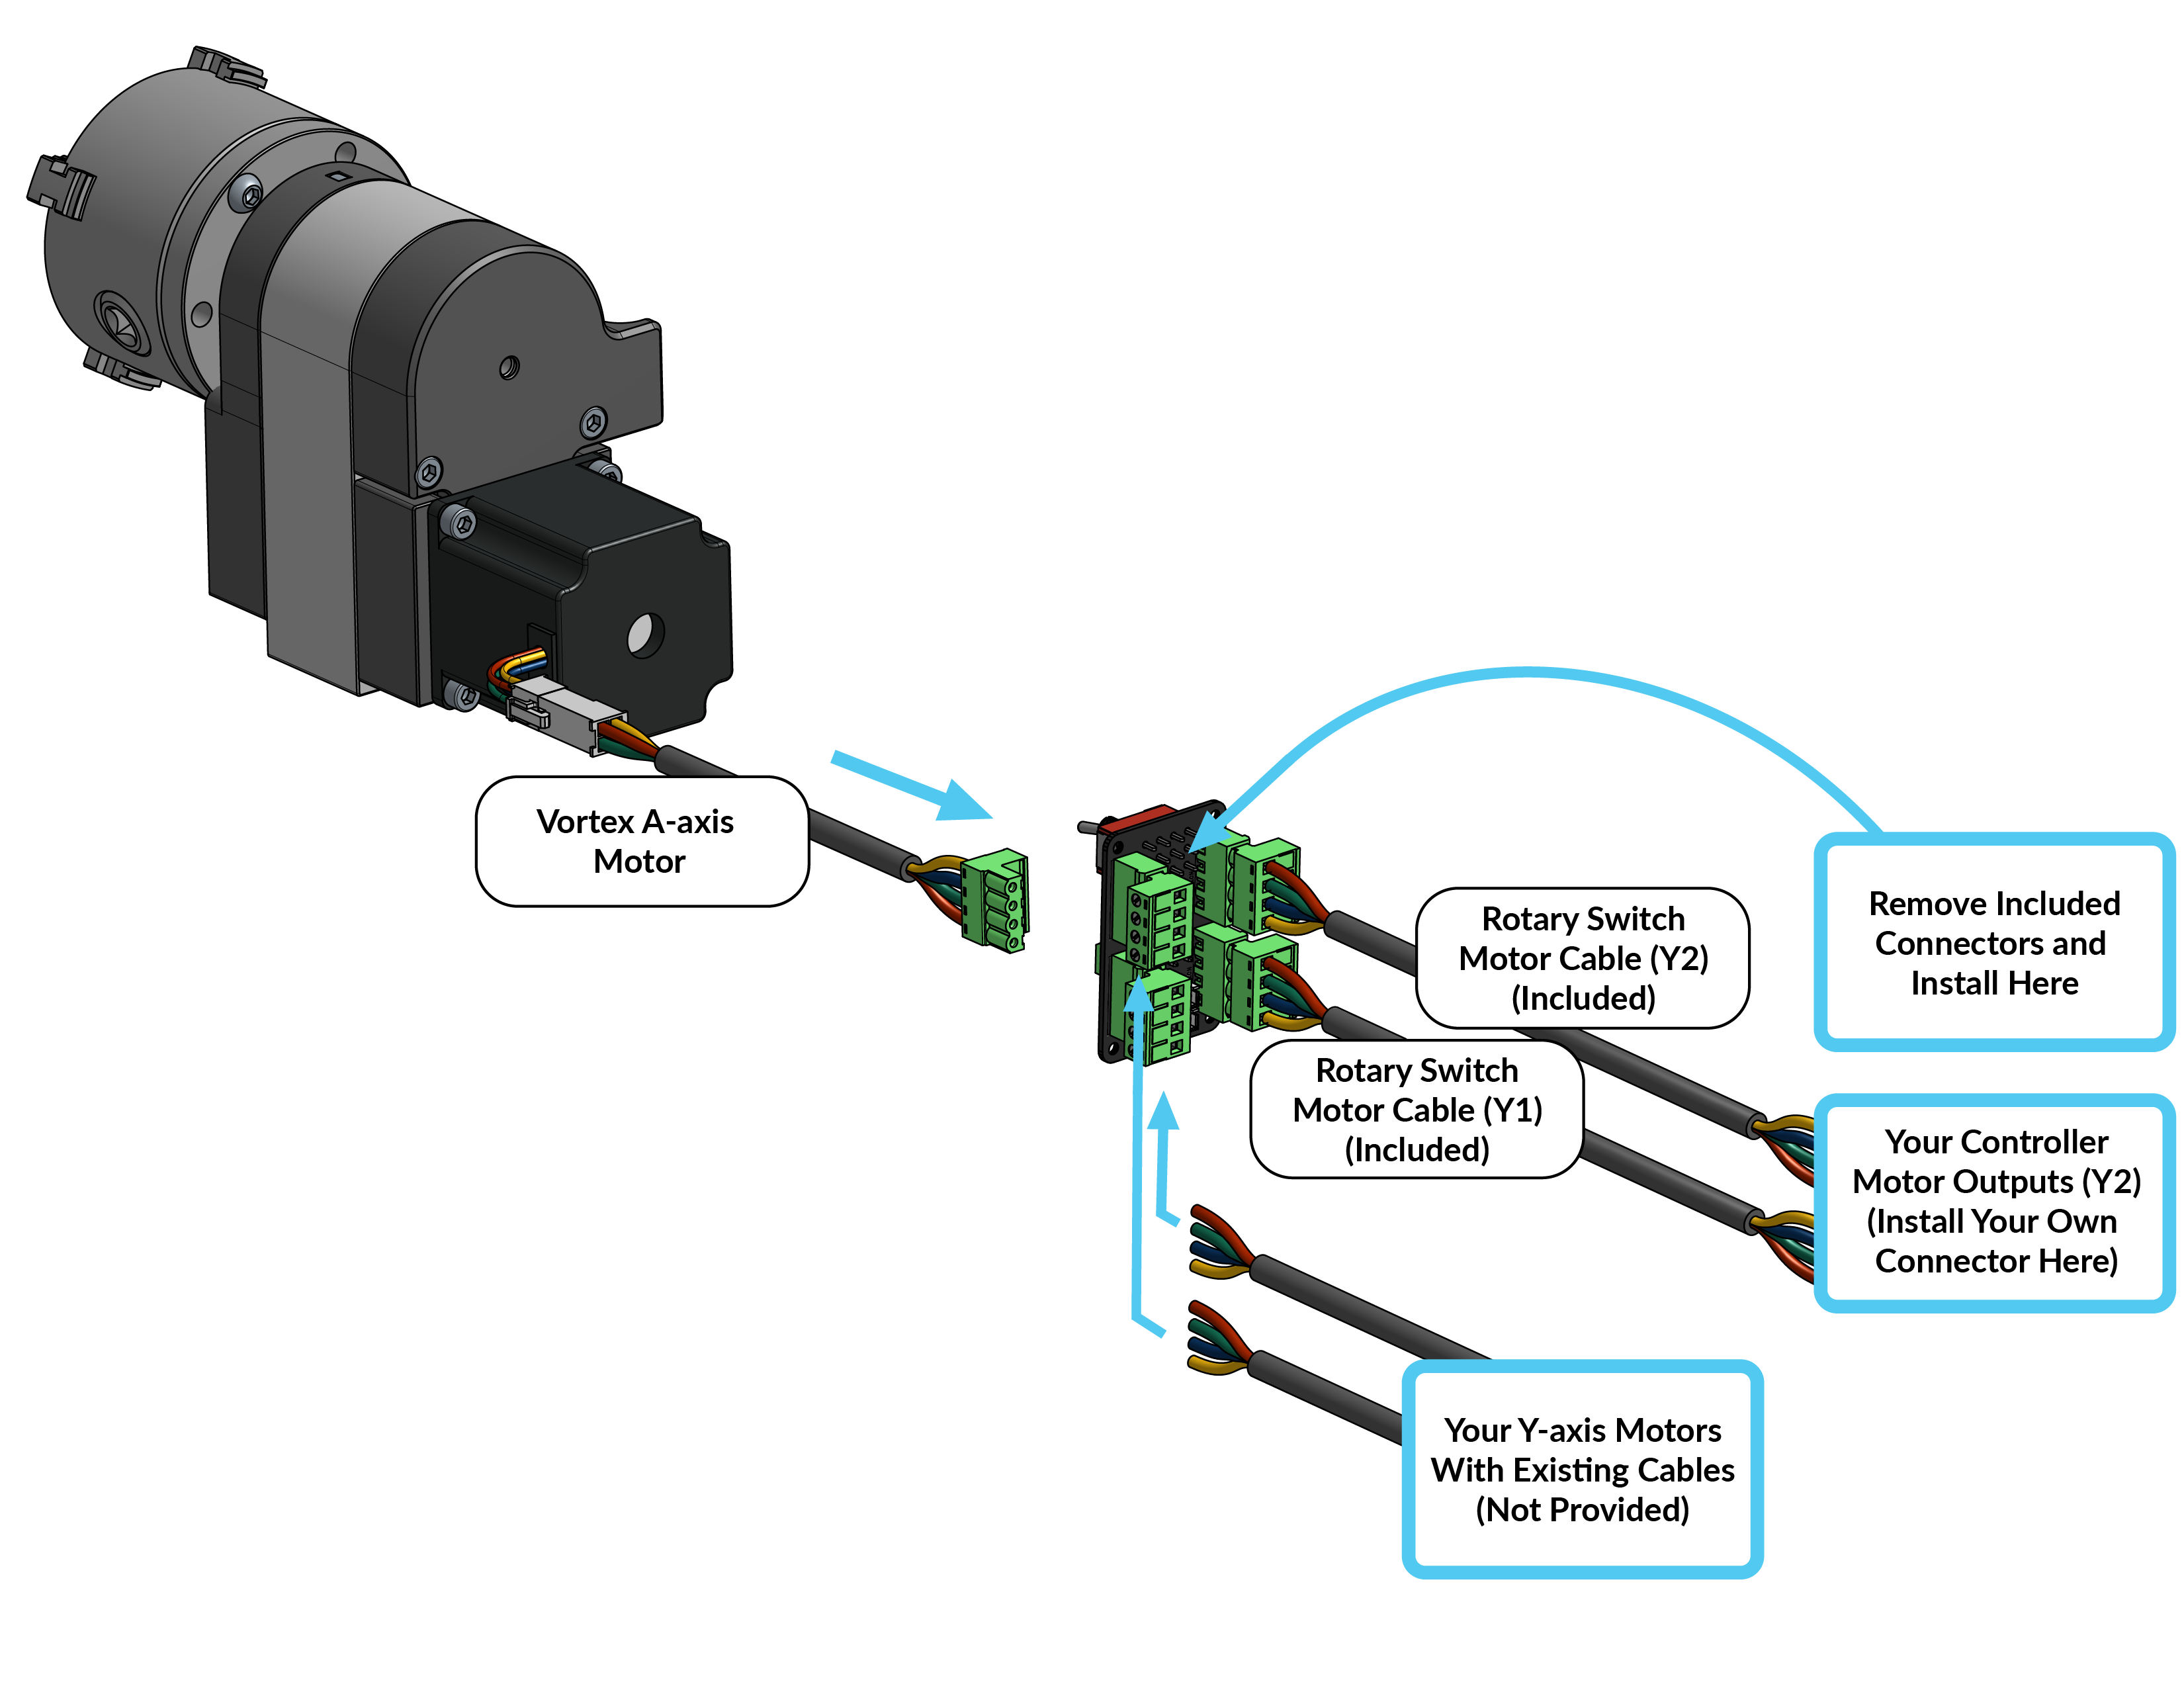
The Vortex features an integrated limit switch. This switch operates using a 5V, 3 pin connection, which may or may not be compatible with your controller. To wire this connector, you may choose to simply plug this into your controller while in use, or wire this in parallel somehow with an existing Y-axis limit switch on your machine.
The Vortex switching module includes three white JST XH2.54 connectors used for wiring the A-axis and Y-axis limit switches in parallel, so that either can be used without unplugging anything. If possible, you may want to crimp this type of connector onto your limit switch, and wire this accordingly. The Vortex kit also includes a limit switch interface cable that can be wired to your controller for this purpose.
Software
Much of what makes the Vortex Rotary Axis straightforward to use is the integration of this ‘Y-axis used as an A-axis’ functionality into our machine interface software, gSender. This software is compatible with any grbl-based controller/machine, so reaping the benefits of this for your machine should be possible. That being said, this rotary axis functionality within gSender has had limited testing across other controller/machines, so we cannot guarantee full support and functionality.
For other non-grbl based controllers, we recommend checking with your manufacturer to see if A-axis control is supported.
Physical Setup
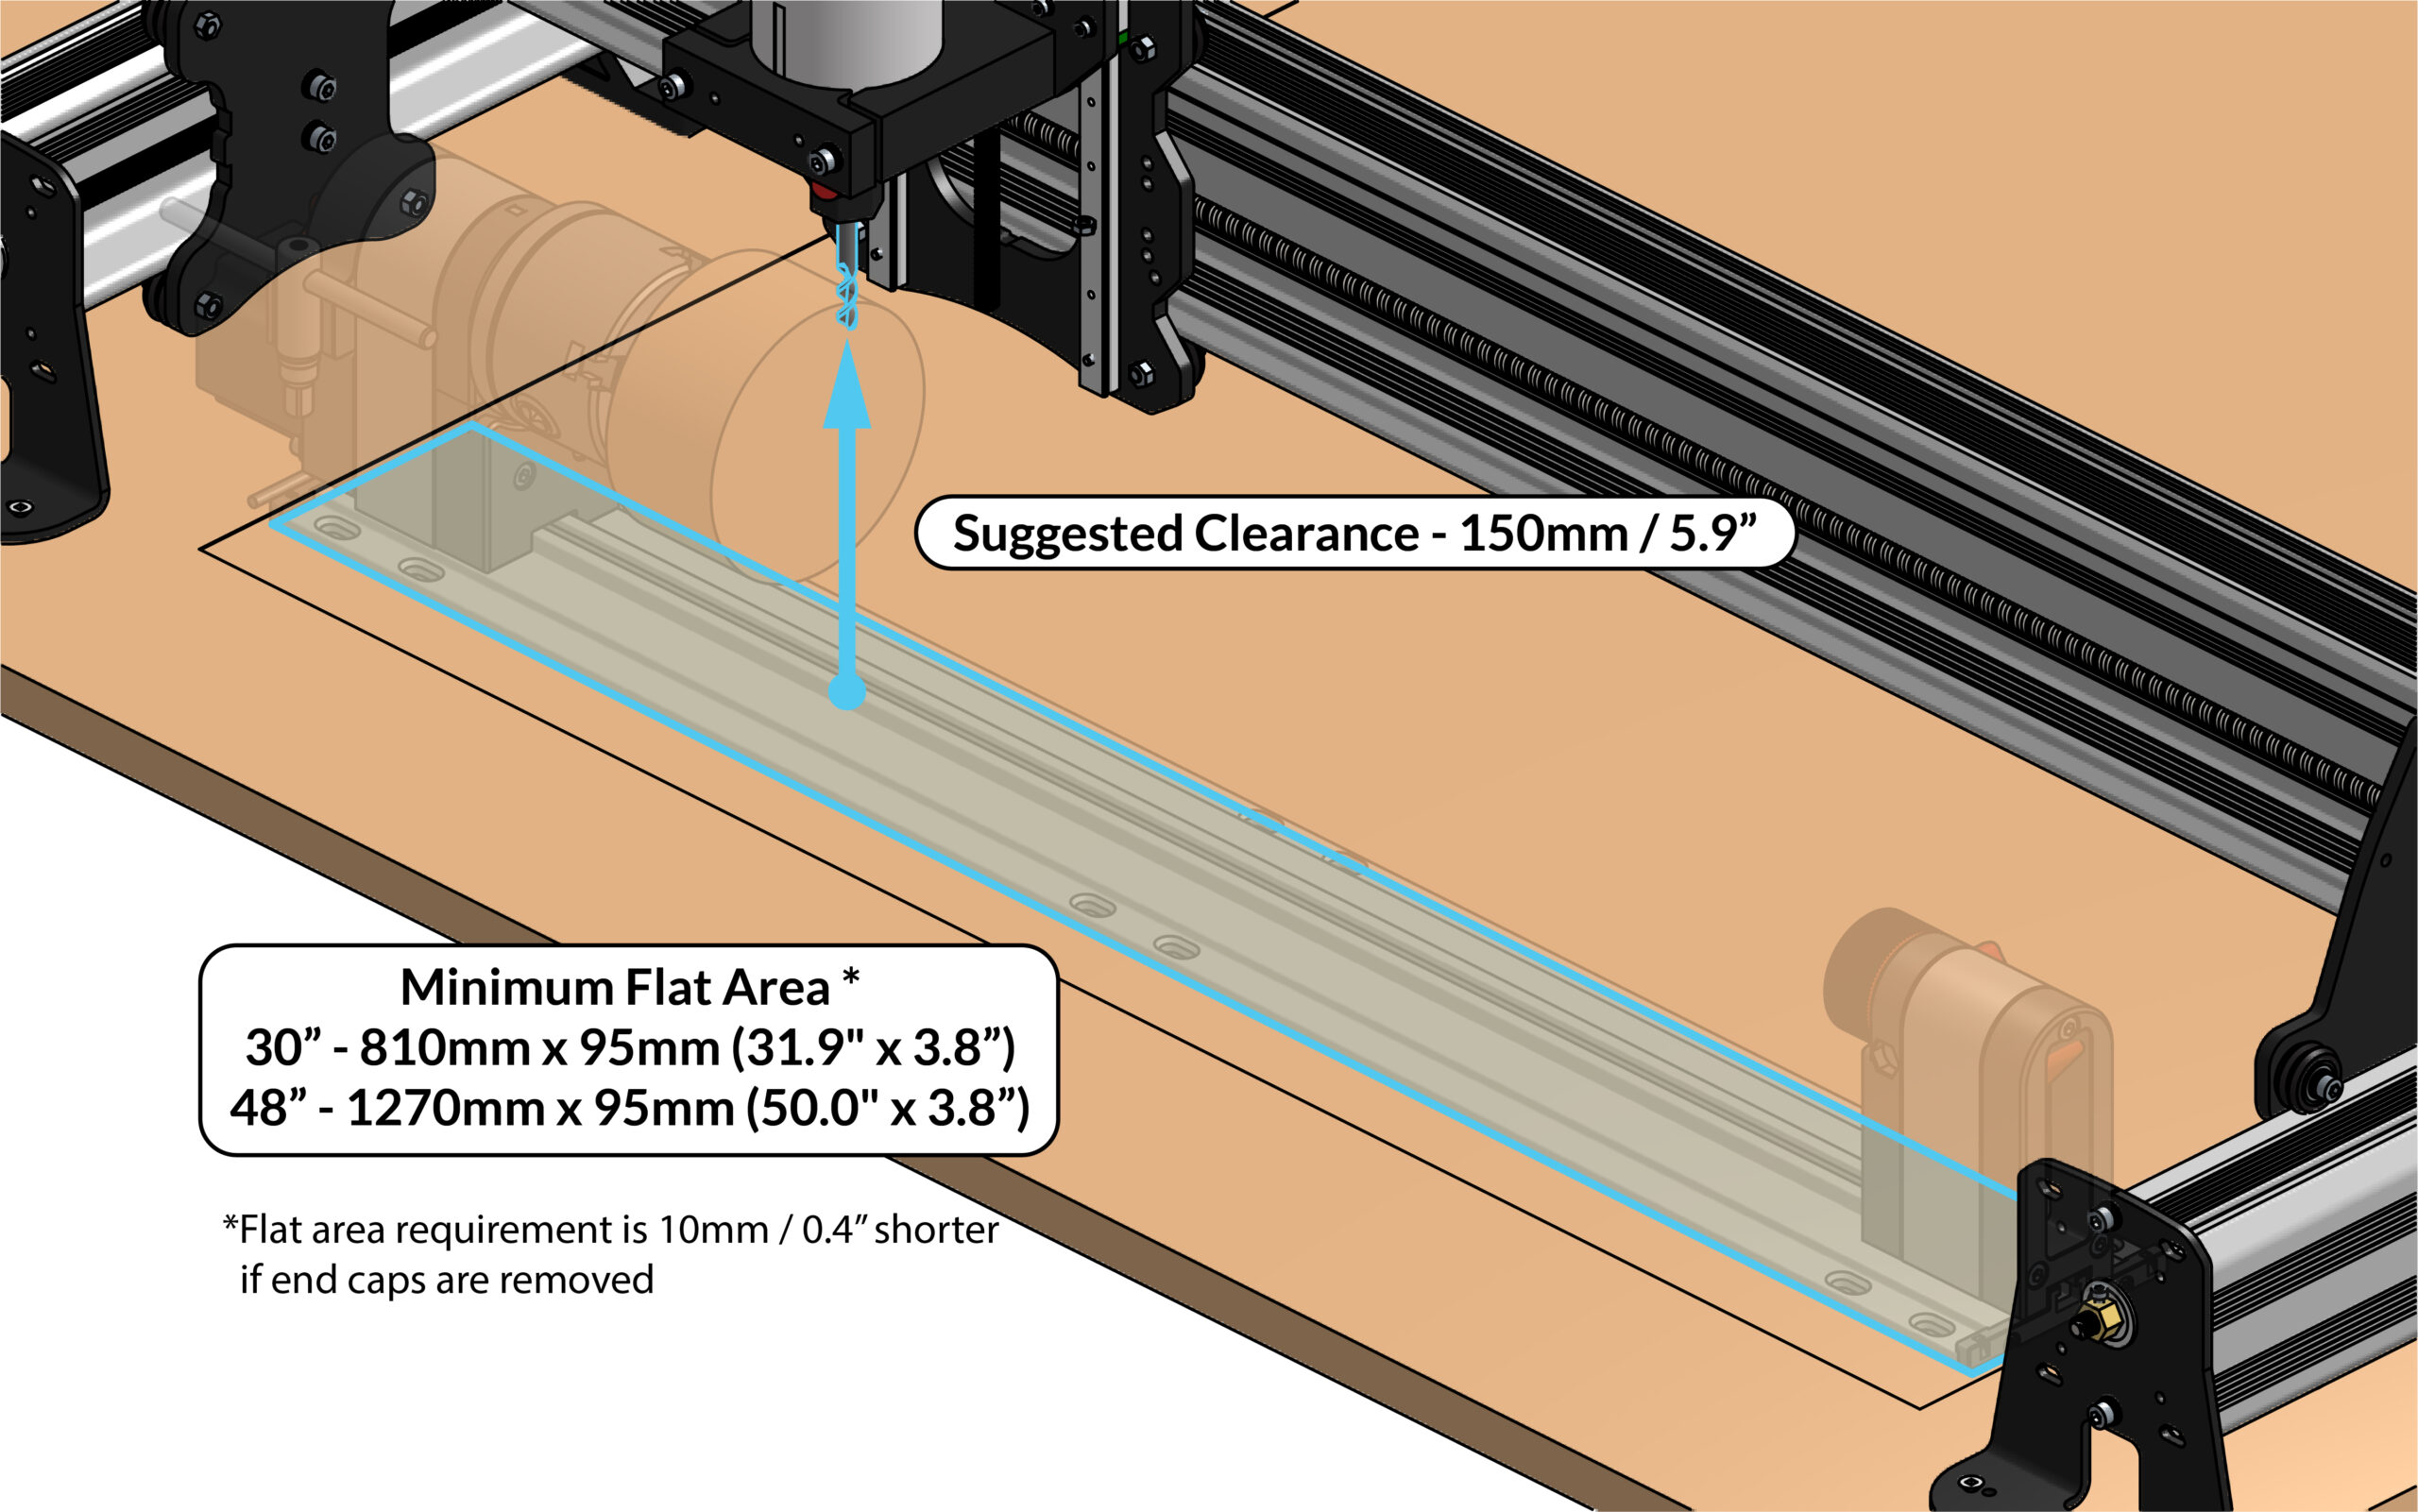
The Vortex was largely designed to be very universal, mounting on any machine surface that can have a set of threaded inserts installed. The main considerations you’ll need to make are:
- Does the X-axis beam/gantry of your machine allow for enough clearance to machine reasonable diameters of material on the Vortex?
- Can you raise how far your router or router mount sits on your machine for extra clearance?
- Is there adequate spacing to fit the Vortex between the left and right sides of your machine table.
For reference on making some of these checks, you can refer to the illustration below, as well as check out the open-source CAD model available here