Check out our video where Johann goes through how to set up and quickly begin each Vortex project.
Note: The video below shows the Open Loop Vortex. For Closed Loop Vortex, use 4th Axis Mode instead of Rotary Mode on gSender.
Rotary Mode vs. 4th Axis Mode
gSender has a unique ability to control a rotary axis on standard, 3-axis grbl machines. We call this “Rotary Mode.” Rotary Mode works by leveraging the Y-axis to control the A-axis. By switching to Rotary Mode, gSender automatically changes the firmware settings in order to translate A-axis movements to your machine, as if they were Y-axis movements.
4th Axis Mode allows you to use the rotary axis without piggybacking on the Y-axis, therefore allowing for XYZ motion at the same time as A-axis motion.
If you have an Open Loop Vortex, use Rotary Mode.
If you have a Closed Loop Vortex, use 4th Axis Mode.
Enabling Rotary Controls
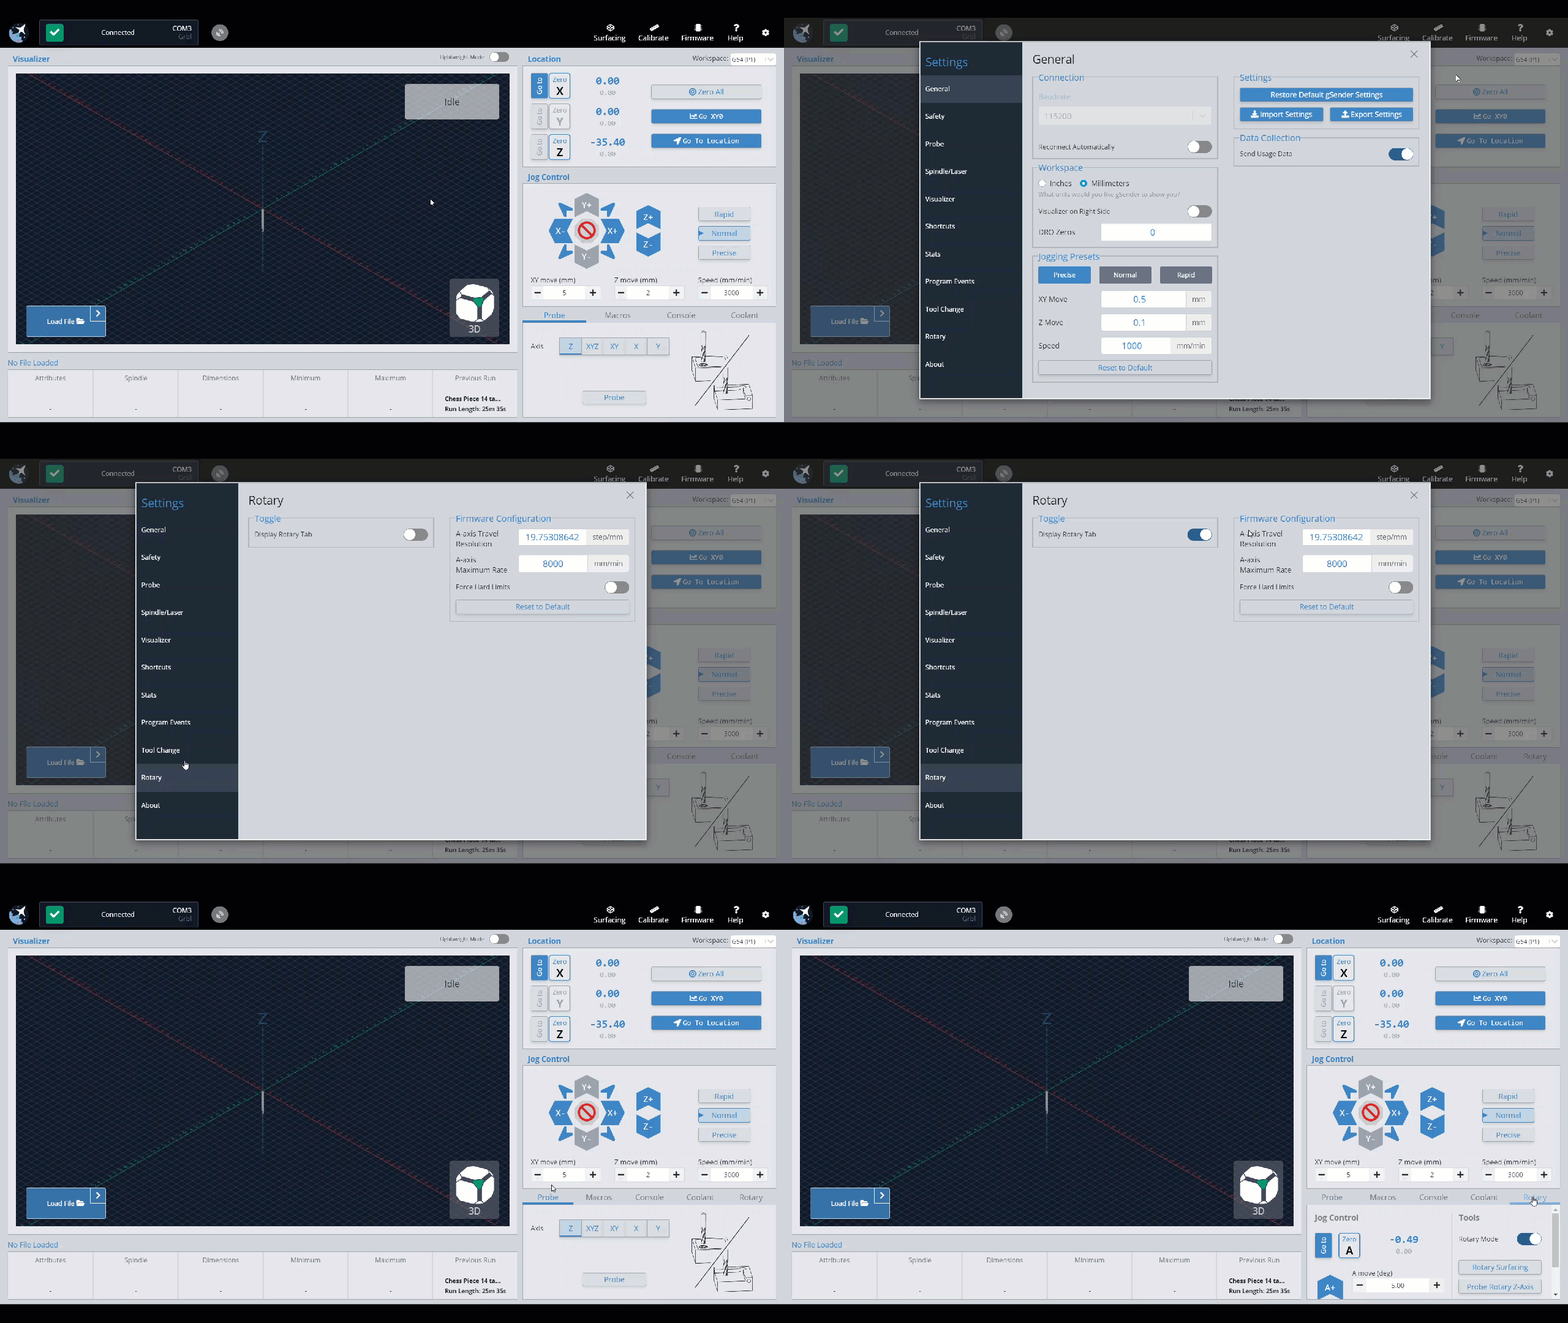
Navigate to the gear at the top right of gSender, where you will find the rotary settings. Here you can toggle the rotary controls to make them visible on the main page.

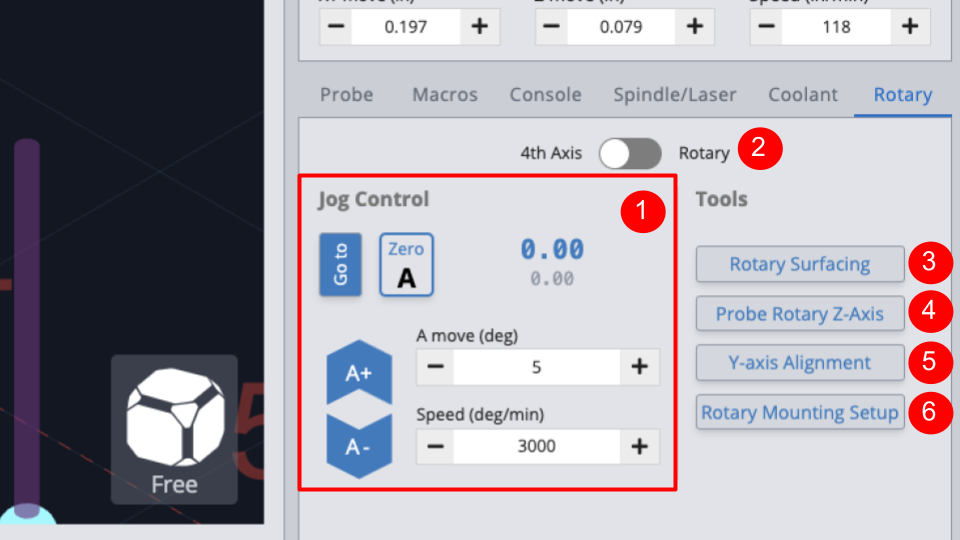
Once the toggle has been turned to display, you will see an additional tab at the bottom right of the window, called Rotary. With this tab you can:
- Jog Control – Rotate the A-axis, go to Zero, set Zero, and adjust speeds
- Rotary Mode – Switch to Rotary Mode or 4th Axis Mode
- Open Loop Vortex → use Rotary Mode
- Closed Loop Vortex → use 4th Axis Mode
- Rotary Surfacing – Wizard to turn square stock round
- Probe Rotary Z-axis – Automatically probe to find the Z-axis
- Y-axis Alignment – Automatically probe to align the Y-axis along the A-axis
- Do this before switching to Rotary Mode
- Not accessible when Rotary Mode is enabled, should disable rotary controls
- Rotary Mounting Setup – Drill holes in your wasteboard to mount the track
- Do this before switching to Rotary Mode
- Not accessible when Rotary Mode is enabled, should disable rotary controls

Workflow Overview
You can use the list below as a quick reminder on how to start each project you run on the Vortex.
Switching To the Vortex
- Mount track on wasteboard
- Raise your router
- Jog all the way back to align X-axis
- Plug in touch probe & magnet
- Use gSender’s Y-Axis alignment wizard
- For open loop, plug in A-axis into the Y-axis outputs on your controller
- For open loop, flip the toggle switch towards yourself
- Ensure 4th Axis (closed loop) or Rotary Mode (open loop) is enabled on gSender
Homing on the Vortex
In Rotary or 4th Axis Mode, home the A-axis in gSender (do not home all axes). This is only applicable if you have limit switches installed.
Workholding
- Install correct jaw set
- Attach faceplate or use jaws to hold stock
Using the Tailstock
- Slide against end of stock
- Match center to divot
- Turn live center away from yourself to tighten
- Lock the live center with the red knob
Setting Your Zero
- Jog bit to the right to clear faceplate and workholding
- Click Zero X
- Rotate your stock if you want it facing a certain direction
- Click Zero A
- Plug in touch probe & magnet
- Jog bit to top of headstock
- Click Probe Rotary Z-Axis
Rotary Surfacing
- Measure largest dimension
- Measure length
- Click Rotary Surfacing in gSender
- Enter measurements and select Stepdown
- Click Generate G-code
- Click Run on Main Visualizer
- Click Start Job
Next Steps
For in-depth, step-by-step procedures on how to create your first few projects, please see Your First Project and Your Second Project.
For detailed information about what each functionality in the rotary controls do, please see our Rotary SLB documentation.
Good luck & have fun!

