
Setting Expectations
You’ve done the research, charted your course, purchased your CNC, and now you’re ready to set sail on your CNC journey — steady at the helm, creativity as your guiding star. You can already picture the incredible projects you’ll bring to life, each one a step forward, heading toward mastering your craft. Just like Christopher Columbus in 1492, let’s explore the unknown waters of preparing to be a CNC owner. (Can you imagine the boats they would build it they had CNC’s back then?)
These four points of interest have been marked on your treasure map to begin…
Before you cast off -> 💨 Take a deep breath and see which way the wind is blowing.
Prepare for your journey by checking out the learning curve you are about to embark upon. Take a deep breath, learn from any mistakes and keep going!
Building the boathouse -> 🚢 We’re gonna need a bigger boat – house. Or do we?
Explore space requirements, research the power requirements and analyze the different costs to get your shop setup and ready to roll
Maintain your equipment -> 🧭 Why does it feel like your ship is veering off course?
Get back on track with machine maintenance tips to keep your CNC running smoothly
Coast Guard to the rescue -> 🪣 Did you pack a bucket to bail out the water?
You can always rely on your fellow sailors to offer a helping hand in the community. Think of the forum as your Navy Boot Camp, ready to help you troubleshoot, learn, and grow.
It’s time to get excited, because learning to CNC is a journey! With our guidance and the help of the community, you’ll be more than prepared to chart your course, hoist the sails, and be ready to explore the learning waters ahead while avoiding common icebergs along the way.
Sit back and enjoy a video about woodworking pros vs the hobby woodworker.
Enjoy a couple more videos about the dark side of CNC, introduction to CNC, and some CNC basics.
| Title | Description | Length | Watch Video |
|---|---|---|---|
| The Dark Side of learning to use a CNC for Woodworking | The hardest parts of beginning a cnc journey. | 16 min | Watch Video |
| The CNC Process for the Absolute Beginner | Introduction to CNC, components, software, and toolpaths. | 22 min | Watch Video |
| CNC Basics | What you need to get started | 9 min | Watch Video |
Learning Curve
There are many moving parts when it comes to producing something from your new CNC machine. An interesting intersection of technology and woodworking. There are several steps to each stage that you can work your way through, to come out with something great on your first try. Make a couple tweaks to your design, and run the job again, and all of the sudden you have something to really be proud of! Know that you will make some mistakes along the way, but embrace them if you can as learning moments. Store that memory away, and prevent it from happening again. Let’s explore some of the new skills you will be learning about, acquiring, and eventually mastering. You got this!
- Commonly used Terms
It will sometimes feel like you are learning an entirely new language. Terms like controller, toolpath, end mill and workholding are all important to know. Check out this article on Common CNC Terms - Software Skills
A significant part of CNC woodworking involves learning CAD (Computer-Aided Design) and CAM (Computer-Aided Manufacturing) software. Programs like Fusion 360, Easel, or VCarve have varying degrees of complexity, and mastering them takes time. The good news is, you don’t need to be a master to make cool stuff, right out of the gates. - Toolpaths and Settings
Beyond software, understanding toolpaths (how the machine moves), feed rates, spindle speeds, and materials will come into play. These settings directly affect the success of your projects. - Patience Required
Expect to spend a good amount of time experimenting and learning through trial and error. Your first few projects may not be perfect, and that’s completely normal. - Learn about Wood
There are a couple things to focus on learning, including how to measure wood, where to buy it, and how to store it.
This video is a good overview of the entire CNC process, followed by some simple projects you can begin with.
Here are a couple more videos that may prove to be interesting at this point. Five easy beginner projects to get the creative juices flowing, begin your journey learning about wood, and then explore how AI can assist you on the design side of things.
| Title | Description | Length | Watch Video |
|---|---|---|---|
| 5 Easy CNC Projects You Can Start Right Now | Easy to make and program items to help start your journey. | 17 min | Watch Video |
| Unlocking the Secrets of the Lumber Yards | Calculate board footage, wood species, and different grades and sizes | 11 min | Watch Video |
| Top 5 Free AI Tools for Elevating CNC Design | Use these AI tools if you don’t want to design your own. | 7 min | Watch Video |
| AI CNC ZoeDepth, shallow relief from AI images. | A deep cleaning and walkthrough of machine maintenance. | 25 min | Watch Video |
Failure is Part of the Process
- Trial and Error
Don’t be discouraged if your first attempts don’t go as planned. It’s common to break bits, misalign materials, or get unexpected results. Mistakes are part of the learning process. - Material Wastage
You will likely waste some material during the learning phase, whether from incorrect settings or accidents. Plan for some losses as you refine your skills, and use rigid foam and/or plywood as scrap material to reduce waste as you get the hang of things.
Mistakes happen, let’s review some of the common ones!
We all need to laugh at ourselves every now and again, so here are some shorts to giggle with. These are those icebergs we are hoping to avoid ourselves. Many people in this hobby have a bin for mistakes labelled Firewood!! Not only do you get to make really cool things, you also get to make a bunch of dust, and some really cool looking firewood. Isn’t it nice when people share their mistakes so we can all learn from them?
| Title | Description | Length | Watch Video |
|---|---|---|---|
| Hitting workholding | — | Short | Watch Video |
| Walnut is expensive | — | Short | Watch Video |
| Hit Pause or Hit X? | — | Short | Watch Video |
| Collet burn | — | Short | Watch Video |
| Dagger Break | — | Video | Watch Video |
Time Commitment
- Setup and Testing
Expect a significant amount of time to be spent on project setup – finalizing the design, securing the workpiece, setting up toolpaths, and making sure everything is aligned. The amount of time spent before you start carving, can often be more than the time it takes to carve!! Testing new designs or tool setups on scrap materials is often necessary too. - Project Completion
Projects can take longer than expected, especially if you are refining a design, troubleshooting issues, or making multiple passes on a complicated cut. Patience is key. Often a roughing pass is used first to remove the bulk of material, then a finishing pass comes along and really smooths thing up.
Community Support
- Learning from Others
The CNC woodworking community is large and active. Online forums, YouTube tutorials, and CNC groups are invaluable resources for troubleshooting, tips, and inspiration. You’re not alone in the learning process. Join us on our community forum! - Asking for Help
Don’t hesitate to ask questions when you get stuck. Most CNC enthusiasts are willing to share their knowledge and help you through challenges.
Space Requirements
Setting up your CNC woodworking machine doesn’t take up much space at all. You can mount it to a workbench, a table, under the table, or even the wall. You can keep your bits in a drawer and begin carving right away! As you progress in skill and project complexity, you’ll find you can use more space than just for the machine itself. Know that you can start off with a simple CNC machine on a table, some simple hand tools and still have great success.
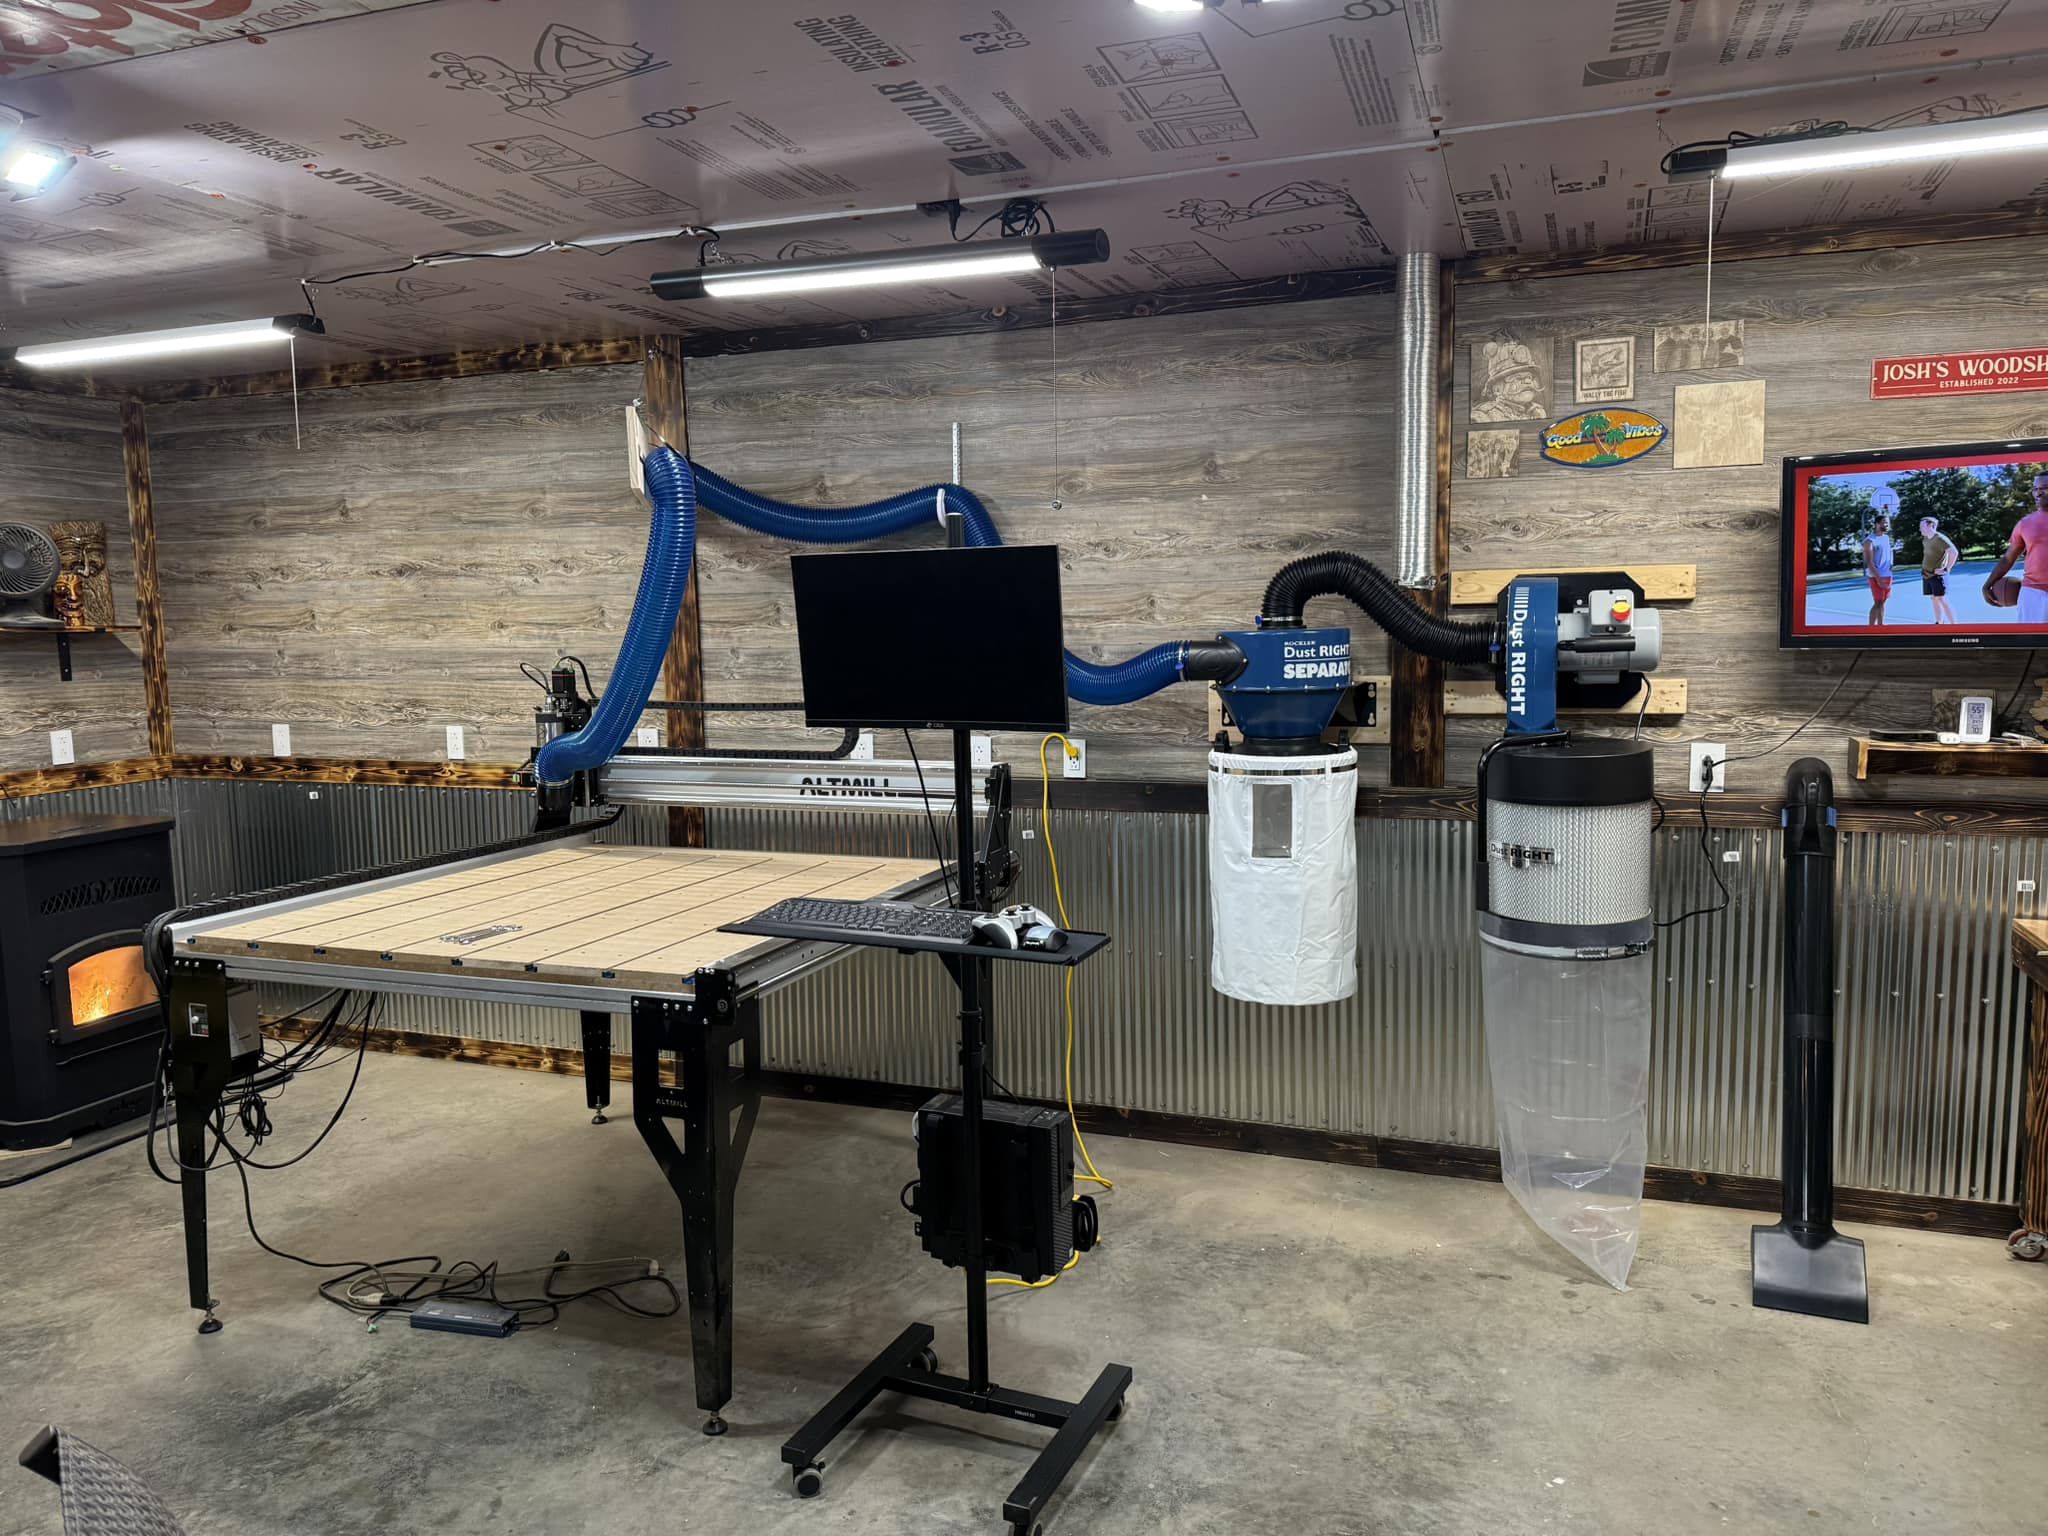
Let’s check out a full single car garage shop and explore some things to consider:

-
Wood Storage
You’ll need a space to store wood materials, whether it’s sheets of plywood, hardwoods, or other materials. It’s a good idea to designate a dry, organized area to prevent wood warping or damage and to ensure easy access during projects. Keep out spiders! -
Tools
Over time, you’ll accumulate a variety of hand tools, sandpaper, clamps, and accessories. Make sure you have proper storage for these tools near your CNC machine to ensure quick access. Having access to a power bar is also very handy. -
Bits
Having the original containers for bit or a small shelf or storage bin will help avoid misplacing or damaging small, delicate items like your cutting tools. The shop pictured above has carpet down to prevent any dropped bits from breaking too. -
Table
Your CNC machine will need a sturdy, flat table or workbench to rest on. You may want to plan for extra space on the left side of your table to allow you to mount the controller or E-stop button. Note that the new AltMill includes a table! -
Dust Collection
CNC projects generate a lot of dust, so a proper dust collection system is essential. This could be a small vacuum setup like pictured above, or a dedicated wall mounted dust collector to keep your workspace clean and prevent damage to your machine and electronics, like pictured below.
These videos explore setting up a garage shop, using the ceiling, installing classic workholding and handy tools to add to your shop.
| Title | Description | Length | Watch Video |
|---|---|---|---|
| How To Set Up A Woodworking Shop In A Garage | Fitting both a CNC and a CO2 laser into one garage. | 39 min | Watch Video |
| How-to Use your shop ceiling fully! | Maximize your workshop by using the ceiling for power and dust collection. | 7 min | Watch Video |
| How to Build a Bench and Install T-Tracks | A traditional workholding method, added to your workbench. | 7 min | Watch Video |
| CNC accessories and tools to make life easier | Handy tools and tips for your shop. | 18 min | Watch Video |
Power Requirements
When setting up your shop, it’s important to consider the power requirements of both the controller, the router or spindle used, and any other tools added. Here’s a quick rundown:
- Controller
- (SuperLongBoard) The SLB requires a 24V external power supply with a 10-12A capacity to run. This adds up to about 2 amps on a 120V circuit which is relatively low, but combined with a spindle or router and other equipment, it’s still essential to keep an eye on your overall power usage.
- (SuperLongBoard EXT)The SLB-EXT requires a 48V external power supply with a 10.4A capacity to run. It’s maximum power is about 480W.
- Router Power (Makita 1.25HP)
- Many hobbyists start with a router instead of a spindle. Routers, like the Makita RT0701C, draw around 6-7 amps on 120V circuits. This is much less than a spindle, making routers a good option if you’re working with limited power supply.
- Spindle Power
- Spindles come in different power levels, which affects how much electricity they use. Common spindles range from 0.8KW to 2.2KW.
- A 1.5KW spindle running on 120V usually draws about 12.5 amps.
- A 2.2KW spindle on 120V can draw up to 18 amps.
- For typical 120V circuits (like the ones with 15A breakers found in many workshops), a 1.5KW spindle is about the highest you can use without risking a tripped breaker. Larger spindles, like a 2.2KW, might need a dedicated circuit with a higher amperage or use of a 220V outlet.
- Spindles come in different power levels, which affects how much electricity they use. Common spindles range from 0.8KW to 2.2KW.
So, if you’re using a 1.5KW spindle with the SLB on a standard 120V, 15A circuit, you’ll be close to capacity. Adding a dust collection system or other devices might push you over, requiring a separate circuit. Alternatively, if you’re using a router, you’ll have more breathing room for other equipment.
Always double-check your circuit’s breaker ratings to avoid overloading your workshop’s electrical setup.
Initial Costs
There are a couple main costs to consider when entering the CNC hobby. You can start with as little as a CNC, table and laptop! Some companies will offer beginner bundles like the Starter End Mill Set for example. These can be a great way to save some money and get a variety of bits to start with.
- Machine Cost
CNC machines come in a range of prices depending on size, precision, and brand. Hobby-level machines can start around $500–$2,000, while more advanced or larger machines can go well beyond $5,000. - Additional Costs
You’ll also need software for designing your projects, which could involve one-time purchases or subscription fees. Accessories like end mills, clamps, dust collection systems, and materials (wood, MDF, etc.) will add to your initial investment.
Optional Add-Ons
Over time, you may want to upgrade parts, like getting better tooling, a quieter dust collection system or adding additional features (such as an upgraded spindle, automatic tool changer or a laser engraver). Every shop is a bit different, and customizing yours to fit your needs is always a fun challenge. It’s not uncommon to reshuffle/reorganize your shop after you’ve had your CNC for a bit and understand where you want things. Many users will already have a computer, mouse, keyboard, saw, workbench, etc. before you begin with your new CNC, which can really save you money starting up.
In the chart below we explore many of the things you may want to consider adding to your shop, before your end mill starts spinning. Don’t fret too much about ‘keeping up with the Joneses’, you can start slow and build up your extras when you are ready.
| Category | Estimated Cost (USD) |
|---|---|
| Router or Spindle (Makita) | $100 – $300 |
| Accessories (dust shoe, touch plate, inductive sensors, etc.) | $100 – $300 |
| End Mills (cutting tools & starter kits) | $50 – $200 |
| Dust Collection Strategy (shop vac, wall mount, cyclone) | $300 – $1,000 |
| Safety Equipment (glasses, mask, etc.) | $50 – $150 |
| Computer, Monitor, Mouse (gControl Panel Computer) | $250 – $800 |
| Software (VCarve Pro, Carveco, LightBurn, CAMLab) | $0 – $699 |
| Supplies (workholding, sandpaper, oils, etc.) | $100 – $500 |
| Table/Enclosure (community builds, wasteboard ) | $200 – $600 |
| Total Estimated Cost: | $1,150 – $4,550 |
Check out a video about the Hidden costs of using a CNC!!
Here are some extra videos to help you save some money when setting up your shop, buying wood, bits or extras.
| Title | Description | Length | Watch Video |
|---|---|---|---|
| A thousand dollars worth of wood – Buying Wood Online | Testing online wood ordering. | 34 min | Watch Video |
| DON’T LET THIS $40 MISTAKE HAPPEN TO YOU! | Great tips to help you protect your investments in bits. | 4 min | Watch Video |
| Getting Started with CNC Machines – Choosing Bits | Explore different types of bits and cutting tools. | 6 min | Watch Video |
| CNC Router Bits for Beginners | Intro to bits and when to use one bit over the other. | 14 min | Watch Video |
| I Solved @Iliketomakestuff ‘s Dust Collection Debacle | Dust collection invention, with cool cart. | 6 min | Watch Video |
| Introducing the New AutoZero Touch Plate! | One of the many accessories you may want to add to your shop. | 7 min | Watch Video |
Machine Maintenance
- Regular Upkeep
CNC machines require regular maintenance to perform optimally. This includes cleaning your rails & wheels, lubricating parts, checking for loose bolts, and inspecting wiring and belts. Some software like gSender will help you track the number of hours you have been running your machine, and recommend specific maintenance be performed. You can checkout the maintenance guides for the LongMill and the AltMill too!! - Replacing Parts
Over time, you’ll need to replace things like the cutting tools, which dull with use, or v-wheels, linear bearings, and delrin nuts that wear out. Knowing how to maintain your machine will help avoid costly breakdowns. Just like replacing tires or windshield wipers on your car. - Calibration
Keeping your machine properly calibrated is key for accuracy. You won’t need to recalibrate on a time scale, but routine checks on squareness, zeroing, and other factors will save you time and material in the long run after parts are replaced as part of your regular upkeep.
| Title | Description | Length | Watch Video |
|---|---|---|---|
| How To Do CNC Router Maintenance | A deep cleaning and walkthrough of machine maintenance. | 77 min | Watch Video |
| How to adjust and tune the LongMill MK2 48×30 | Get peek performance and prevent movement issues | 15 min | Watch Video |
Final Thought: Start Small
It’s tempting to jump straight into large or complex projects, but starting with simpler tasks will help you build confidence and understand your machine. Set realistic expectations for your first few months, focus on mastering the basics, and steadily work your way up to more advanced projects. Embarking on your CNC journey can be incredibly rewarding, but it requires patience, learning, and ongoing investment. Enjoy the milestones as you learn new skills and upgrade your projects along the way.
Stay curious, embrace the mistakes as learning opportunities and you may just find your very own gold treasure! May the winds always be at your back.