
You can adjust the current on each axis of the LongMill. Each one is set to between 2.0-2.2A by default. At this configuration, the LongMill has a max current draw of 8.8A (4 drivers x 2.2A). Note that this guide only applies to the LongBoard and not the SLB.
Some users may choose to increase or decrease their current settings to change the torque and speed characteristics. If you choose to adjust the default current settings, please do thorough research on the impact of current and motor performance before making changes.
Warnings
Adjusting the current settings on your machine can significantly impact the performance of your machine, and incorrectly changing the current settings may cause issues and damage.
Please note that improperly set current settings may:
- Cause your machine to perform poorly. Current settings that are too high may cause excessive resonance and vibration, whereas too low of a setting may lack torque and cause missed steps.
- Affect the performance and torque output of the motors depending on your speed.
- Overheat your drivers and motors
If you do choose to adjust these settings, we recommend:
- Testing your machine at different speeds
- Checking the temperature of your motors and drivers, and consider adding a fan to prevent overheating
- Upgrading your power supply if you’re needing more current than it can provide
Adjusting the Current
Making adjustments to your current can improve the overall performance of your machine. For the majority of users, you should not have to adjust your current settings for normal use. We recommend adjusting your driver to the position shown below.
If you’ve checked your mechanical parts and have issues with:
- Vibrations or resonance
- Missed steps
- Overheating
We recommend adjusting your current settings.
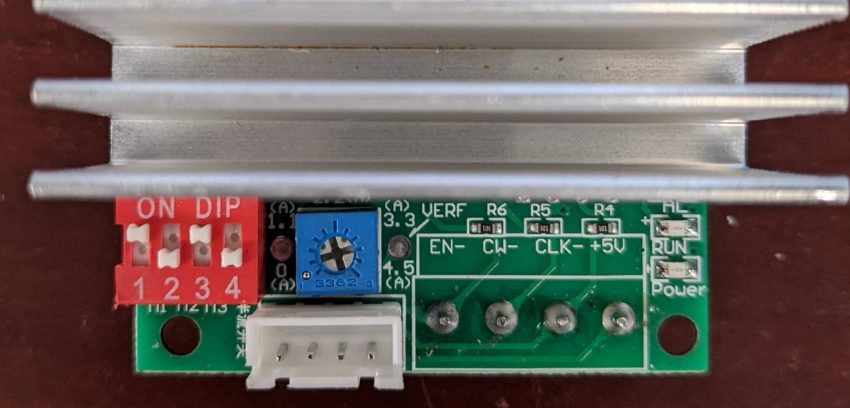
To adjust the current, simply use a small screwdriver to turn the potentiometer to the current setting you want. Depending on your control box design, you may have to remove the outer casing to reach this spot or there might be a hole in the case that your screwdriver fits into. The two small notches on the potentiometer indicate the direction it’s pointing with the white numbers on the board noting the current at that location. In this photo, you can see that the current is set to about 2A since the slot between the two notches is pointed just to the left of the 2.2(A) label.
Download the instructions to adjust the drivers. The LongBoard allows for a max current setting of 4.5A.
Some theory
A bipolar stepper motor of the type that we use for the LongMill has two sets of coils that produce a magnetic field when the driver provides a current. The driver changes the polarity of the coils to attract or repel an inner magnetic rotor to turn the stepper motor clockwise or counterclockwise, as well as change the speed of the motor by adjusting the frequency of the changes in polarity and magnetic field.
Torque
CNC machines that use stepper motors should have enough torque throughout their intended operating speeds to function properly. Since stepper motors, by design, lose torque the faster they turn this creates a range of movement that you have to account for. The LongMill, by default, is set to about HALF the speed that it’s capable of in the X and Y-axes, and this is because we restrict the max speeds to ensure that your machine has enough torque to work reliably.
Generally speaking, the motor torque is proportional to current, but due to losses and the inductance of the motor, this is typically not the case as the motor spins. It is important to understand that higher current does not necessarily mean better performance. Based on our observations, setting the driver to a lower current (1.8A-2.0A) has a lower torque at lower speeds, but has a flatter torque curve at higher speeds, which gives it a higher top speed while avoiding mid-frequency resonance which is discussed below.
Resonance
Stepper motors hum and vibrate during operation. Due to the nature of stepper motors, when the rotation of the inner rotor overshoots or undershoots between each coil, more vibrations are produced. Much of this effect is typically created from having too much current.
In some cases, the vibrations match the resonant frequency of the motor, which can cause “mid-frequency resonance”. We’ve found that some LongMills can have a mid-frequency resonance area of around 4000mm/min.
With the dampening effect of the machine as a whole and the current settings of the drivers, this mid-frequency resonance can be largely eliminated.
Method
When a stepper motor is operating at its resonant frequency, it can be heard by ear. You can test this by moving your machine at a variety of different speeds and observing the sound of the motor. A significant change in volume, buzzing, or rattling can indicate resonance. In extreme cases, your machine may stall at these speeds. Jog your machine back and forth in each axis at different speeds to identify speeds that have resonance.
- Properly adjust your Delrin nuts and v-wheels before starting the test. Make sure that your ACME locking nuts are set correctly as well. Set your current to the recommended setting before starting.
- Listen for resonance and vibrations and the varying speeds.
- If you hear the resonance in your system, jog your machine back and forth at that speed
- Adjust your current potentiometer up or down until the resonance or vibration is reduced or eliminated. If you are using the LongMill’s standard stepper motors you want this to be above 1.5A and below 2.8A.
- Rerun the test g-code and note if there is any resonance at any other speeds
- Perform a test cut or project with your new settings and observe for any lost steps or vibrations