
This part of the resources covers common issues and fixes for the LongMill. If you run into an issue with your machine, we hope that this can help you diagnose and fix problems to get you milling as quickly as possible. If you can’t find the answers here, please feel free to get in touch with us.
If you are having a gSender-based issue, please check the List of Common Problems & Fixes for gSender.
Stuck troubleshooting your machine? Check out our article on General Tips and Tricks on LongMill Troubleshooting.
IMPORTANT: EMI does not cause the LongMill to lose position or move erratically. It is a very common misconception that grounding your machine will help prevent missed steps, stalling, or positioning issues. EMI only causes CNC machines stop completely or disconnect from the computer. If your machine is not moving the way you think it should, it is a mechanical issue or an issue in your g-code. If you are experiencing these issues, please start with double checking the mechanics of your machine.
Quick Fixes
Below are some common issues you could run into, luckily these can usually be solved with relative ease. Some of these issues are revisited in more detail in the sections below.
- My machine rattles, chatters, vibrates, or stalls when moving rapidly. – Your driver’s current settings may need to be tuned. For complete instructions, check our guide here. You may also need to check your v-wheels and anti-backlash nuts are properly tensioned as well.
- Check to make sure that your ACME locking nuts are holding the bearings against the plates securely.
- My machine does not move when connected. – Make sure the E-stop button is not pressed, and ensure the E-stop and power supply are plugged into their correct ports.
- One motor is not moving. – Check that motor’s cable to ensure both the green and clear plugs are fully seated in their respective plugs by unplugging and plugging in each connector. Check the coloured cable for any breaks or poor connections inside the plugs.
- My machine is moving erratically. – Reset your machine’s EEPROM (firmware) settings by clicking ‘Restore Defaults’ within the ‘Firmware’ window in gSender (find more info on this here). Also, make sure to check your mechanical components, such as your coupler, v-wheels, and Delrin nuts to make sure that things are tight and properly adjusted.
- A common first assembly issue is the bolts on the X axis of the 48×30 coupler being too loose on the motor side. Double check there is no slipping from the coupler.
- My machine is binding/stalling when moving. – Turn all lead screws by hand to ensure they all spin with equal resistance. For any difficult to turn lead screws, loosen the two M5 mounting screws on the Delrin nut, make sure the anti-backlash tensioning screw is not over-tightened, and check that V-wheels on that axis are not over-tensioned.
- A common assembly mistake is the couplers not being tight enough or the bolts holding the Delrin nuts to the gantry plates too tight.
- My machine is not cutting where it should. – Make sure you’ve zero’d your machine’s X,Y, and Z coordinates appropriately before starting the job.
- My cuts are not coming out square. – Ensure that the machine was mounted square on your table following the table mounting procedure. Before cutting, run the machine all the way to the rearmost feet to ensure the left and right Y-gantries are lined up.
- My machine is not cutting consistently deep. – Make sure your MDF wasteboard has been surfaced. This surface can also warp over time, so it may be necessary to surface this again if not done recently.
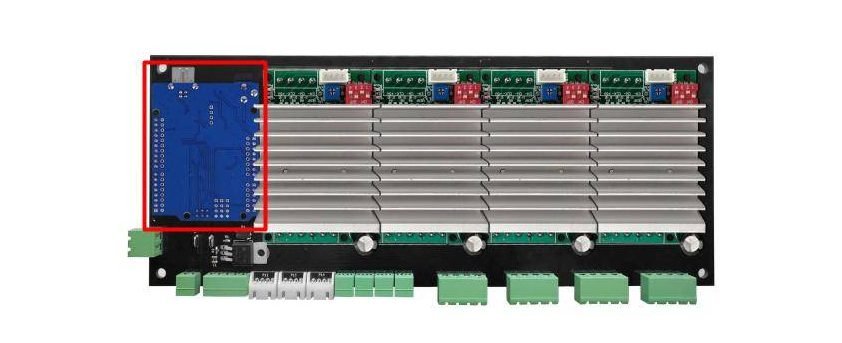
- My machine disconnects randomly and the USB port on the controller is loose. – Your Arduino inside the controller may have come loose from the main board. The Arduino is a smaller board that acts as the “brains” of the board and processes the g-code commands from your computer into commands the stepper drivers can understand. Watch the video on replacing it here, but if your board is in working shape, you can simply push it back in place.
Assembly issues
I am missing or cannot find a part
If you can’t find something, please reach out to us and we’ll make it right. However, before reaching out to us, there are a couple things you can check.
- Ensure you are following the assembly instructions for the correct version of the machine since there are variations between versions.
- Check inside hollow parts or in other bags, sometimes we get creative to keep packaging small.
- Some parts and add-ons, such as the t-tracks, come in separate packages, so make sure you’ve received and opened all boxes.
I have leftover parts
Don’t worry, we supply extra additional parts in case you need spares from something going wrong during assembly.
Initial Connection
Controller does not turn on
- First, ensure that your LongMill’s power supply cable is connected to the wall and power brick correctly. If you have an E-stop, check that the button is released by twisting it counterclockwise and if you have a power switch, ensure it’s toggled on.
- Make sure your power supply brick is plugged into a 100V-130V AC outlet. If you do not have this AC voltage available in your area, you’ll need to use a transformer to step down to 110/120V.
- Check that the E-stop is plugged into the top of the LongBoard, and the power supply is plugged into the side of the LongBoard.
- Make sure that the polarity of the power wiring is correct.
- If the red light on the controller top (newer versions) or on the drivers (visible through the grates on the underside of the controller) are on, then you are getting power to the controller. You may be having issues with connecting your machine to the computer.

Cannot connect to the machine
- Try restarting your program or computer.
- Make sure your Arduino is fully seated in your control board. You can typically use a non-conductive tool to push it into the socket if it is starting to come loose. A video on replacing the Arduino can be found here, but if your board has simply become loose, you can just push it back in place.
- If you have other programs that are open that may be connecting to your Arduino (especially Arduino IDE) that they are closed.
- You might not have drivers installed. You can install Arduino drivers by installing the IDE for your computer.
- Check your computer’s drivers. Update or reinstall them if necessary.
- Try a different USB port and USB cable.
The software says ALARM
Something’s happened during the operation of the machine which was unexpected so it’s decided to lock itself just in case.
- Something’s happened during the operation of the machine which was unexpected so it’s decided to lock itself just in case.
- If your machine has ‘homing’ enabled, this will cause the controller to start in an alarm state upon connecting to prompt you to run the homing cycle, so this is normal.
- In gSender, you can click or hover over the question mark symbol to bring up more information about the alarm.
- Click the ‘Unlock’ button below the alarm in gSender to bring it out of the alarm state and back into its ‘IDLE’ state.
- In some cases, your EEPROM settings (the machine settings) have changed. Make sure they are correct by referring to the default EEPROM settings.
- If it continues to go into an ALARM state under similar conditions in the future, check that no wires or hardware have come loose and that there’s nothing externally affecting the movement of your machine.
Current

Classic gSender

Movement issues
One motor does not move or moves erratically
When jogging or running the LongMill, one of the motors does not move correctly or at all.
- If your motor does not move at all, try switching and testing if it is working correctly by plugging it into a different axis on the motor controller. If the motor moves on a different axis, then you can confirm that the motor is working correctly and identify that there may be an issue with the controller.
- Check that all the plugs and individual wires are secure by giving them a light tug and firmly pressing them into place.
- Make sure the screws on the coupler are tight. Make sure that your motor or lead screw isn’t slipping by jogging the machine and making sure that the lead screw and motor is turning at the same rate.
- If one y-axis motor moves but the other doesn’t. Switch the y connectors. If the issue moves to the other side, it might be the driver is supplying the wrong amount of current. Follow these instructions to make adjustments.
- Check that the light on all of the drivers inside the control box are illuminated. If you have a driver that is not illuminated, please contact us for additional support.
- Check that all of the DIP switches are properly seated in the correct orientation. If the switch is only part of the way on or off, the driver may not operate.
- Make sure your Arduino is fully seated in your control board. You can typically use a non-conductive tool to push it into the socket if it is starting to come loose.
Moving the wrong direction
- Ensure that all plugs and cables are fully seated and connected properly. Check the other plugs for reference.
- Check the colour pattern of each wire coming from the motor and connected to the LongBoard. Is the pattern the same with each motor? If not, change the order of the wires to match.
- If your Z-axis motor is moving the wrong direction, ensure that you’ve selected the LongMill MK2 machine profile in gSender. The LongMill MK1 machine profile will cause the Z-axis direction to be flipped.
- Reload the EEPROM settings on your Arduino, as these settings may have changed when using various g-code senders. These settings control aspects such as the jogging direction and the machine’s work space boundaries. To access them, go to the Firmware tool in gSender, or the Firmware Settings in UGS. gSender will have the ability to “Restore Defaults” and revert to the LongMills factory settings. For UGS, make sure you have the default settings (found here) by going through each line and manually changing the values, or download the configuration zip file, unzip it, and load it into UGS.
Not moving the correct distance
- Your coupler may be slipping. Ensure that the screws on your coupler are fully tightened.
- Your machine may be stalling. Instructions on checking for stalling motors can be found in the next section.
- The microstepping on your drivers may not be set correctly. Check the drivers under your machine and make sure that they are set to 1/8″ microstepping by ensuring that the DIP switches are in the correct position.
- Make sure your EEPROM settings for your machine are set correctly. In particular, the settings $100, $101, and $102 should all be set to 200.000 steps/mm.
- Try restarting your g-code sender.
Motors are stalling
- Make sure that all of the motor wires are seated properly.
- Make sure that you have not over-tightened the Delrin anti-backlash nuts on your machine as this can distort the threads that run on the lead screw. Loosen the two M5-25mm screws that hold the nut in place and see if that helps.
- Ensure that the couplers are secured onto the motor shaft and lead screw with the set screws. If the coupler is slipping and requires re-tightening often, there is a possibility that the coupler threads are stripped.
- Ensure that the current of the motor drivers are set correctly. For more info, please read the article here.
- Re-flash the Arduino with the firmware to ensure that the code on the Arduino hasn’t been altered somehow. Since the Arduino acts as the “brains” of the control board, it can affect how the motors are running. The instructions for flashing the Arduino are found here: https://resources.sienci.com/view/lm-grbl-firmware/
Y-axis is skewing (one side moves further than the other)
- Run the machine to the back until you hear a grinding noise, this will realign your y-axis gantries to be square with the X-axis. See if the issue is still persisting by jogging back and forth, moving through the entirety of the Y-axis travel.
- Power off the machine. Using your hands, turn each Y-axis lead screw a few rotations, checking that they are difficult but not impossible to turn and that they are equally hard to turn. If that is not the case, adjust by slightly loosening the fasteners in the anti-backlash nut with an Allen key (both the mounting screws and the single screw sticking out). Keep checking and adjusting the lead screws until they are equal and difficult to turn by hand.
- The microstepping on your drivers may not be set correctly. Check the drivers under your machine and make sure that they are set to 1/8″ microstepping by ensuring that the DIP switches are in the correct position.
- The potentiometers on your drivers may not be set correctly. Check the potentiometers in the controllers are all set to the same location by looking through the back of the controller. How to adjust the potentiometer can be found here.
Lead screws wobble excessively
Excessive wobble is when the lead screw is deviating from center by more than about 3mm or 1/8″. This means that butting a measuring tape or ruler against the LongMill wasteboard and recording down the height of the lead screw at its lowest point, and then again at its highest point, should result in a difference in the two measurements of no more than 6mm or 1/4″. Wobble can happen due to a loose lead screw or due to the screw being physically bent: if it’s bent then the wobble will happen at any movement speed, whereas if it’s loose then it will wobble mostly at higher movement speeds (above 2000mm/min).
- Loose screw: loosen the two M5-25mm screws that hold the Delrin anti-backlash nuts slightly for the axis which the lead screw is on and run the machine back and forth. This will align the lead screw and the nut. Re-tighten the screws once the wobbling as gone away. Also check the ACME locking nut and coupler on both ends of the screw are firmly tightened and sandwiching the lead screw properly.
- Bent screw: a sure way to confirm is to completely remove the screw and roll it along a surface that is very flat to see if it rolls evenly.
48×30 X-axis not moving correctly
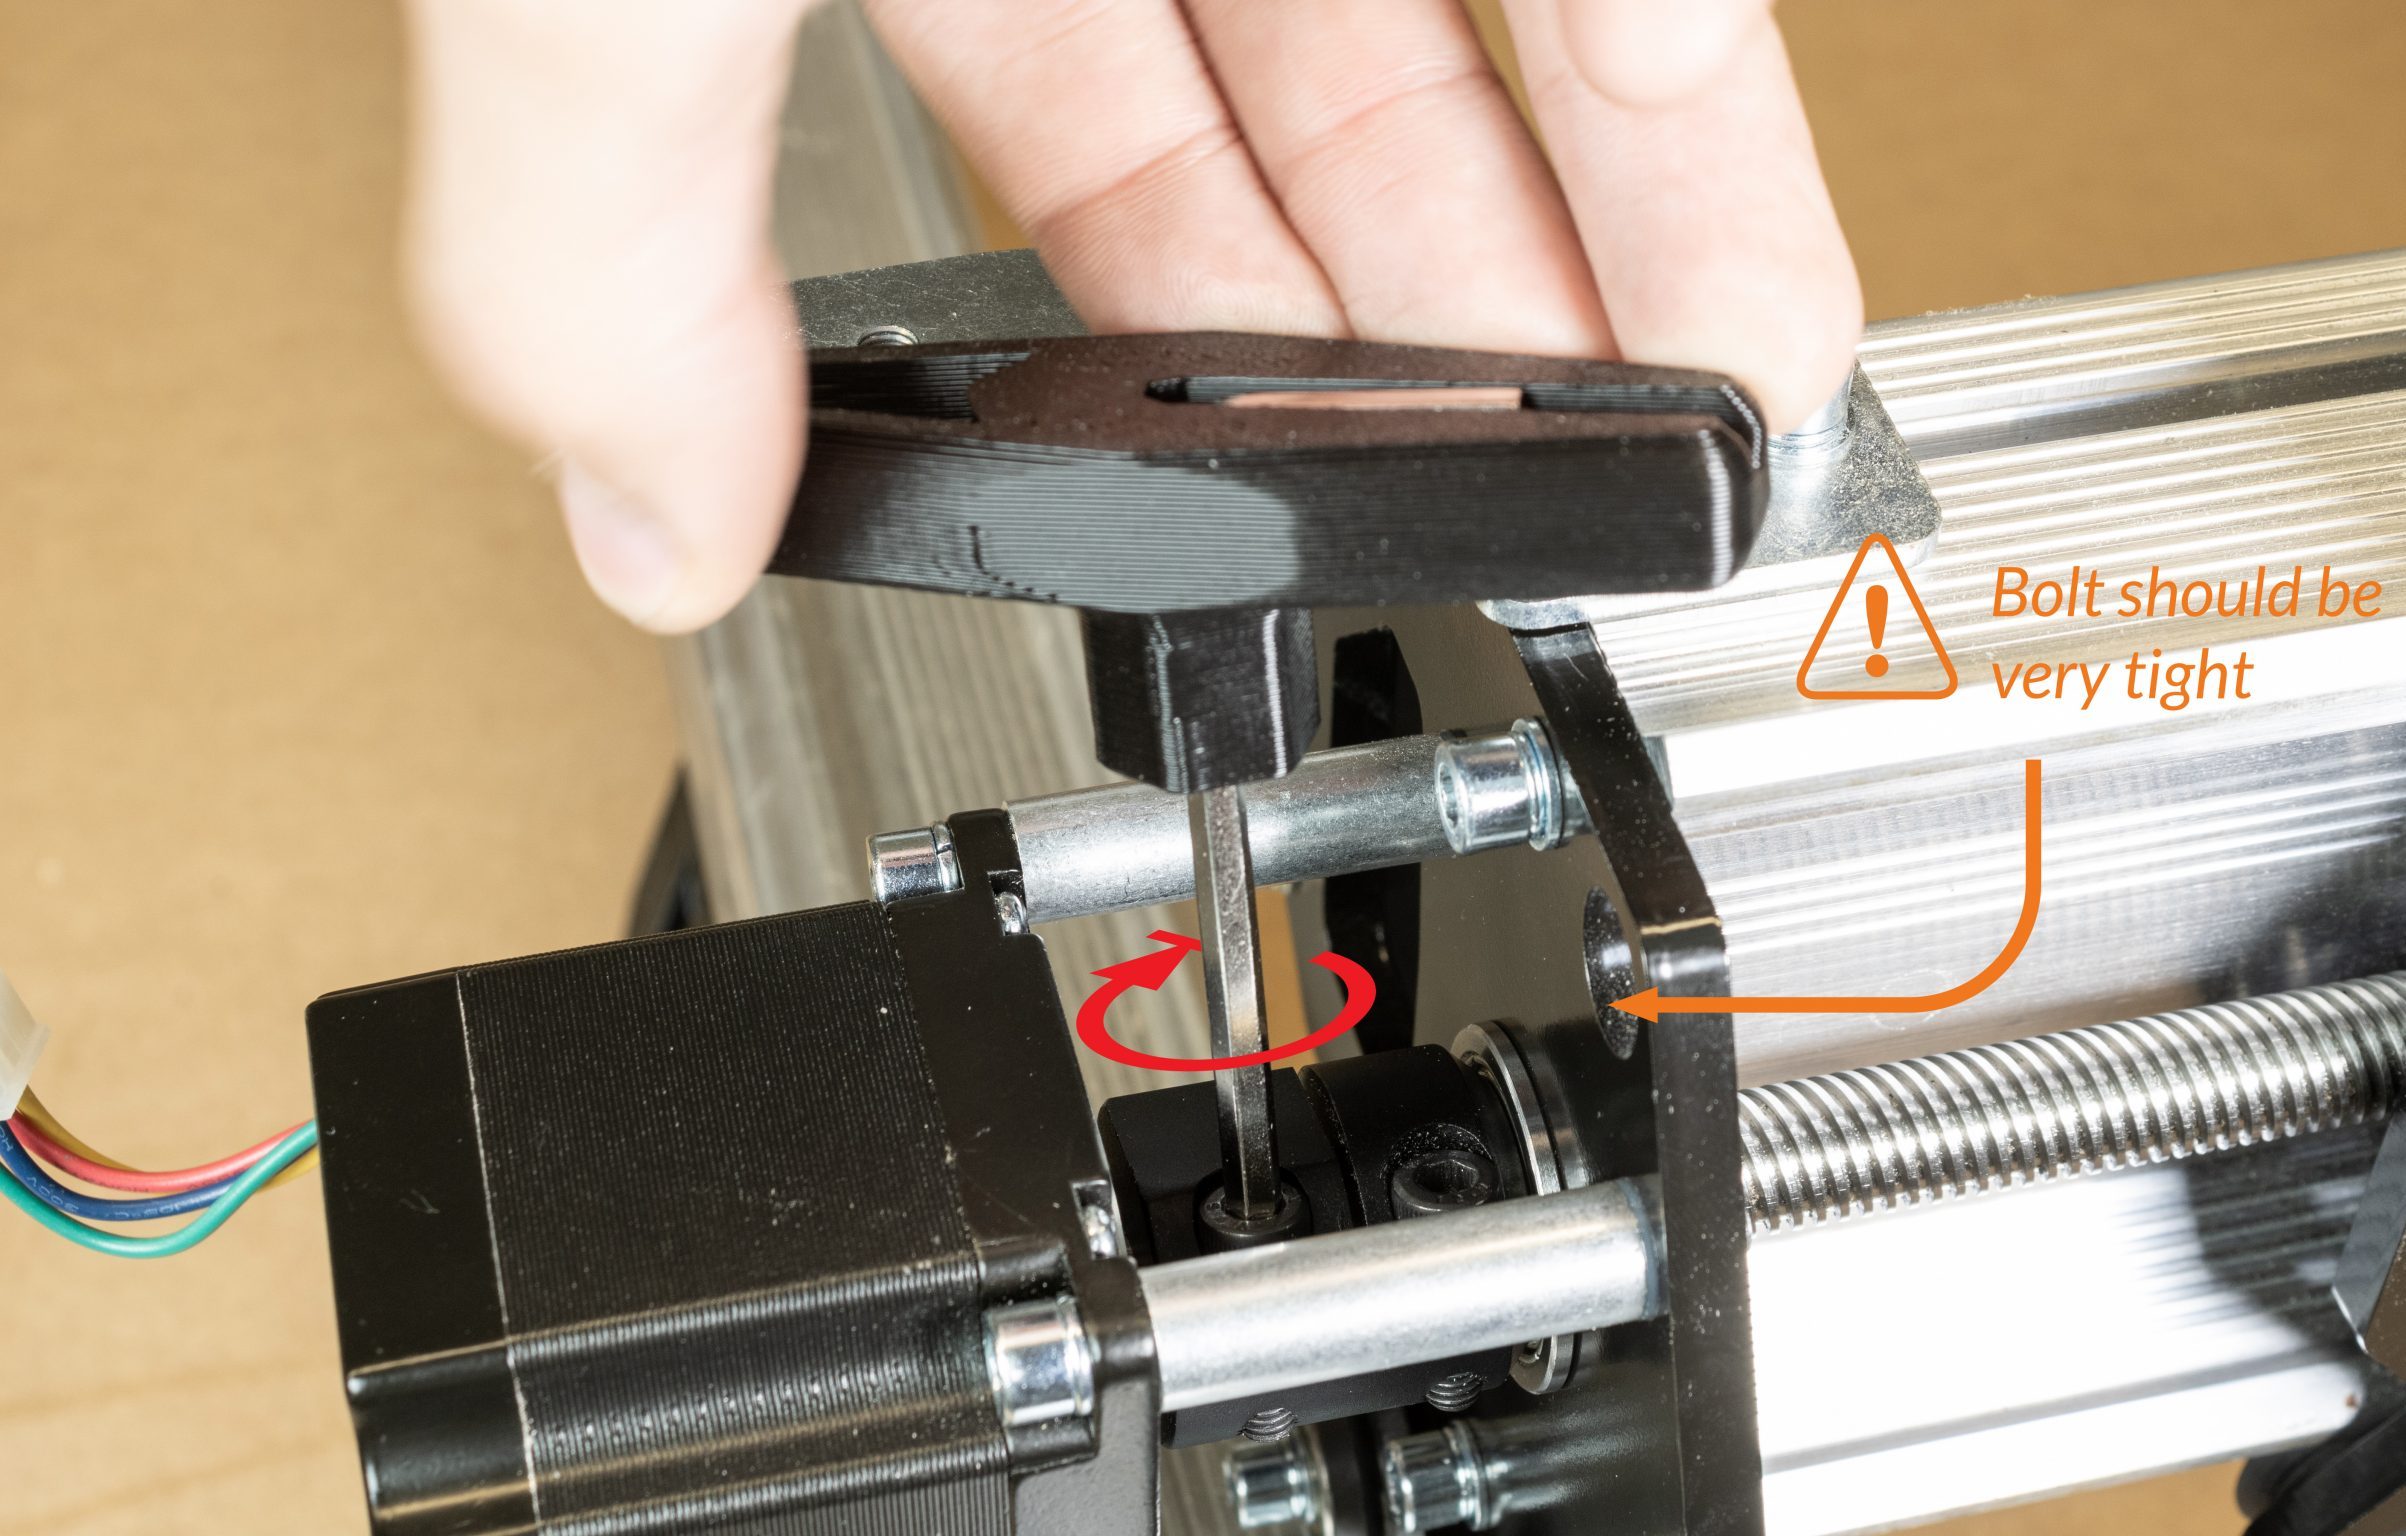
- The EX coupler for the extension kit is quite a bit thicker and it needs a lot more force to apply the right tension to the motor. Try to tighten the set screw as hard as you can, you might need a longer Allen key to help with this.
- Loosen the acme nut so it’s resting against the washer but not putting any lateral pressure of the inner race against toward the gantry.

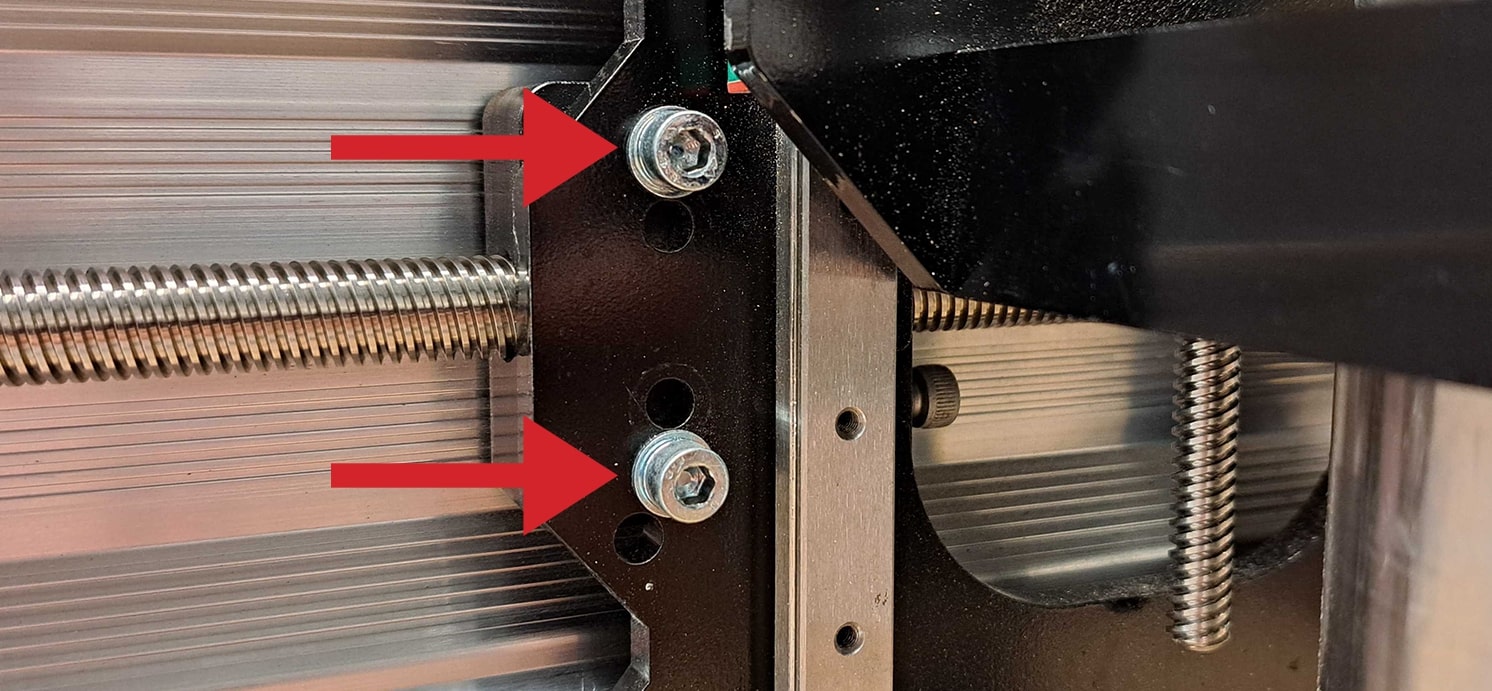
- Make sure the two mounting nuts that hold the blocks to the gantry are only tightened till snug. Do Not over-tighten them. It will put unwanted pressure on the lead screw.
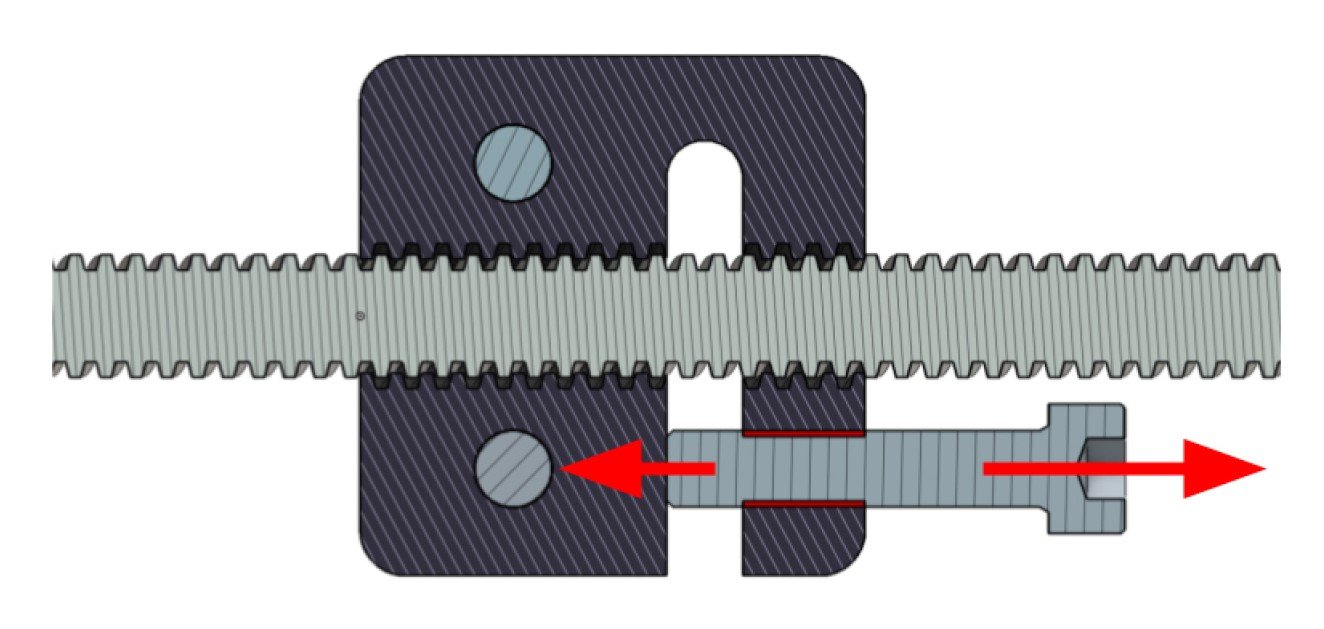
- Loosen the set screw on the anti-backlash blocks using the set screw shown below. The lead screw should rotate by hand easily at this stage. If not, make sure the mounting bolts and acme nut are adjusted as noted above. Tighten the set-screw a 1/4 turn at at time till the lead screw rotates by hand with some difficulty. Any tension on the lead screw will be adjusted by the set screw.
Z-axis slowly dropping with a spindle or vertical LongMill
- In these situations the weight of the CNC or spindle can cause it to overpower the mechanics of the machine. This is easily fixed by “motor holding” which can be turned on in gSender’s ‘Firmware’ tool where the second option called “Step idle delay” should be set to 255. The holding will then ‘turn on’ the next time you make a stepper motor movement like a jog command. For anyone not using gSender, this setting value is $1, so in the console of their sender if they send the command “$1=255” that will make the same change.
- Note that turning this on will be a bit more taxing on the motors and the control board and cause them to heat up more since it keeps everything permanently powered on. If you ever want to turn this back off, just reduce the value back to about 100, but even lowering it to 254 will turn the effect off, only a value of 255 turns it on.
- Check if your motor drivers are excessively hot. The drivers should not exceed 80C.
Cutting Issues
Pauses while cutting
- Using the wrong post-processor in your CAM software may cause your machine to pause due to incompatible g-code. Make sure your settings are correct in your software before running your code. Check out our section about post processors for more info.
Cuts not coming out accurately
- Try reducing your speeds and feeds, or use a different cutting tool.
- Check that there is no dust in the collet of your router so that the bit does not slip in the collet during operation.
- You may have a loose component. Make sure that all of your fasteners are tight and your eccentric nuts and Delrin anti-backlash nuts are tensioned correctly.
- Your motor or lead screw may be slipping inside the coupler. Ensure that the coupler is fully tightened and pressed firmly against the flange bearing to eliminate movement axially.
Cuts on the z-axis not the correct depth
- Ensure that the coupler screws on the Z-axis assembly are tightened properly and make sure the brass ACME nut is making contact with the lower bearing. The Z-axis lead screw should not be able to slide up and down.
- Ensure that the LongMill has enough travel on the Z-axis for it to cut deep enough. It may be bottoming out.
- If your LongMill is bottoming out, lower the position of your router or use a longer end mill.
Machine is cutting lines into my project
- If you have the ‘homing cycle’ enabled in your firmware settings, any ‘G28’ command used for a safe retract height will cause the machine to move to it’s Z-axis home position. If you have not homed the machine before this command is called, the Z-axis may not lift high enough, or plunge into the work material. With the ‘homing cycle’ disabled, gSender will automatically ignore these ‘G28’ commands and will lift the Z-axis to a clearance height instead.
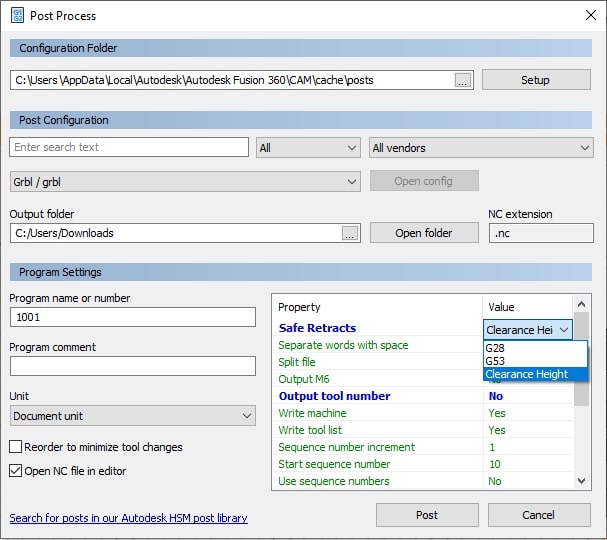
- If you are using Fusion 360, ensure that ‘Safe Retracts’ is set to ‘Clearance Height.’
- Ensure that you are not hitting the Z-axis movement limits when running the job.
- Review the g-code with a visualizer (https://ncviewer.com/) to ensure there are no unexpected toolpaths or incorrect g-code commands.
- Check all the transmission components (V-wheels, couplers, ACME nuts, anti-backlash nuts, pulleys)
- Z-axis coupler and ACME nut are secured and in the correct position.
- Anti-backlash nuts are not mounted too tight; you can loosen the two M5-25mm screws that hold the nut in place and see if that helps.
- Eccentric nuts are adjusted so that V-wheels are tight on the rail but are still able to turn by hand.
Machine disconnects randomly
Before diving in, one of the most common sources of disconnections is a loose Arduino inside the control board in which case you can follow the guide below or use a non-conductive tool to push the Arduino back into place through the bottom slots of the controller.
When your machine disconnects during use, it’s important to keep an eye out for common patterns/situations when it happens:
- Sometimes subtle things like a slightly loose USB cable connection, power connection, using other power tools at the same time as the machine, etc. can cause disconnects to happen. In these cases, consider checking your other machine connections, using newer cables, putting your machine on a dedicated circuit, or if you have a newer board with Ethernet then consider switching over to gain a more reliable communication connection.
- If you notice that the machine only disconnects during longer jobs, it is possible that your computer is causing the USB to ‘sleep’ and disconnect from your machine.
- If you were using a dust collector/vacuum, try running the machine with them off to see if disconnections keep happening. If the machine no longer disconnects, you can likely conclude that static build up or interference from your dust collector is the cause. Another easy way to know if your dust collection might be causing issues is if you occasionally get static shocks when you touch the shoe or hose, which points to large static buildup likely affecting your machine.
- If you have other appliances, tools, or electrical strains on the same circuit as your machine, or your home/shop does not have reliable power in the form of blackouts or brownouts, it is possible that power fluctuations are causing your machine to skip, disconnect, or stutter.
If there don’t seem to be any specific patterns in these disconnection occurrences, there is most likely some EMI (electromagnetic interference) to blame, a.k.a. electrical noise. These unexpected electrical signals can find their way back to your CNC controller and disrupt it’s on-board electronics, affecting how reliably your CNC can cut projects for you.
Conditions which will typically cause EMI to present itself include:
- Having other tools like vacuums, motors, and other electronics running on the same circuit.
- Cutting/surfacing materials that tend to accumulate static charge such as MDF, epoxy, or other plastics
- Using a low-quality dust collector that’s not appropriately grounded
- Using a low-quality hose that isn’t anti-static or doesn’t contain an inner metal wire spiral
- Running your CNC in a humid environment
- Have incorrectly wired ground lines to your garage or shop
If you’re still unsure, we’d recommend going through each section below since eliminating any possible source of EMI is the best course of action to get reliable results.
Machine disconnects on long jobs
Loss of connection on a long job can happen if your computer or USB port ‘fall asleep’ on you. If you plan on running long, intricate cuts on your CNC you’ll have to change your computer power settings so that it ‘stays awake’ while cutting. If you’re using a Mac computer, you can find dedicated instructions for sleep management here: https://support.apple.com/en-ca/guide/mac-help/mchle41a6ccd/mac. Some laptops may have embedded power savings that may turn off your USB port randomly on battery power. If you are running into disconnection issues, it may be worth testing while on wall power.
- Click the Windows icon at the bottom left corner of your screen and start to type “control panel” to bring it up

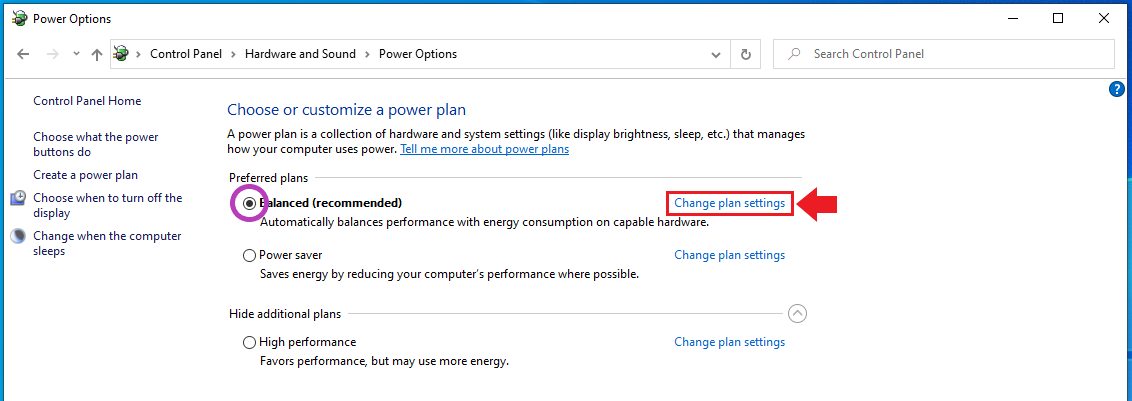
- Once you’ve clicked to open it, go to Hardware and Sound then Power Options


- Now, whichever plan you have currently selected (circled in the picture) will be the one that you want to click Change plan settings
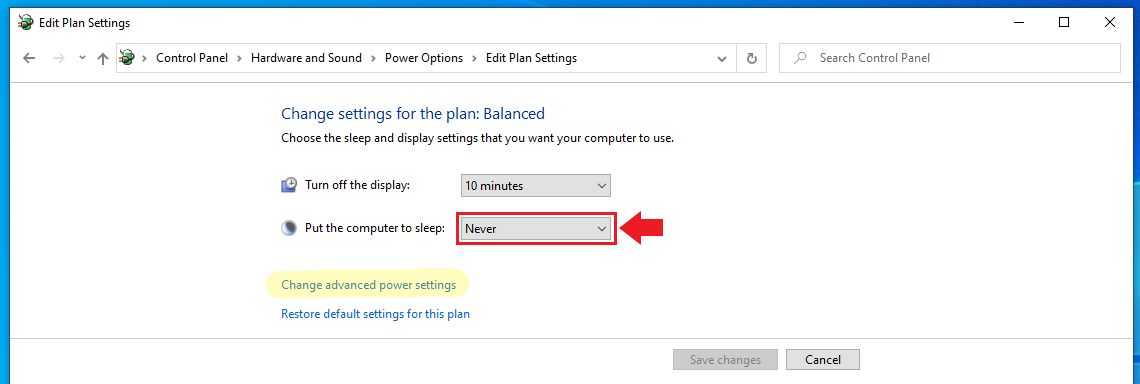
- Go to the second drop-down and set it to Never, save the changes to ensure that your computer never dozes off on its own. An additional step can be to stop your USB ports from ‘sleeping’ by clicking Change advanced power settings
- In the separate window that appears, you’ll want to Expand the USB Settings, then USB selective suspend setting, and finally change this drop-down to “Disabled“. Click to Apply these new settings. Sometimes on a Windows update these settings will be reset, if you want to make sure you’ve got all your bases covered, be sure to check back on these settings on occasion if you want to feel confident while running long jobs.

Lastly, if you are using a laptop, try making sure it is plugged into an outlet. Some laptops may change power management while running programs that can cause the program to stall.
Machine disconnects when using a dust collector
The most common solution for preventing static buildup is by having an escape path for built-up charges. Using a ‘ground point’ works because it’ll be a path of least resistance which stray charges will prefer to take instead of sticking around.
If you plan to try this, ensure that you only use one ground point for your entire machine setup (including dust collection). For example, if your home has just one electrical panel, you can ground it on that or the attached ground stake outside. This avoids possible ground loops which can create additional interference.
It is highly recommended that you have your dust collection and your machine on a separate circuit.
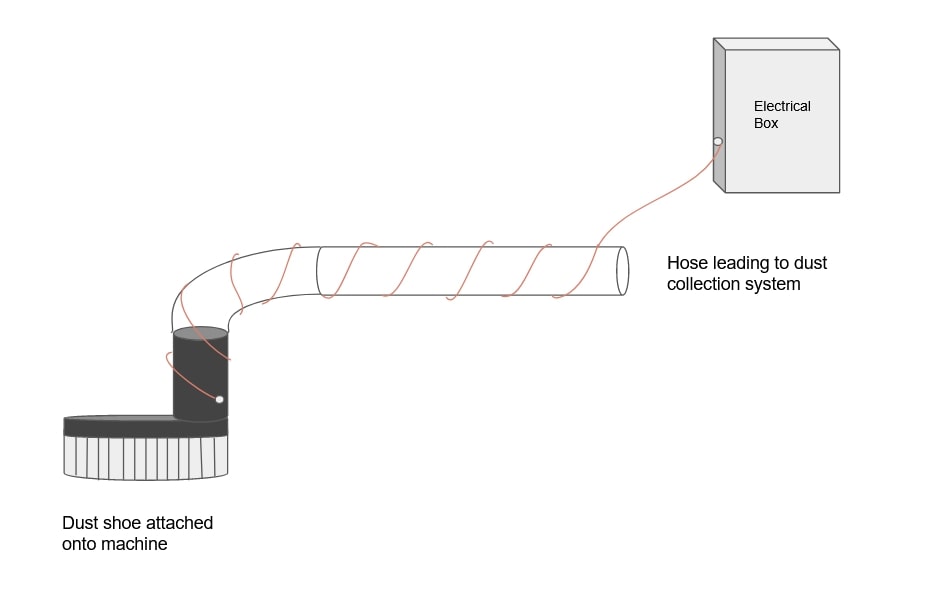
- Using bare solid copper wire between 10 to 18 AWG, wrap the wire around the body of the dust shoe and hose securely. Make sure the wire will not get caught in any moving parts during use. Fasten one end of the wire at the dust shoe end, and the other fixed directly to the ground stake or other grounded item such as an outlet box, electrical box, or grounded 3-prong power bar.
- You can also pick up something like the Grounding Kit that’s offered by Lee Valley. This is a collection of essentially speaker wire, twist-on wire connectors, and some screws: https://www.leevalley.com/en-ca/shop/tools/workshop/dust-collection/parts-and-accessories/62616-grounding-kit-for-dust-collection-systems?item=03J6201
Machine disconnects from power surges
Depending on where you live or how your shop is wired up, power flickers and brief outages can make their way through to your shop outlets. This might not be noticeable for regular power tools, but it can affect precision machines like a CNC or even for a desktop computer. You can identify this problem for yourself if, after grounding your machine, you still get unexpected behaviour from your machine such as:
- unexpected stopping
- random disconnects
A backup UPS solves these issues by continuing to provide power to your computer and CNC temporarily when your shop’s power flickers off. This will allow you to either keep your LongMill running reliably or if the power outage is severe, return it to a set point before waiting for power to return.
You can find these on Amazon or big box stores, by searching up “UPS backup 1500VA.” Good quality, high-power UPS backups are around $200 CAD. Look for UPS devices with 1000-1500VA and at least 4 plugs with battery backup functionality. This should have enough power to sustain your machine and computer. Depending on the UPS, you can connect your router as well however we recommend prioritizing your CNC and computer first. For information on the power consumption of the LongMill, check here.