
The Basics
If you want to create anything on your machine, you’re going to need to learn some of the basics on cutting tools. These cutters are used by the Mill One’s router to carve away at materials in order to make the object you’re trying to create.
Creating a project with a nice surface finish on any CNC router usually comes with its difficulties. With the Mill One, we’ve continued applying our industry experience so that your chances of success when creating something awesome are as high as possible.
Most CNC cutting tools can be thought of like drill bits. However, not only can these cutting tools drill downward like drill bits, they can usually cut side-to-side as well. This enables the CNC router to cut away material in any fashion required to make your final 3D object.
When cutting material with a rotating bit, you can imagine that going too slow will dull or break the bit very quickly. For example, imagine trying to cut through a plank of wood with a saw except instead of moving the saw back and forth you’re just trying to push it directly through. Similarly, a bit that’s moving too fast can burn or melt the material that you’re cutting. Finding a happy medium between these two extremes is a balancing act between three main factors:
- How quickly the tool is translating (feed rate/plunge rate)
- How fast the tool is spinning (spindle speed)
- How much material the tool is removing at any given time (depth of cut & step over)
Each of these factors must be suited to the properties of the material that you’re cutting; cutting through foam can happen much faster than cutting aluminum. We generalize these variables under the term ‘feeds and speeds’, and each cutting tool has a different set of ideal feeds and speeds.
Since there are so many different types and sizes of cutting tools, we’ve created a list below of just 3 different cutting tools that we strongly recommend to get started on your Mill One. We’ve created feed and speed tables for these tools for cutting in various materials so that you can copy/paste the values you need for your first projects. If you’re looking to get started with this recommended list, all of these tools can be found for purchase in our store!
With one of these tools in hand, you can start making cool and good-looking things on your Mill One without added complexity! Ensure that any cutting tool you end up using is installed as deeply as possible into the router, with a bare-minimum of 3/8″ of the tool being inside the router for light cuts.
Cutting Tool Essentials
- 1/8″, 2-flute end mill (for woods, plastics, and foams)
- 1/8″, 2-flute ballnose mill (for contours and detailing)
- Small-degree v-bit (for fine engraving, detailing, and PCBs)

Advanced Reading (optional)
Learning how to tie a tool’s size and shape to its movement, rotation speed, material type, and material removal rate is nearly an art form. There are engineers whose job is knowing how to properly balance all these numbers and apply them based on part geometry, desired finish, and the total job cutting time. We at Sienci Labs are continuing to develop smarter algorithms so that this work can be done more autonomously through software. In the meantime, these more complicated cutting operations will be for you to explore as your learn more about what makes CNC routers tick.
Without the proper planning, you can expect many headaches along the way including broken tools, broken material, and an uneven or rough surface finish on your project. The following is more in-depth information on terminology and the theory behind how cutting tools are applied in a cutting job. A summary and some suggestions can be found at the bottom.
Cutting Tool Lingo
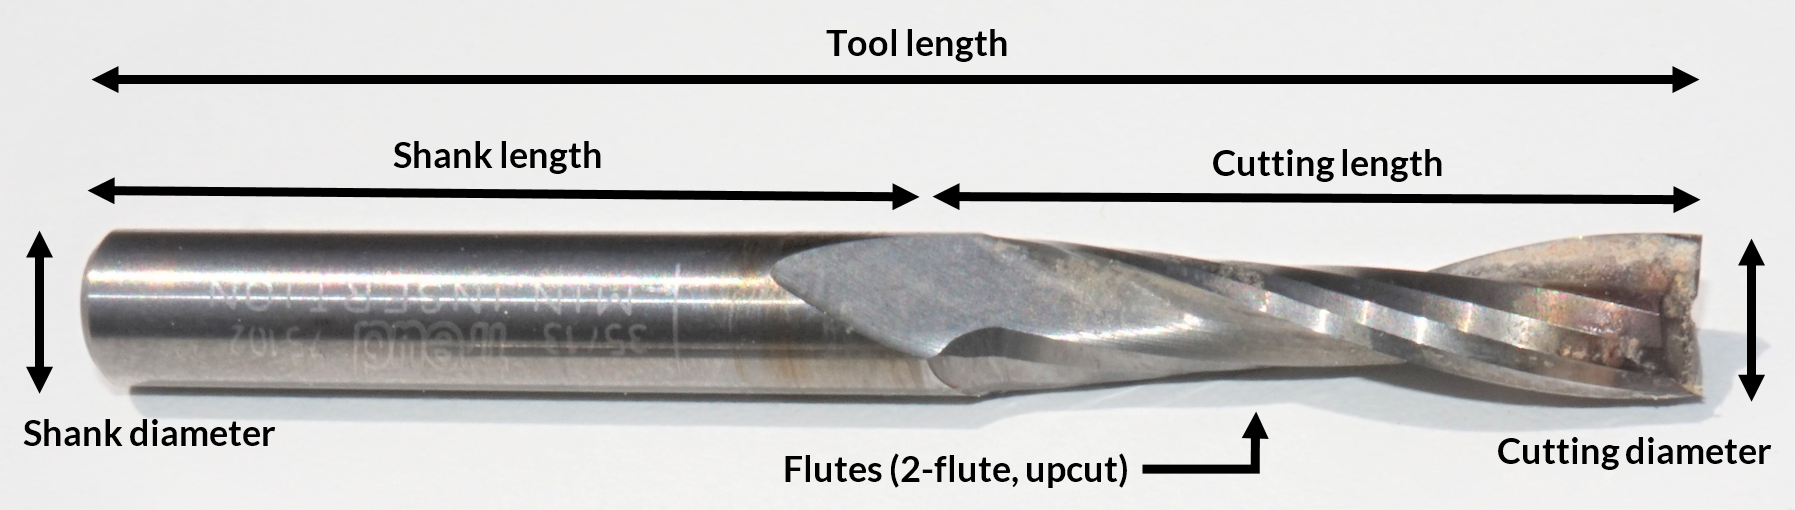
There are cutting tools for every possible cutting application. Features such as tip shape, shank diameter, cutting diameter, tool length, flute count, helix direction and tool material can all vary from tool to tool. The material that you wish to cut, how fast you wish to cut it, and your desired surface finish will decide what features you want on the tool you end up using. Since there are a lot of variables, we’ll try to stick to the most commonly available cutting tools that you can use with your Mill One.
There are many types of cutting operations that you can run on you Mill One:
- Surface engraving
- 2D profiles
- “2.5D” objects (profile & pocket combinations)
- 3D “relief” cuts
Depending on if you’re looking to carve fine details, or just want to hog material out fast, choosing the right tool size is critical. For example, a smaller diameter tool can produce finer details but it limited to removing material slowly, otherwise it might break.
The detail accuracy that you can produce with your machine is primarily determined by the cutting diameter of the tool, with the maximum depth determined by its length. Some of our go-to sizes include:
- 1/4″ diameter tools to remove a lot of material at once but cannot create detailed reliefs
- 1/8″ tools for smaller items, offering a balance between speed and the level of detail
- 2mm tools and under for more precise parts
One final deciding factor that needs to be accounted for is the hardness of the material. While it may be possible to cut away at aluminum with a 1mm end mill, we would certainly not recommend it because you’d surely end up with many end mills in the garbage. Instead, a tool should be chosen that you’re sure will be able to handle the stress of cutting the material you want to cut.
Tip shape
Tool tips can take on many shapes, with each tip designed to be used for a specific application. The three most common tip shapes are ballnose, flat end/fishtail,and v-bit/engraving.


End mills are typically used to mill most 2D parts and any 3D parts that do not have complex features, while ballnose mills excel at cutting 3D curves and contours to a smooth finish. Increasing the overlap between cutting passes for either of these tools will also boost their ability to produce a smoother surface finish.
Lastly, v-bits have a much more specialized usage in sign-making, PCB milling and other forms of engraving where a 2-dimensional pattern is cut into a material blank. You can vary the depth of cut of the v-bit to vary the width of the engraving. This means that for very fine lines, the Mill One will make very shallow cuts with the v-bit, and for wider lines, make deeper cuts.
Since v-bits can come in a variety of cutting angles, ensure that your bit has the right angle for your application. Usually larger (60 degree and 45 degree) v-bits are used for making signs and doing other detailing work whereas smaller angles (30 degree and lower) are used for PCB milling to achieve small trace paths.
Flute number, direction, and chipload
The flutes on the cutting tools are the cutting edges that remove material but also act as channels which move chips and dust away from the cut. Most tools have two or four flutes, but you can find tools with any number of flutes. When an cutting tool has less flutes, more material can be cut away per flute, per rotation. This means that fewer flutes will remove material faster, at the downside of making rougher cuts, meanwhile having more flutes increases the chance of a smoother surface finish.

The ‘chipload’ on a cutting tool is important because as material is removed it takes a little bit of heat along with it, and if the tool or the material starts to heat up then you’ll get poor cuts and bad edge finish, you may even burn or melt your material and dull your cutting tool. This is why fewer flutes are generally used on materials which can easily melt or weld themselves to the tool, such as plastics or aluminum.
The spiral direction of the flutes will also have an impact on the surface finish of the material. Since the shaft on CNC routers always spins clockwise, if the flutes wrap in a counter-clockwise direction then the downward spiral will eject the material downward, meanwhile the opposite will eject them upward. The downside to both downcut and upcut bits is that they can cause ‘tearout’ (material splintering or burring) on either the bottom or the top of the material respectively.
The solution to this is compression mills which spiral in both directions to ensure a smooth finish on both sides; however these bits are much rarer and come with a few of their own problems. You can also clamp a scrap piece of material either above (for upcut bits) or below (for downcut bits) the part that you wish to cut in order to reduce the amount of burring.
Material
Your tool must be harder than the material it is cutting. Thankfully, the materials that are used to make cutting tools are some of the toughest of the tough. The most commonly used materials are high speed steel (HSS) and solid carbide.

HSS usually combines with a variety of other alloys to have a high wear resistance and durability for cutting both soft and hard materials. Since HSS is softer than solid carbide it’s less likely to crack and instead wear out over time, so it’s limited to slower cutting speeds. HSS tools are also usually much cheaper than solid carbide tools and can be additionally improved if they come with a coating.
On the other hand, solid carbide tools are very hard so they’ll stay sharp for longer and won’t wear as much at higher temperatures. Recently, carbide tools have become much cheaper and accessible for use in CNC routing, however it’s important to note that carbide cutting tools require much higher speeds in order to mill properly. This makes it a great candidate for cutting finishing passes, milling PCBs, and cutting materials that won’t easily burn or melt.
Coatings
Carbide cutting tools have the ability to be covered in fancy coatings like TiN (titanium nitride), TiCN (titanium carbonitride), TiAlN (titanium aluminum nitride), and AlTiN (aluminum titanium nitride). All of these coatings can enhance the tool’s abilities by increasing its wear resistance, making it more thermally stable, lowering its coefficient of friction, or increasing its ductility.
For more non-abrasive materials, coatings will only have an affect on the lifetime of the bit. However, for ultra-precision machining or when milling carbon fiber or hard metals, the wear resistance introduced by these coatings are worth their added cost.
To conclude…
Here’s what we can apply to the most general of cases:
Size
- Use the largest diameter cutting tool you can bear if you don’t mind surface finish and want to remove material quickly
- Long tools can make deeper cuts but usually deflect more and affect surface finish, try to use the shortest tool you can afford (or mount it deeper into the router)
Flutes
- One flute is best for rough cutting materials that can melt or weld
- The higher the number of flutes, the nicer your surface finish will be at the cost of being able to cut away less material at once
- Downcut and upcut spiralled flutes both have a downside, although upcut bits are more commonly used since they eject material upwards; pick your poison
Material
- You should expect more expensive tools to last longer; if it’s your first time using a CNC router or you tend to make more mistakes then you’d admit to, then stick with the cheaper ones
Coatings
- If you’re on the lookout for a reliable set of cutting tools, make the jump and invest in some coated end mills. Otherwise, if you’re on a tight budget or you’re still learning how to use your machine then hold onto your money for the time being.
Cutting tool suggestions
If you’ve come looking for some tool recommendations, this is a list that we’ve put together for the slightly more experienced CNCer, or a beginner that’s ready to try something new (in your choice of either HSS or solid carbide):
Experimental bits
- 1/8″, 1-flute end mill (for foam, plastics, and aluminum)
- 1/8″, 4-flute end mill (for soft metals)
- Some smaller end mills around 2mm (for more detailed cutting)
- Smaller ballnose mills around 2mm (for more detailed contouring)
- 1/4″, 2-flute end mill (for bulk removing wood)
- 60° or 90° v-bit (great for cutting hardwood signs)
Specialty bits
- Large planar bit for surfacing material blanks
Note: if you find any cutting tools being sold for dirt cheap, steer clear! When it comes to cheap bits you’ll find that the money you save ends up costing you in headaches from broken tools. If it’s your first time using a CNC router, expect to make mistakes while getting used to the Mill One. You’ll probably break/damage bits during the learning process, so consider holding off on buying the expensive ones until you’re more comfortable with your machine.
This goes the other way too. If you find yourself looking at a price tag that’s half the cost of your machine then maybe you should consider upgrading to a new machine. The Mill One was built to be a simple learning platform, not the be-all and end-all of CNC machines 🙂
Other Helpful Resources
–Makezine- The Skinny on Endmills
–CNC Cookbook- End Mill Guide
–Guerrilla guide to CNC machining- Stocking up on End Mills
–Tinker and Futz- A Guide to CNC Bits
–CNC Zone- Router Bits and End Mills
–Wikipedia- Milling Cutter
–Shapeoko Wiki- End Mills
–Hannibal Carbide Tool- Titanium Coatings