
Putting a laser on your LongMill or any CNC machine can be a fun and useful tool in expanding your creativity. The LongMill fully supports the use of either our own LaserBeam module or an aftermarket laser module.
If you’ve purchased a laser module from us, all the information about assembling and using the LaserBeam System can be found in it’s own resources section here: https://resources.sienci.com/view/lb-manual/
![]()
Users installing an aftermarket laser can follow the instructions below.
Why a laser? Because lasers focus down to a very small point, you can cut and engrave extremely small details that even small v-bits might have difficulty replicating. There are also some materials that lasers do well with that cutting can’t achieve.
Pros:
- Ability to cut extremely fine details
- No need for workholding
- No cutting tools to wear out
- Burnt engravings and edges provide a contrast against the base material
Cons:
- Creates smoke and is a fire hazard
- Lasers can be very dangerous
- Lasers leave a burned edge where it is engraving or cutting, which can be undesirable at times
Laser Safety
Please note that lasers are very dangerous. Sienci Labs is not responsible for injury or damage caused by the use of aftermarket lasers on your machine.
- Always wear eye protection, specifically laser safety glasses with the correct Optical density (OD) to match your laser’s wavelength range (nm)
- Never point the laser at other people or yourself
- Cut in a well-ventilated area or have a way to remove smoke
- DO NOT CUT/ENGRAVE: PVC, ABS, Fibreglass, and any other materials that emit toxic fumes when cut
- Never leave the machine and laser unattended, and make sure that you always have the equipment on hand to deal with fires
Installing a 3rd Party Laser
Choosing a Laser
While there are a couple different types of lasers used in cutting and engraving, the type of laser suitable for the LongMill is called a diode laser or a solid-state laser. In simple terms, it works very similarly to a LED light, but with the ability to emit coherent light that can be focused into a very small spot.
When purchasing a laser, you want to look for:
- Laser driver which is usually a separate circuit that handles laser switching
- PWM (pulse width modulation) control so the CNC can set its power (check the product description)
- Power supply to power it
You will also want to choose a power rating that works for you:
- Single diode lasers can produce up to 7-10 watts of continuous optical power and can be very good for engraving or light cutting.
- Higher-power, high quality laser diodes can go past 40 watts but can be expensive or hard to find and benefit on more purpose-build systems or for cutting thicker material.
- The listed power may refer to continuous/average power or peak/pulse power (not the same thing), so double-check your not buying a weaker one than you think.
- Sometimes manufacturers falsify the laser power rating or overclock a diode with a lower rating which can lead to quick component degradation. This is why low quality high-power laser diodes typically do not last as long.
Wiring up the Laser
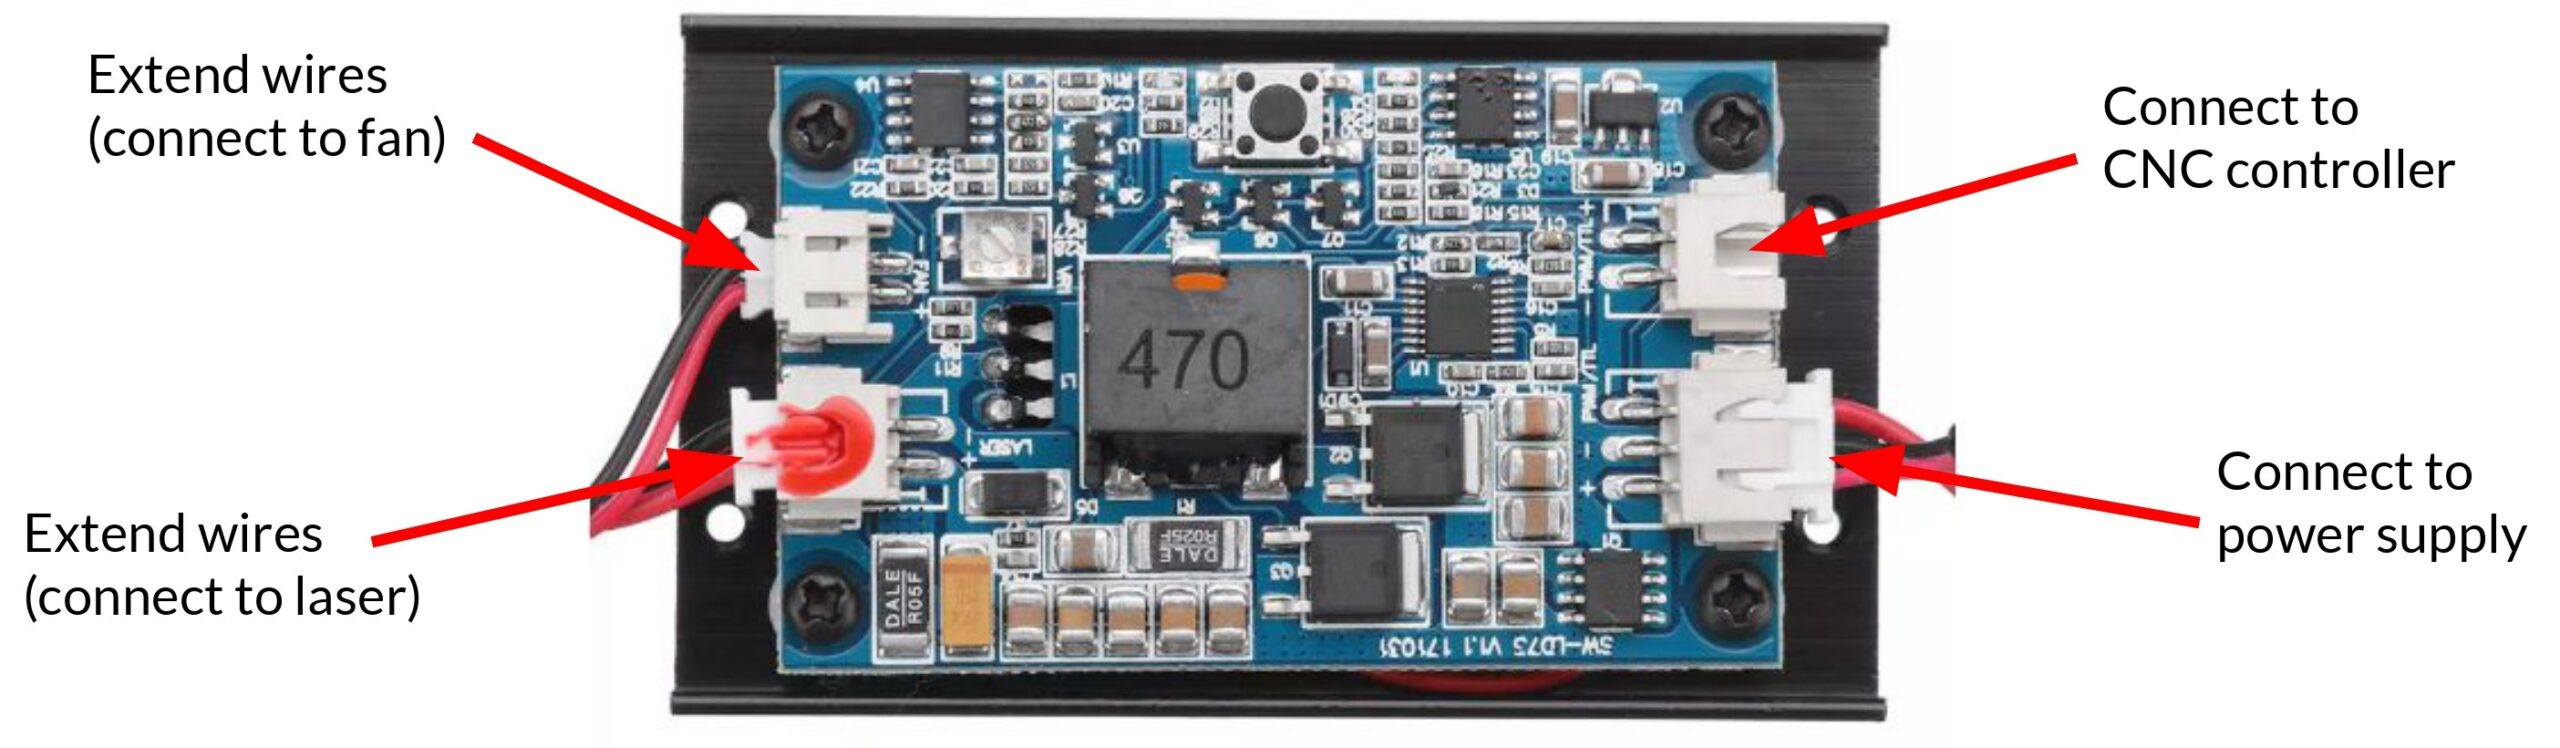
Installing a laser onto your LongMill is fairly easy. There are just three connections to make. If any of your wires are too short, you can lengthen them with butt splices or solder them with heatshrink for a more secure connection.
1) Connect the laser to the driver
Typically there will be two pairs of wires, one to power the laser diode and another to power the cooling fan. You can extend these wires to route them through your CNCs drag chains.
2) Connect the driver to the controller
The laser driver will have a + and – input for PWM (sometimes it’s marked as TTL) that can be wired into the LongBoard controller on the Spindle PWM port (marked as SpinPWM). Use a flat head screwdriver to attach the wires to the terminal connector on the LongBoard and ensure you get the polarity correct otherwise the laser won’t work.
3) Connect the driver to its power supply
Use the power supply that came with the laser driver, plugging the power connector into the indicated socket on the driver.
Additional step
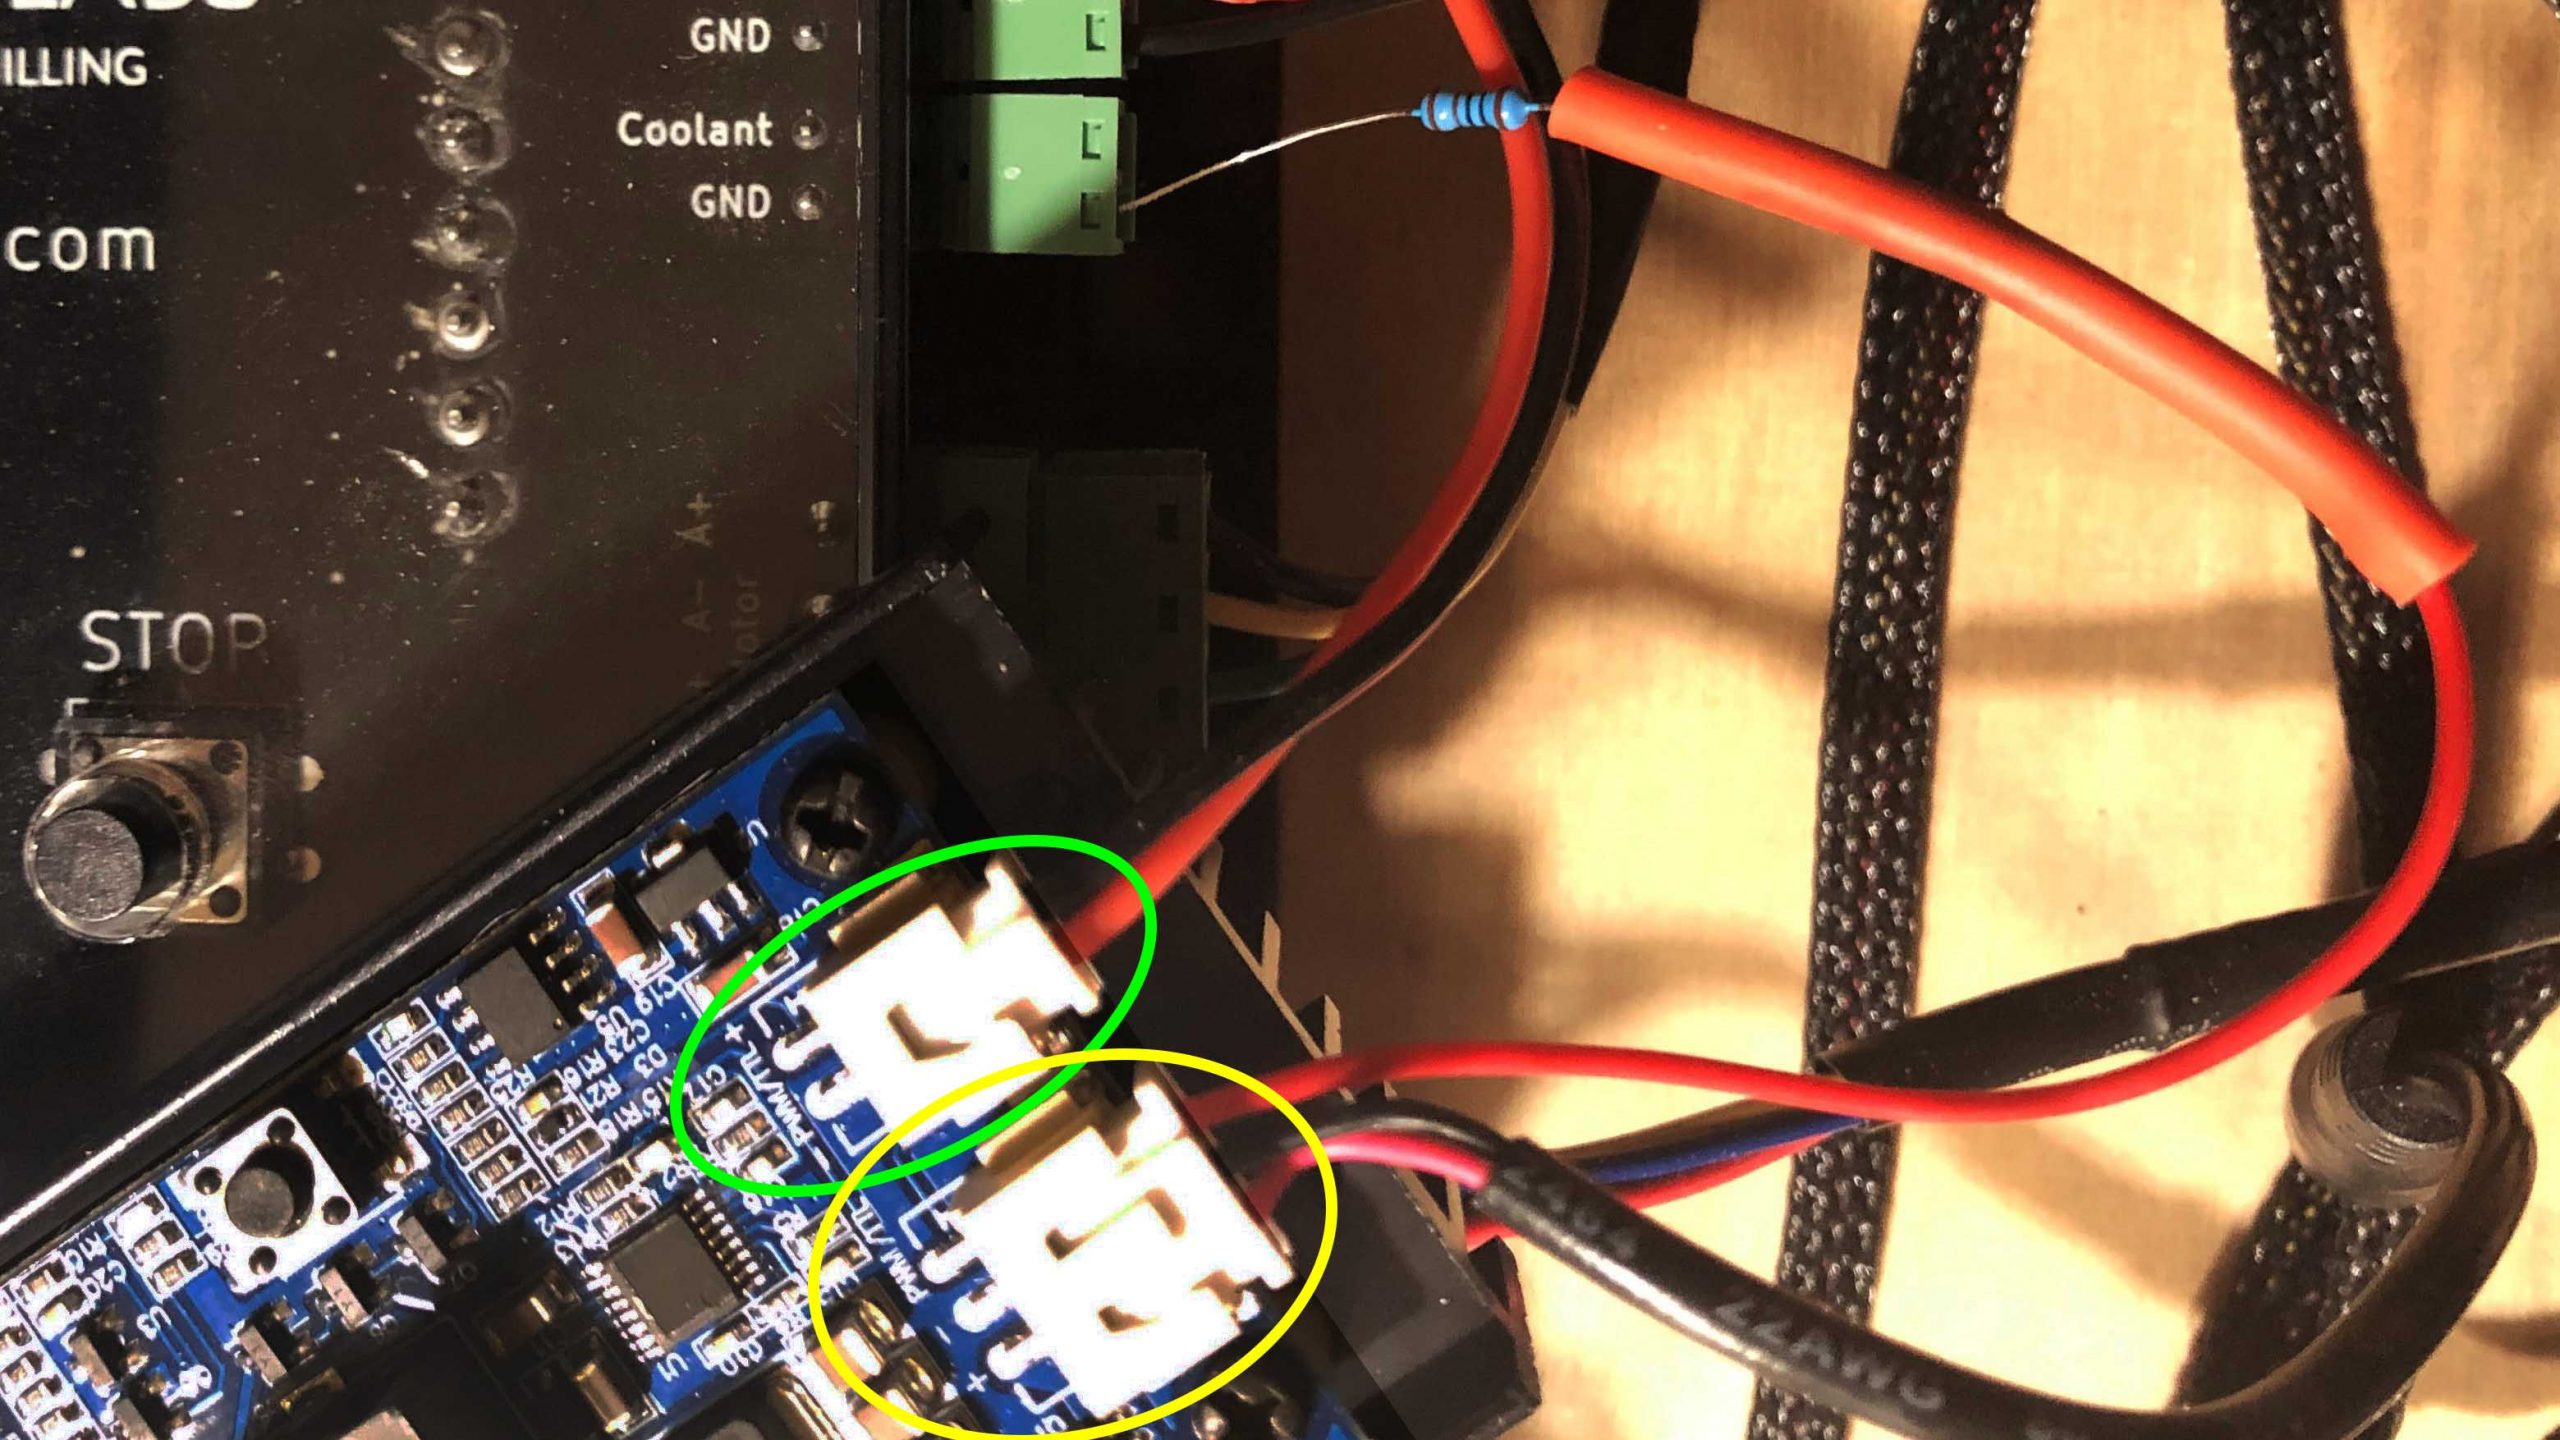
As reported by members of our community, some laser drivers (like the common Banggood SW-LD75 V1.1, bought as a package #: LA03-5000) require an extra step since their internal circuitry is a bit wonky. This involves picking up a 1kΩ resistor and wiring it up from the PWM pin on the driver board to any GND connection on the LongBoard. In the case of the picture below, you can see that the free pin on the 3-pin power connector (circled in yellow) is being used rather than splitting off the PWM+ wire on the 2-pin signal connector (circled in green). That wire then has the resistor soldered on and follows to the GND connection for Coolant in this case.
Setting up the Firmware
All g-code senders will have a way to access your LongMill’s settings – whether via a Firmware settings window or a Console. If you run your LongMill with a spindle, want to note down the current spindle settings because you’ll either need to use them when making your laser g-code, or if you change the values as outlined below then you’ll need to change them back later. You can do this in the Console by typing “$$” and hitting the Enter or Send key. Write down the values for $31 and $32 from the list that appears.
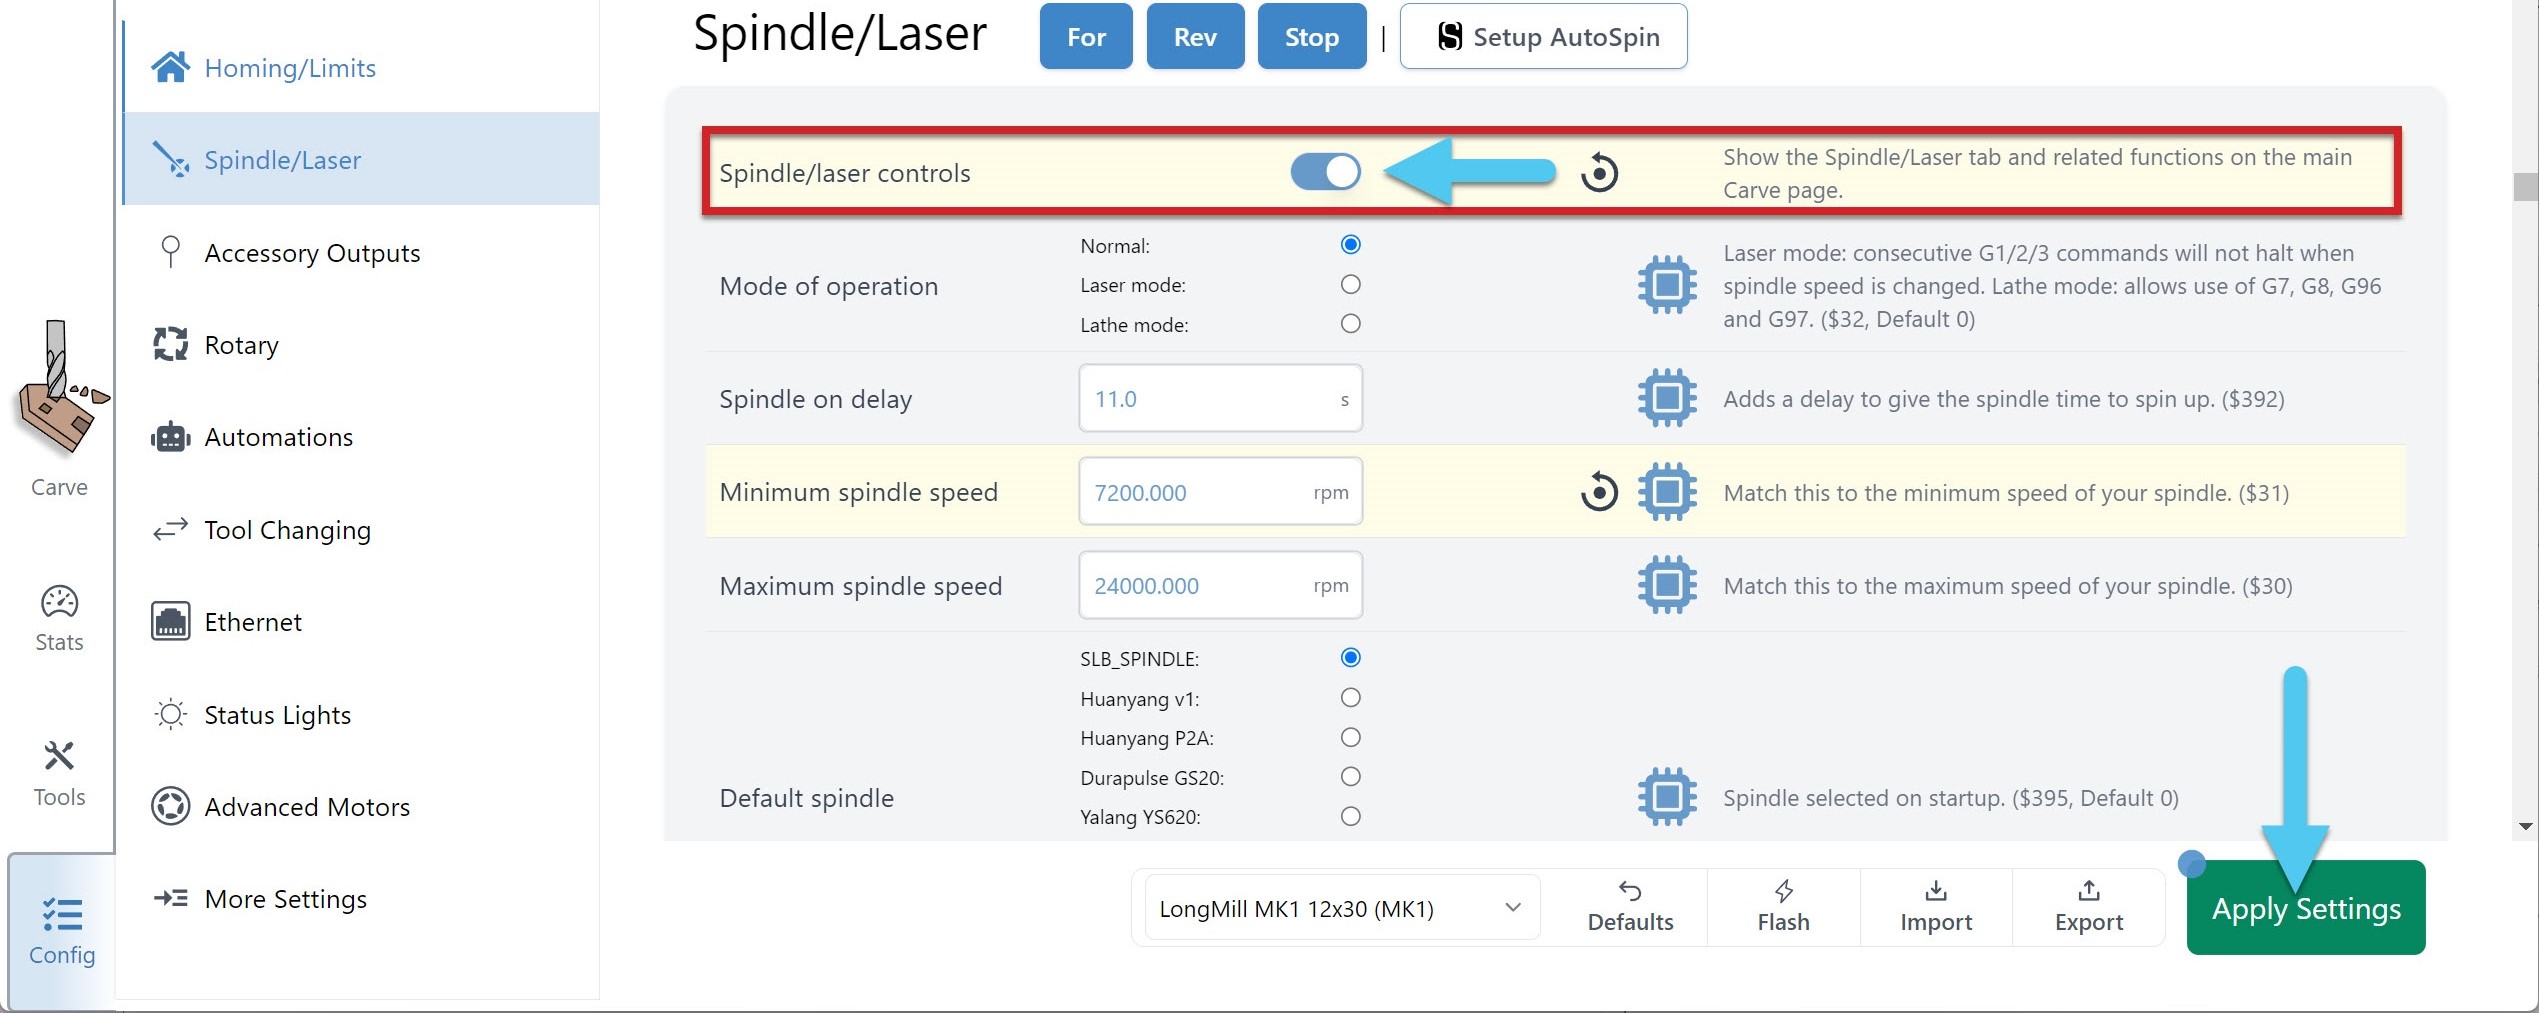
You can find all the info about grbl and how “laser mode” works on this page: https://github.com/gnea/grbl/wiki/Grbl-v1.1-Laser-Mode. The key takeaways are that you’ll need to alter three machine settings to prepare your CNC for using a laser:
- Set the maximum spindle speed ($30) to a value of 255, or send the command
$30=255. Lightburn documentation recommends using 255 or 1000 - Set the minimum spindle speed ($31) to a value of 0, or send the command
$31=0 - Enable laser mode ($32) by setting it to a value of 1, or send the command
$32=1
The machine firmware will now know that it’s running a laser via the SpinPWM connector.
If you ever finish up using the laser, or want to toggle back to using a spindle on your LongMill, you will need to revert these settings. You can do this by sending the commands through the console window like before, or by creating a macro that saves these values for you.
- To disable laser mode, send the command
$32=0. Using the Spindle/laser toggle in gSender does this automatically - If you changed your spindle values, revert back to your original values for $31 and $30
Remember that you can always check your settings anytime by typing $$ in the console window. The key with setting the Maximum Spindle Speed is to just match it between your settings and your laser design/CAM software.
Laser Testing
There are a couple test commands you can use to verify that all your wiring and firmware changes have gone as expected. Please be very cautious and aware when testing your laser. Wear eye protection, specifically laser safety glasses, so they’re hugging your face to protect from both direct and indirect laser light, ensure there’s clear signage to warn and protect possible onlookers, have some material beneath your laser that won’t burn easily for when you power it on, and have your hand over the disable switch for your laser power supply so that you have a hardware switch if anything goes wrong.
Test-firing a laser using grbl requires three things:
- An ‘ON’ signal (M3)
- A power amount (S10). This is at 10% for safety and testing purposes
- A movement command. This is a grbl safety feature that disables laser operation unless the CNC is moving
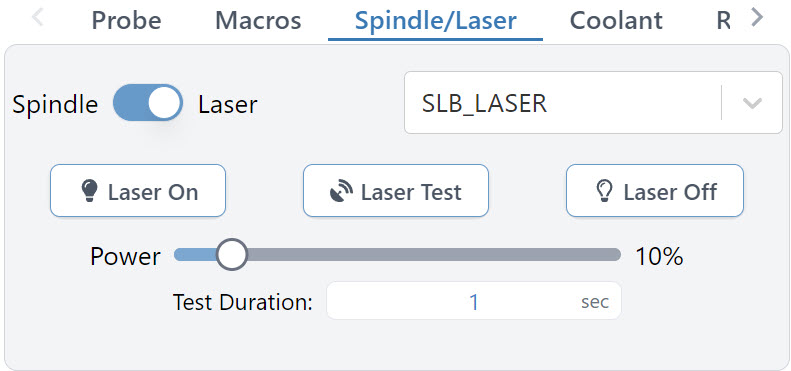
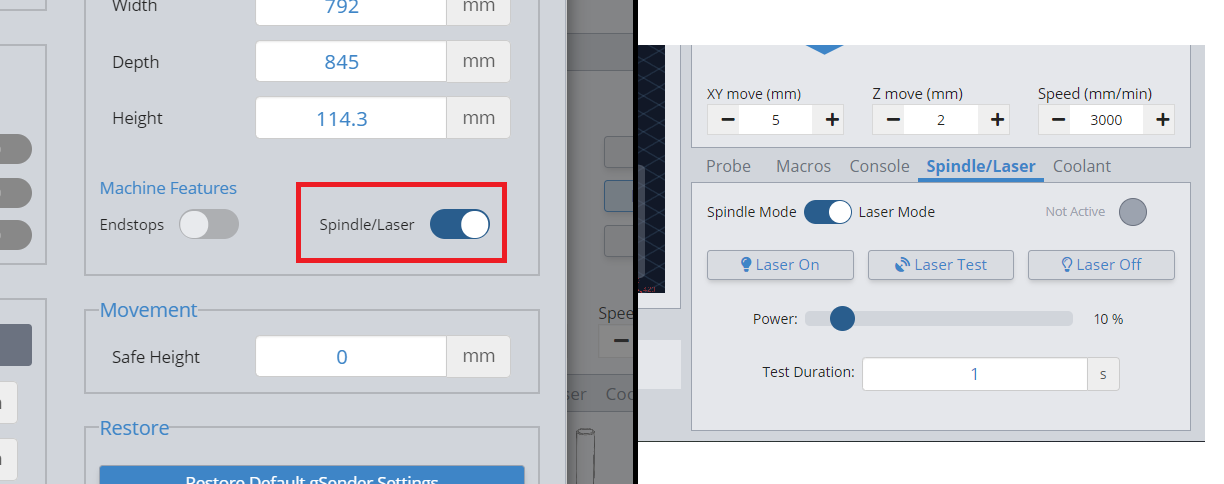
If you’re using gSender the Laser On, Laser Test, and Laser Off buttons will take care of these commands for you, just be sure to set the power to 10% and the Test Duration to around 1-2 seconds. For other g-code senders, you’ll test the laser using the Console input to your LongMill.
Bringing all these commands together you get the full command “G1 F1 M3 S10” which you can enter into the Console to initiate the test and “M5” which you need to enter into the console to turn the laser back off. If this testing is successful for you, then try sending another test at a different power (for example “G1 F1 M3 S5” for 5%) to make sure the laser beam has visibly changed intensity which confirms it’s receiving a good signal.
*Keep in mind that these commands are for a Maximum Spindle Speed of 100, if it’s 255 for example then you’ll want to use “G1 F1 M3 S25” for 10% laser power.
If none of this testing is going as expected, go back and check your wiring first in case you missed anything or if you have a multi-meter on hand try using it in resistance or continuity mode to confirm that all your connections are secure. Be mindful when poking around with a multi-meter, testing output current or voltage while the laser diode is connected can sometimes damage the diode depending on your laser driver design.
Mounting
Most CNCs have a router mount by default and most diodes have holes to mount them. Most times, it’s easy to draw up a simple plate with all the holes to attach between the laser and the router mount and then hand cut it or use your CNC to cut some wood or acrylic.
Laser CAM Software
Once your laser is set up and working, it’s time to go and make your own laser engraving projects! There are a couple different options for generating g-code for lasers. One very popular one is called LightBurn which works well with the LongMill and has lots of tutorial videos. It is a paid program but comes with a 30-day free demo.
LaserGrbl is also recommended if you are looking for a free option. Although lacking some features, they do have some solid resources on their website.